1. Introduction
The LuxtechPro MSR580 is a three-track magnetic stripe reader designed for reading and transmitting card information. It utilizes F2F decoding and supports bi-directional swiping, complying with ISO or ANSL technical standards. This device offers plug-and-play functionality without requiring drivers and is powered directly via a USB port.
This manual provides instructions for setting up, operating, and maintaining your MSR580 magnetic stripe reader.

Figure 1: LuxtechPro MSR580 Magnetic Stripe Reader in use, demonstrating a card swipe.
2. Product Features
- Three-Track Magnetic Stripe Reading: Reads and transmits data from all three tracks of magnetic stripe cards.
- ISO/ANSL Standard Compliance: Adheres to industry standards for reliable data reading.
- Bi-Directional Swipe: Allows card swiping in either direction for user convenience.
- USB Plug and Play: No drivers required; connects directly to a PC via USB.
- Configurable Output: Users can set start/end symbols, Enter key, Beeper, or character replacement.
- Low Power Consumption: Operates without external power, drawing power from the USB port.
- High Durability: Features a long head life suitable for high-load operations.
- Self-Test Function: Performs a self-test upon connection.
- Visual and Audible Feedback: Green LED indicates successful read; optional buzzer provides audible confirmation.
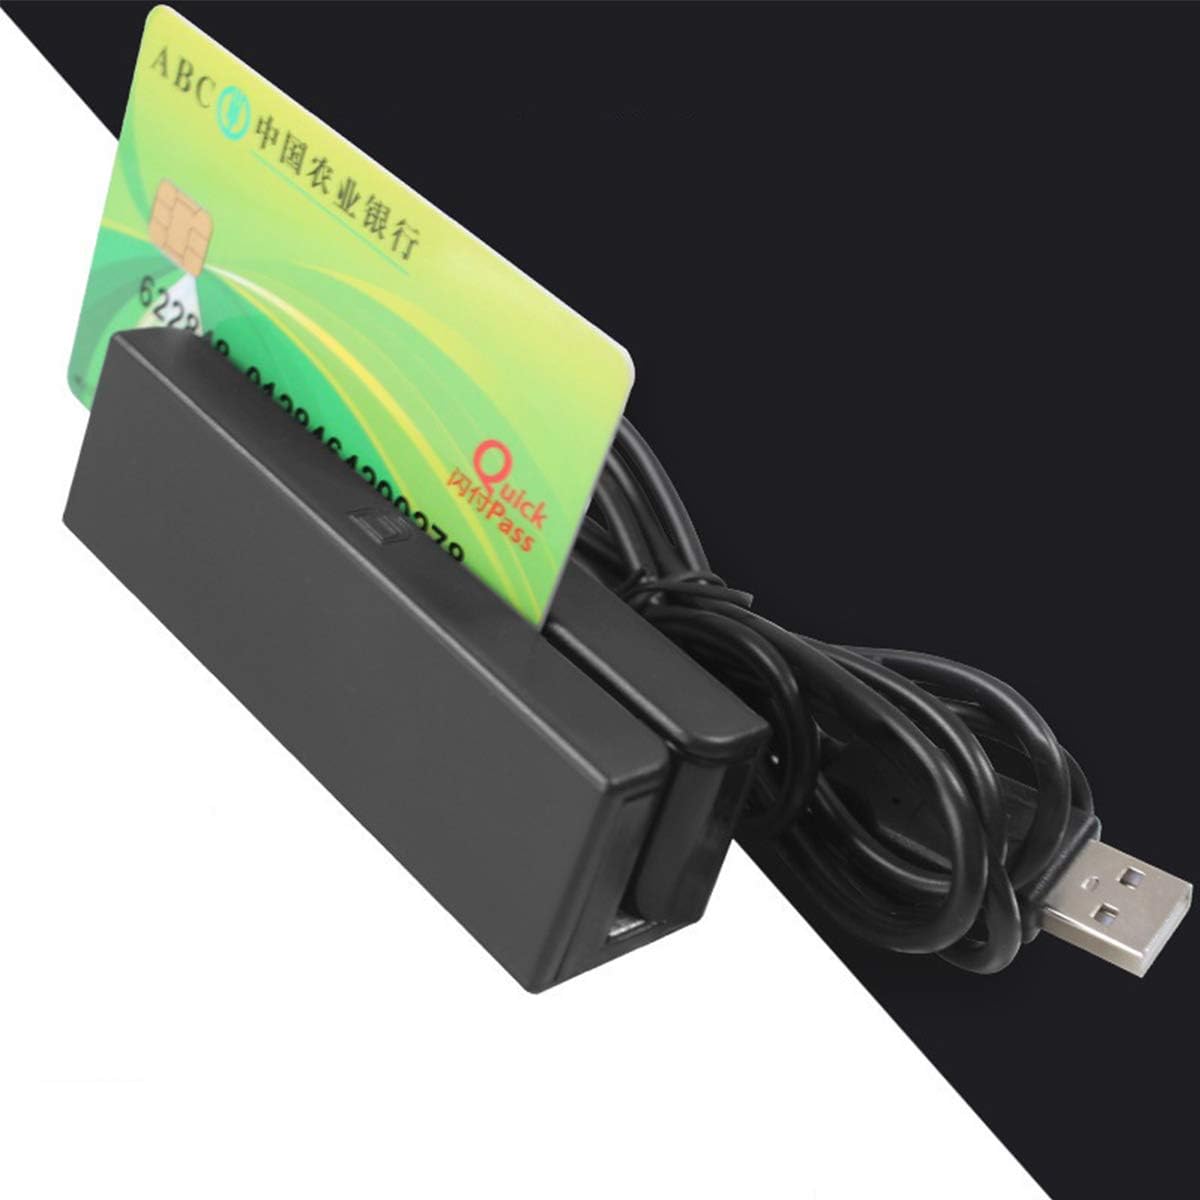
Figure 2: Angled view of the MSR580 reader, showcasing its compact design and integrated USB cable.

Figure 3: Top-down view of the MSR580 reader, highlighting the card swipe slot and USB cable.

Figure 4: Bottom view of the MSR580 reader, showing mounting points.
3. Setup Instructions
- Connect the Device: Plug the USB cable of the MSR580 reader into an available USB port on your PC. The device is plug-and-play and does not require separate driver installation.
- Launch the Demo Software: Locate and double-click the provided demo software (e.g., "Magnetic stripe card Demo V3.0") on your computer. This software allows you to configure settings and view read data.

Figure 5: Initial screen of the MSR580 demo software, displaying device controls and output track options.
4. Operating Instructions
Once the device is connected and the demo software is running, you can configure and operate the reader as follows:
4.1. Setting Start and End Symbols
The software allows you to define custom start (SS) and end (ES) symbols for each track (TRK1, TRK2, TRK3). If no specific symbols are required, ensure the corresponding input boxes are empty.
- In the "SS and ES flag option" section, enter the desired start and end symbols for each track.
- To remove default symbols (e.g., %, ?, +, etc.), delete the characters from the respective input boxes.
4.2. Configuring Data Entry (CR Flag)
You can configure the software to automatically add a Carriage Return (CR) flag at the end of each track or at the end of the entire packet of data.
- In the "Output CR flag option" section, select the checkboxes for "Output (CR) flag at the end of Track 1," "Output (CR) flag at the end of Track 2," "Output (CR) flag at the end of Track 3," or "Output (CR) flag at the end of packet" as needed.
4.3. Beeper Settings
The device features an optional buzzer to provide audible feedback upon a successful read.
- In the "Buzzer" section, you can choose between "Big Buzzer" or "Small Buzzer" for different sound levels.
- To disable the buzzer, ensure the "Open Buzzer" checkbox is unchecked.
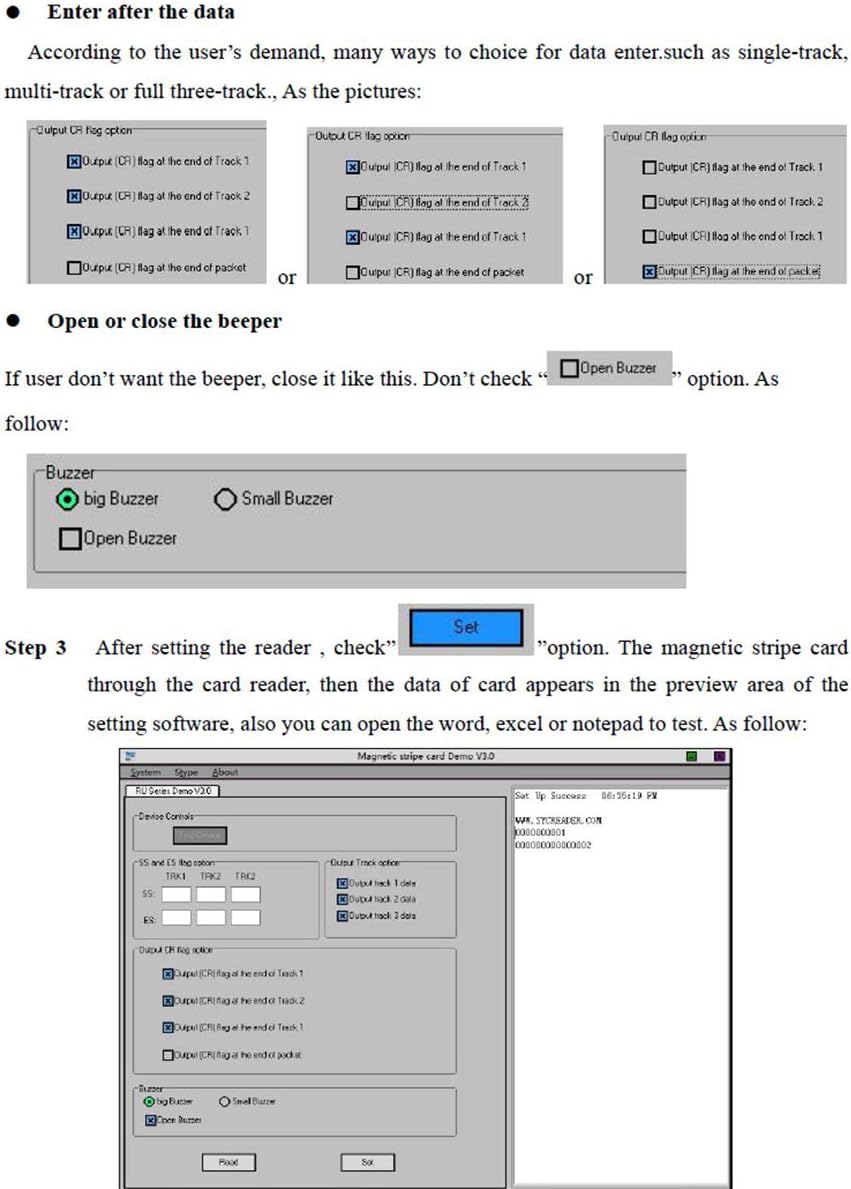
Figure 6: Configuration options within the MSR580 software for customizing data output and beeper behavior.
4.4. Reading Cards and Viewing Data
- After configuring your desired settings, click the "Set" button in the software to apply them.
- Swipe a magnetic stripe card through the reader. Ensure a smooth, consistent swipe for accurate reading.
- Upon a successful read, the green LED on the device will illuminate, and if enabled, the buzzer will sound.
- The read card data will appear in the preview area of the software. You can then copy this data to other applications like Word, Excel, or Notepad.

Figure 7: The MSR580 software displaying data after a successful card swipe.

Figure 8: The MSR580 reader with its green LED lit, confirming a successful data read.
5. Specifications
The following table details the technical specifications of the LuxtechPro MSR580 Magnetic Stripe Reader:

Figure 9: Detailed technical specifications for the MSR580 reader.
| Item | Detail | Item | Detail |
|---|---|---|---|
| Standard | ISO7810-7813 | Method | USB |
| Rate | 15-120cm/sec | Head Life | ≥800,000 swipes |
| Operating Voltage | DC 5V±5% | Operating Current | ≤50mA |
| Status Tips | LED (Optional Buzzer) | Material | ABS |
| Card Thickness | PVC 0.76±0.08mm | Track Width | 1.5mm |
| Size (Product) | 91.4mm×27.6mm×28.2mm | Gross Weight (G.W.) | 100G |
| Size (Package) | 138.7mm×67mm×41.4mm | Net Weight (N.W.) | 80G |
| Indicators | LED and Buzzer | Wire Length | 1420mm |
| Remark | |||
| Track Position | ISO1 (ATA) | ISO2 (ABA) | ISO3 (MINTS) |
| Recording Density | 210BPI | 75BPI | 210BPI |
| Number of Characters | 79 | 40 | 107 |
| Operating System | Windows XP, Windows 7, Windows 10, Android, Linux etc. | ||
6. Maintenance
- Cleaning: Regularly clean the card swipe slot with a soft, lint-free cloth to prevent dust and debris buildup, which can affect reading accuracy. Do not use harsh chemicals or abrasive materials.
- Storage: Store the device in a cool, dry place away from direct sunlight and extreme temperatures.
- Handling: Avoid dropping the device or subjecting it to strong impacts, as this can damage internal components.
- Cable Care: Do not bend or crimp the USB cable excessively. Always grasp the plug, not the cable, when disconnecting.
7. Troubleshooting
- Device Not Recognized:
- Ensure the USB cable is securely connected to both the reader and the PC.
- Try plugging the reader into a different USB port.
- Restart your computer.
- Card Data Not Reading Accurately:
- Ensure the card is swiped smoothly and consistently through the slot.
- Check the magnetic stripe for damage or dirt.
- Clean the card swipe head as described in the Maintenance section.
- Verify that the correct tracks are selected for output in the demo software.
- No Green LED or Buzzer Confirmation:
- This indicates a read error or that the card data could not be processed. Refer to the "Card Data Not Reading Accurately" steps.
- Ensure the buzzer is enabled in the software settings if you expect audible feedback.
- Software Issues:
- Close and reopen the demo software.
- Ensure your operating system is compatible (Windows XP, 7, 10, Android, Linux).
8. Applications
The LuxtechPro MSR580 Magnetic Stripe Reader is suitable for various applications requiring magnetic card data input, including:
- Point of Sale (POS) systems
- Access control systems
- Time and attendance tracking
- Membership card reading
- Loyalty programs

Figure 10: Examples of environments where the MSR580 magnetic stripe reader can be applied.
9. Warranty and Support
For information regarding warranty coverage, technical support, or service, please refer to the official LuxtechPro website or contact your retailer. Keep your purchase receipt as proof of purchase.