1. Introduction
The Cornet ED88TPlus is a versatile and portable measuring instrument designed for quick assessment of electromagnetic fields (EMF). It provides measurements for high-frequency Radio Frequency (RF) power density, low-frequency Electric Fields (EF), and low-frequency Magnetic Fields (MF). This device is intended to help users understand and identify sources of electro-pollution in their environment.
The meter features a broad frequency range for RF measurements from 100 MHz to 8 GHz, and for LF Magnetic Fields from 50 Hz to 10 kHz, and LF Electric Fields from 50 Hz to 50 kHz. It displays both signal level and frequency, offering a comprehensive view of the electromagnetic environment.
2. Safety Information
- Battery Safety: Use only the specified 9V battery. Ensure correct polarity when inserting. Do not mix old and new batteries, or different types of batteries. Remove the battery if the device will not be used for an extended period to prevent leakage.
- Environmental Conditions: Do not expose the meter to extreme temperatures, high humidity, or direct sunlight. Avoid dropping the device or subjecting it to strong impacts.
- Cleaning: Clean the device with a soft, dry cloth. Do not use abrasive cleaners or solvents.
- Repairs: Do not attempt to open or repair the device yourself. Refer all servicing to qualified personnel.
3. Package Contents
Please check the package contents to ensure all items are present:
- Cornet ED88TPlus Trimode Meter
- 9V Battery (pre-installed or included separately)
- Carrying Case
- Instruction Manual (this document)

Figure 3.1: Cornet ED88TPlus meter and carrying case.
4. Product Overview
Familiarize yourself with the components and controls of your ED88TPlus meter.
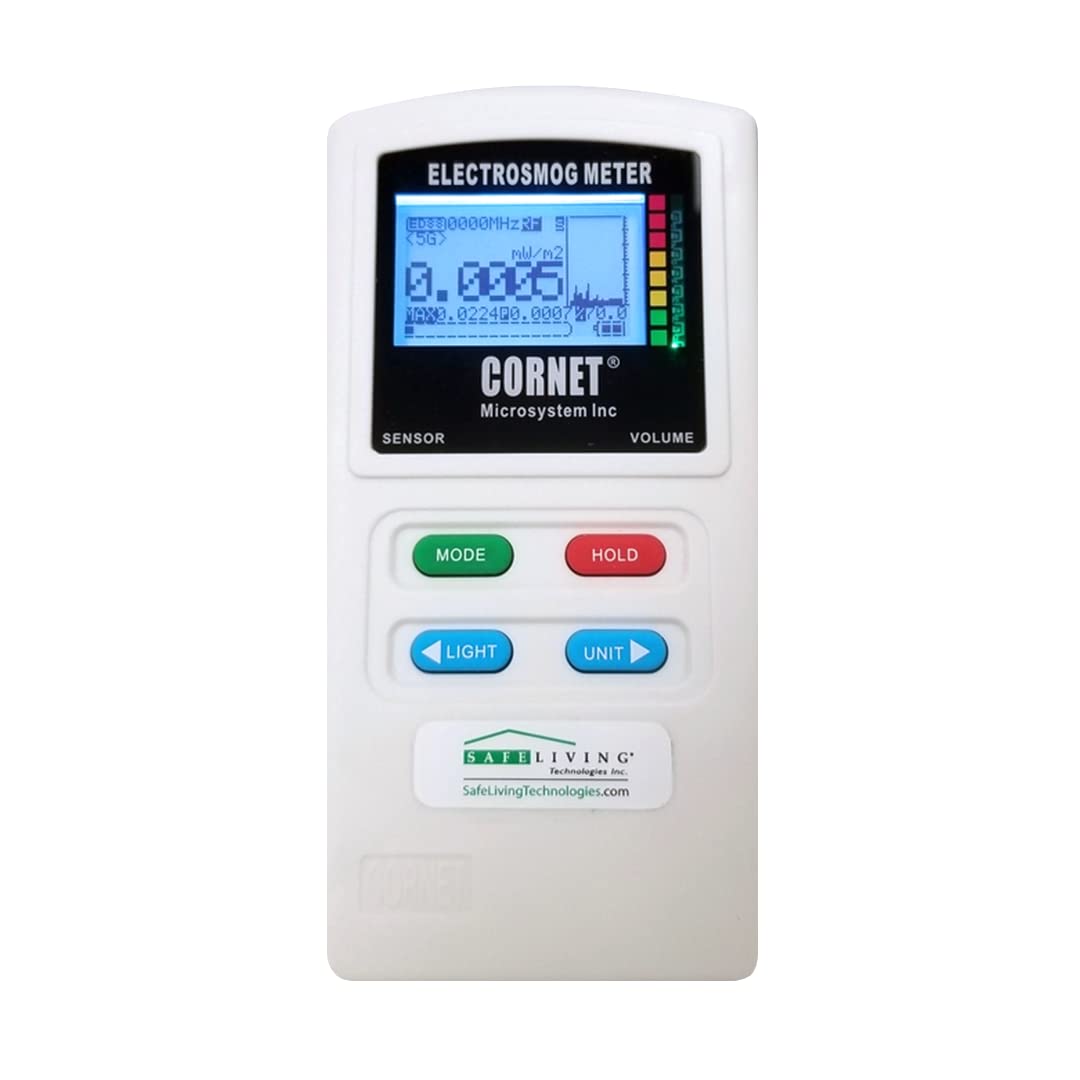
Figure 4.1: Front View

Figure 4.2: Side View (Ports)

Figure 4.3: Back View
4.1. Front Panel
- LCD Display: Shows measurement values, frequency, units, and mode indicators.
- MODE Button (Green): Cycles through measurement modes (RF, LF Magnetic, LF Electric).
- HOLD Button (Red): Freezes the current reading on the display. Press again to release.
- LIGHT Button (Blue): Toggles the display backlight on/off.
- UNIT Button (Blue): Changes the measurement units within the current mode (e.g., mW/m², V/m, mG/uT).
- VOLUME Slider: Adjusts the audio output level for RF detection.
- SENSOR Indicator: Points to the internal RF sensor location.
4.2. Side Panel
- USB Port: For external power supply (5V DC) or data connection (if applicable).
- Headphone Jack: For connecting headphones to listen to the audio output.
4.3. Back Panel
- Battery Compartment: Houses the 9V battery.
- E-FIELD SENSOR: Location of the Electric Field sensor.
- LF Gauss Meter Sensor: Location of the Low Frequency Magnetic Field sensor.
- RF SENSOR: Location of the Radio Frequency sensor.
5. Setup
5.1. Battery Installation
- Locate the battery compartment cover on the back of the meter.
- Slide the cover downwards to open the compartment.
- Connect a 9V battery to the battery clip, ensuring correct polarity (+ to + and - to -).
- Place the battery into the compartment and close the cover by sliding it upwards until it clicks into place.

Figure 5.1: Battery Compartment Open
5.2. Powering On/Off
Press and hold the MODE button for approximately 2 seconds to turn the meter ON. To turn the meter OFF, press and hold the MODE button again for 2 seconds.
6. Operating Instructions
The ED88TPlus operates in three primary measurement modes: RF, LF Magnetic Field, and LF Electric Field.
6.1. Switching Modes
Press the MODE button to cycle through the available measurement modes. The current mode will be indicated on the LCD display.
- RF (Radio Frequency) Mode: Measures high-frequency electromagnetic radiation (100 MHz to 8 GHz). This mode is suitable for detecting signals from Wi-Fi routers, cell towers, cordless phones, microwave ovens, etc.
- LF Magnetic Field Mode: Measures low-frequency magnetic fields (50 Hz to 10 kHz). This mode is used for detecting fields from power lines, electrical appliances, motors, and wiring.
- LF Electric Field Mode: Measures low-frequency electric fields (50 Hz to 50 kHz). This mode is used for detecting fields from unshielded electrical wiring, power cords, and electronic devices.
6.2. Changing Units
In any measurement mode, press the UNIT button to cycle through the available measurement units for that mode. For example, in RF mode, you might switch between mW/m² and V/m.
6.3. Holding Readings
Press the HOLD button to freeze the current reading on the display. This is useful for noting down fluctuating values. Press HOLD again to resume live readings.
6.4. Backlight Control
Press the LIGHT button to turn the display backlight on or off, improving visibility in different lighting conditions.
6.5. Audio Output
The meter provides an audio output for RF signals, which can help in identifying the presence and characteristics of RF sources. Adjust the volume using the VOLUME slider on the side of the device. Headphones can be connected to the headphone jack for private listening.
7. Understanding Readings
The ED88TPlus display provides numerical readings, a bar graph, and frequency information.
- Numerical Display: The main numerical value shows the current measurement.
- Bar Graph: Provides a visual representation of the signal strength, often indicating peak levels.
- Frequency Display: Shows the dominant frequency detected in RF mode.
7.1. RF Power Density Levels
The back of the meter provides a guide for RF power density levels, correlating dBm values to mW/m² and indicating relative strength with a color-coded scale.
| dBm | mW/m² | Relative Strength |
|---|---|---|
| 5 dBm | 180 mW/m² | Very High |
| 0 dBm | 56 mW/m² | High |
| -5 dBm | 18 mW/m² | Moderate |
| -10 dBm | 5.6 mW/m² | Low-Moderate |
| -15 dBm | 1.8 mW/m² | Low |
| -20 dBm | 0.56 mW/m² | Very Low |
| -30 dBm | 0.056 mW/m² | Minimal |
| -40 dBm | 0.0056 mW/m² | Negligible |
Note: These values are for general reference. Specific exposure guidelines may vary by region and organization.
7.2. Measurement Orientation
- RF Measurements: The RF sensor is located at the top right side of the meter (when viewed from the back). For best results, point this side towards the suspected RF source.
- LF Magnetic Field Measurements: The LF Gauss Meter sensor is located at the top left side of the meter (when viewed from the back). Magnetic fields are vectorial, so rotate the meter slowly in all three axes (X, Y, Z) to find the maximum reading.
- LF Electric Field Measurements: The E-Field sensor is located at the top center of the meter (when viewed from the back). Point the top of the meter towards the suspected electric field source.
8. Maintenance
- Cleaning: Wipe the meter with a soft, dry, lint-free cloth. Do not use liquid cleaners or aerosols.
- Storage: Store the meter in its carrying case in a cool, dry place away from direct sunlight and extreme temperatures. Remove the battery if storing for extended periods.
- Battery Replacement: Replace the 9V battery when the low battery indicator appears on the display or if the meter fails to power on.
9. Troubleshooting
| Problem | Possible Cause | Solution |
|---|---|---|
| Meter does not turn on. | Dead or improperly installed battery. | Check battery polarity. Replace with a fresh 9V battery. |
| Readings are consistently zero or very low. | No significant EMF source present, or meter is not oriented correctly. | Ensure you are near a known EMF source. For LF Magnetic fields, rotate the meter to find the maximum reading. For RF, point the top right side towards the source. |
| Readings are erratic or fluctuating. | Intermittent or rapidly changing EMF source. | This can be normal for some sources (e.g., pulsed Wi-Fi signals). Use the HOLD function to capture peak readings. |
| Display backlight not working. | Backlight is off or low battery. | Press the LIGHT button. Check or replace the battery. |
10. Specifications
| Feature | Detail |
|---|---|
| Model Number | ED88TPlus |
| RF Frequency Range | 100 MHz - 8 GHz |
| LF Electric Field Range | 50 Hz - 50 kHz |
| LF Magnetic Field Range | 50 Hz - 10 kHz |
| RF Sensitivity | -60 dBm to +5 dBm |
| Display | LCD with backlight, showing signal level and frequency |
| Power Source | 1 x 9V battery (included) |
| Dimensions (L x W x H) | 6.42 x 3.35 x 1.54 inches (approx.) |
| Weight | 7.05 ounces (approx.) |
| Manufacturer | CORNET Microsystems |
11. Warranty and Support
For warranty information and technical support, please contact Safe Living Technologies or CORNET Microsystems directly. Details regarding warranty periods and service procedures are typically provided with your purchase documentation or can be found on the manufacturer's official website.
For further assistance or inquiries, please refer to the contact information provided by your retailer or the manufacturer.