1. Introduction
This instruction manual provides guidance for the installation and use of the OTOHANS AUTOMOTIVE Complete Wiring Harness Kit for GY6 125cc and 150cc 4-Stroke engines. This kit is designed to replace or repair the electrical system in compatible ATVs, Quads, Pit Bikes, Scooters, and Go Karts. Please read these instructions thoroughly before beginning installation to ensure proper function and safety.
2. Product Components
The OTOHANS AUTOMOTIVE Wiring Harness Kit includes the following essential electrical components:

Figure 1: Overview of included components in the OTOHANS AUTOMOTIVE Wiring Harness Kit.
- CDI (Capacitor Discharge Ignition): Controls the ignition timing.
- Spark Plug: Ignites the air-fuel mixture in the engine cylinder.
- Ignition Coil: Transforms low voltage from the battery into high voltage to create a spark.
- Solenoid Relay: Acts as a switch to allow high current to flow to the starter motor.
- Rectifier (Voltage Regulator): Converts AC voltage from the stator to DC voltage and regulates it for the battery and electrical system.
- Ignition Switch: Controls the main power to the vehicle's electrical system.
- ATV Switch (Multi-functional Switch): Typically includes controls for lights, engine kill, and starter.
- Magneto Stator: Generates electrical power for the ignition system and charging the battery.
- Complete Wiring Harness: The main loom connecting all electrical components.
3. Compatibility
This wiring harness kit is designed for specific engine types and vehicle models. Please verify your vehicle's specifications before installation.
3.1. Compatible Models
- Almost all years of Chinese-made electric start upright engine GY6 125cc and 150cc 4-Stroke engines.
- Compatible with ATVs, Quads, Coolster, Go Karts, Pit Bikes, Scooters, Buggies, and Motowork vehicles equipped with a GY6 125cc or 150cc engine and a 6-coil stator.
- Known compatible brands include Coolster, Kazuma, Pitpro, Hummer, Xmoto, Monsoon, Trooper, Hunter, Motox, Blitz, Kawasaki KLX, Bigfoot, Kuda, Motoworks, Chongqing, and Ducar.
3.2. Incompatible Models
This assembly is not compatible with:
- 49cc, 50cc, 70cc, 110cc, 200cc, 250cc, 300cc Zongshen Lifan ATV / QUAD engines with a different stator type.
- Any engine type that is not a GY6 model, unless specifically verified for compatibility.
Note: If your vehicle's magneto stator matches the one shown in the product images, the kit is likely compatible.
4. Installation Instructions
Installation of a complete wiring harness requires careful attention to detail. It is recommended that this procedure be performed by individuals with experience in automotive electrical systems. Always disconnect the battery before beginning any electrical work.
4.1. General Installation Steps
- Preparation: Ensure the vehicle's battery is disconnected. Remove any old or damaged wiring harness components.
- Reference Wiring Diagram: Utilize the provided wiring diagram as a primary guide for connecting components. Pay close attention to wire colors and connector types.
- Connect Major Components: Begin by connecting the main components such as the CDI, ignition coil, rectifier, and solenoid relay to their respective points on the wiring harness.
- Connect Switches and Sensors: Attach the ignition switch, multi-functional switch, rear brake switch, and any other sensors or switches.
- Stator Connection: Connect the magneto stator to the harness. Ensure all wires are securely fastened.
- Battery Connection: Connect the positive and negative terminals of the battery to the harness, ensuring correct polarity.
- Spark Plug: Install the spark plug into the engine cylinder and connect the ignition coil wire.
- Secure Wiring: Route the wiring harness neatly and secure it with zip ties or clips to prevent chafing, pinching, or contact with hot engine parts.
- Initial Test: Reconnect the battery. Before attempting to start the engine, perform a visual inspection of all connections. Test the ignition switch, kill switch, and lights.
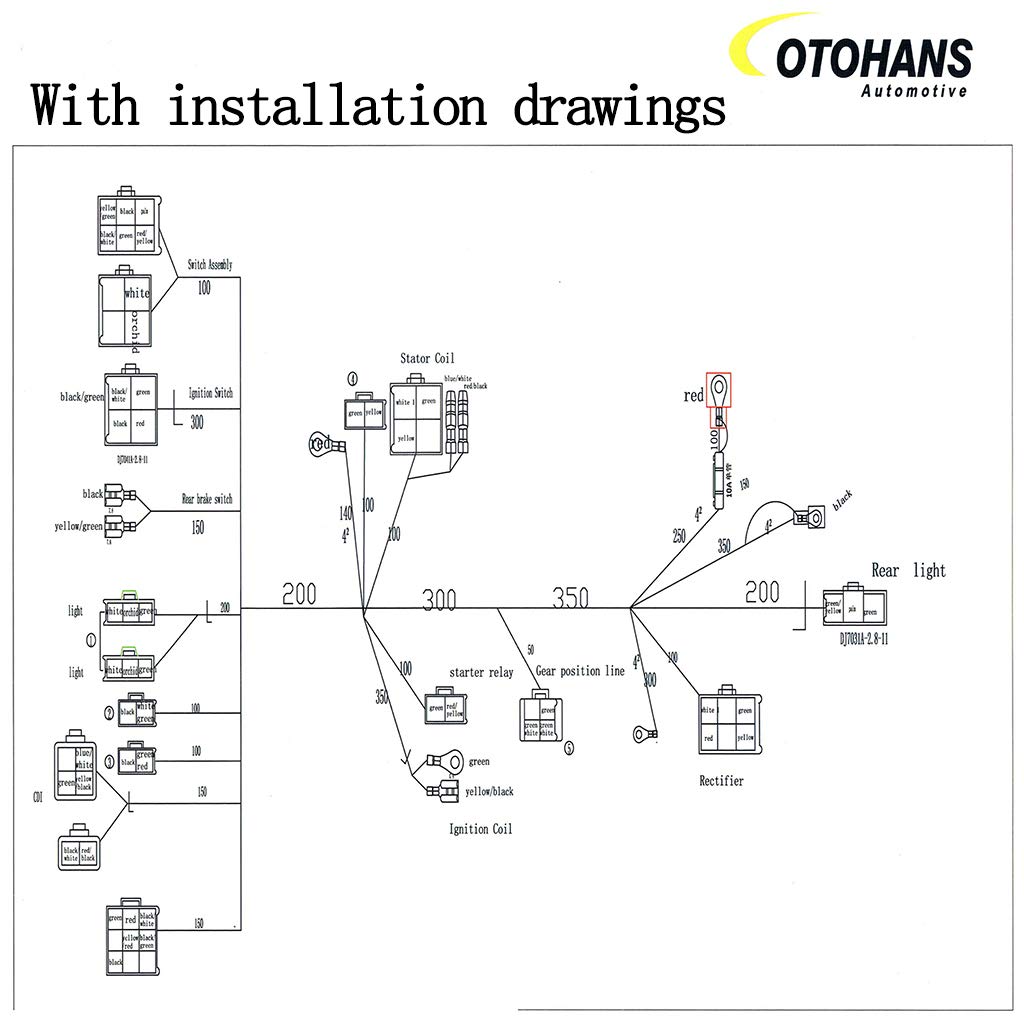
Figure 2: Example of a wiring diagram for the harness kit.
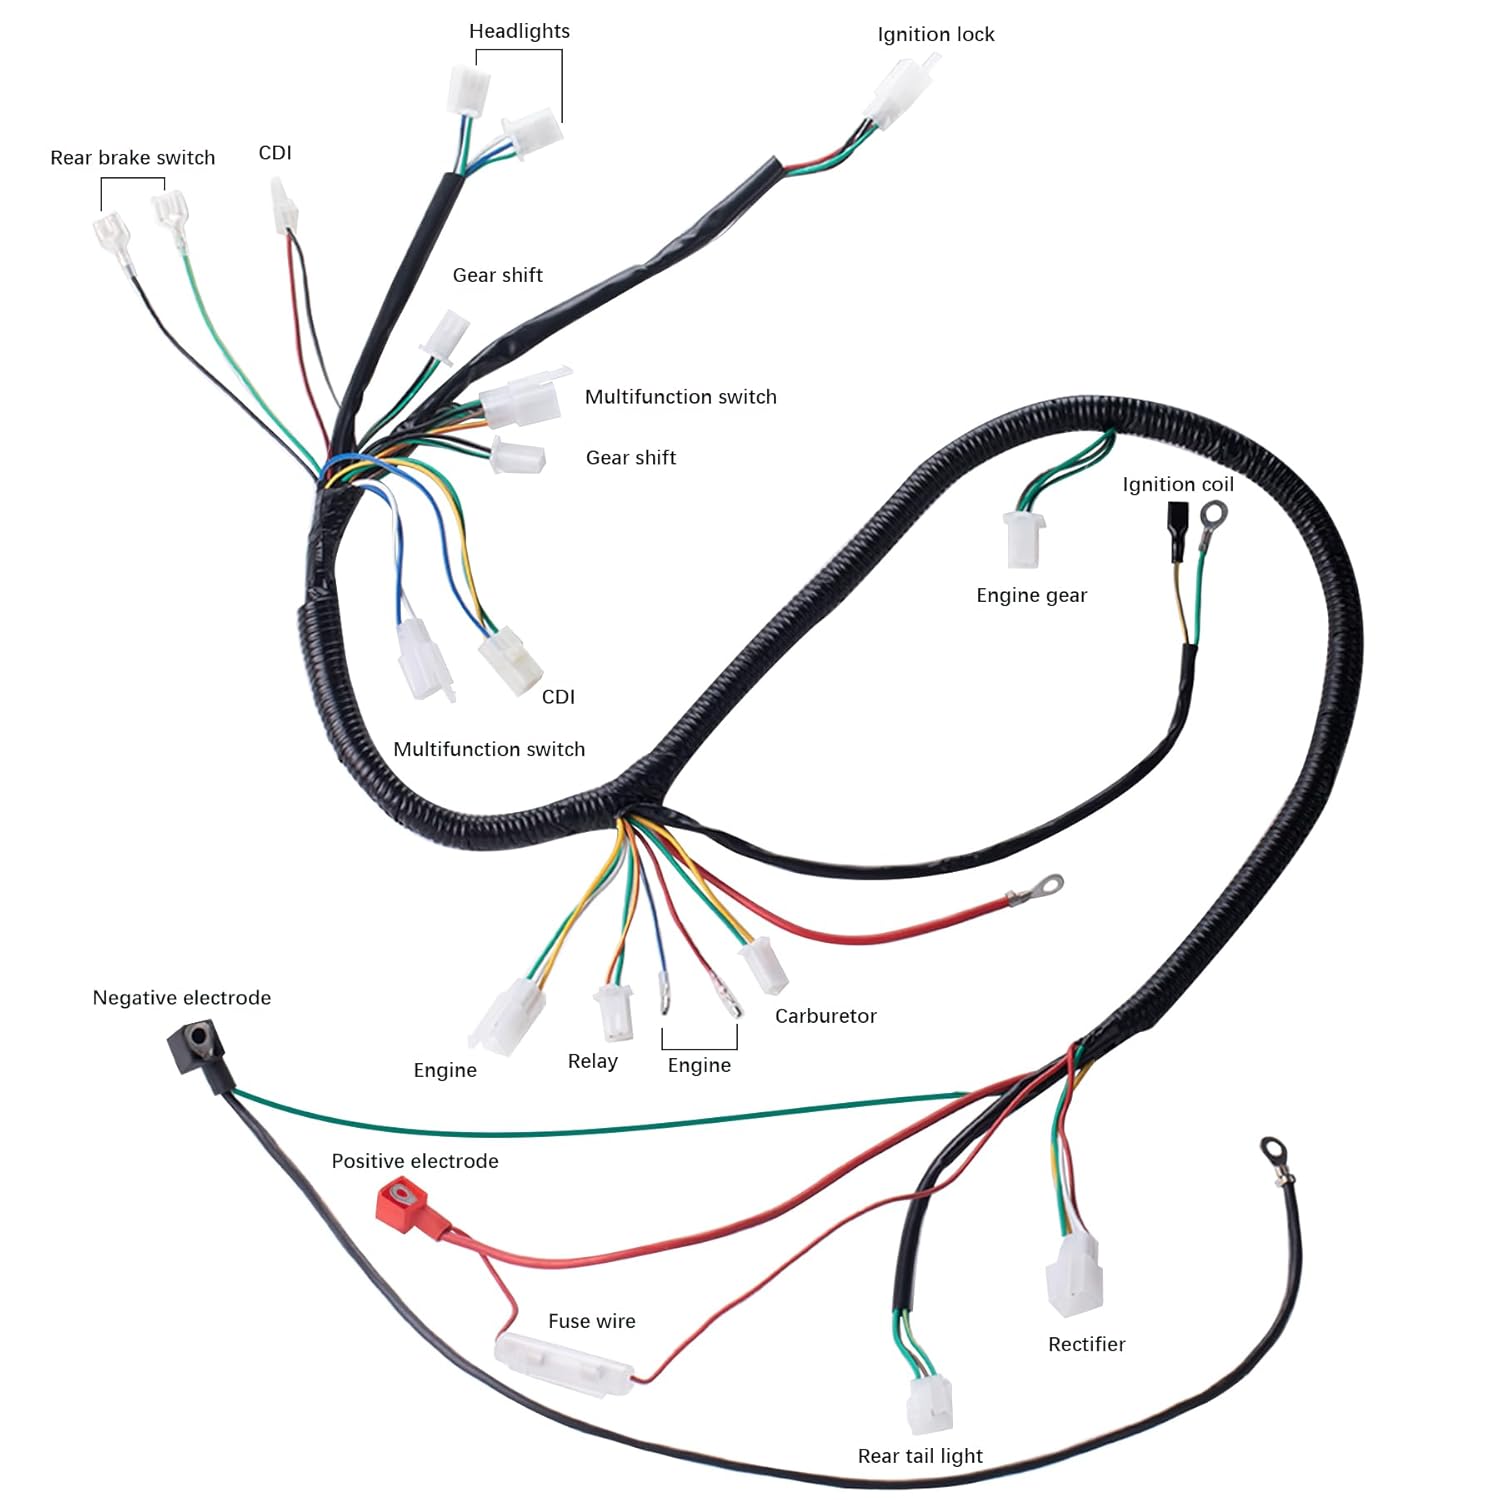
Figure 3: Detailed view of harness connections.
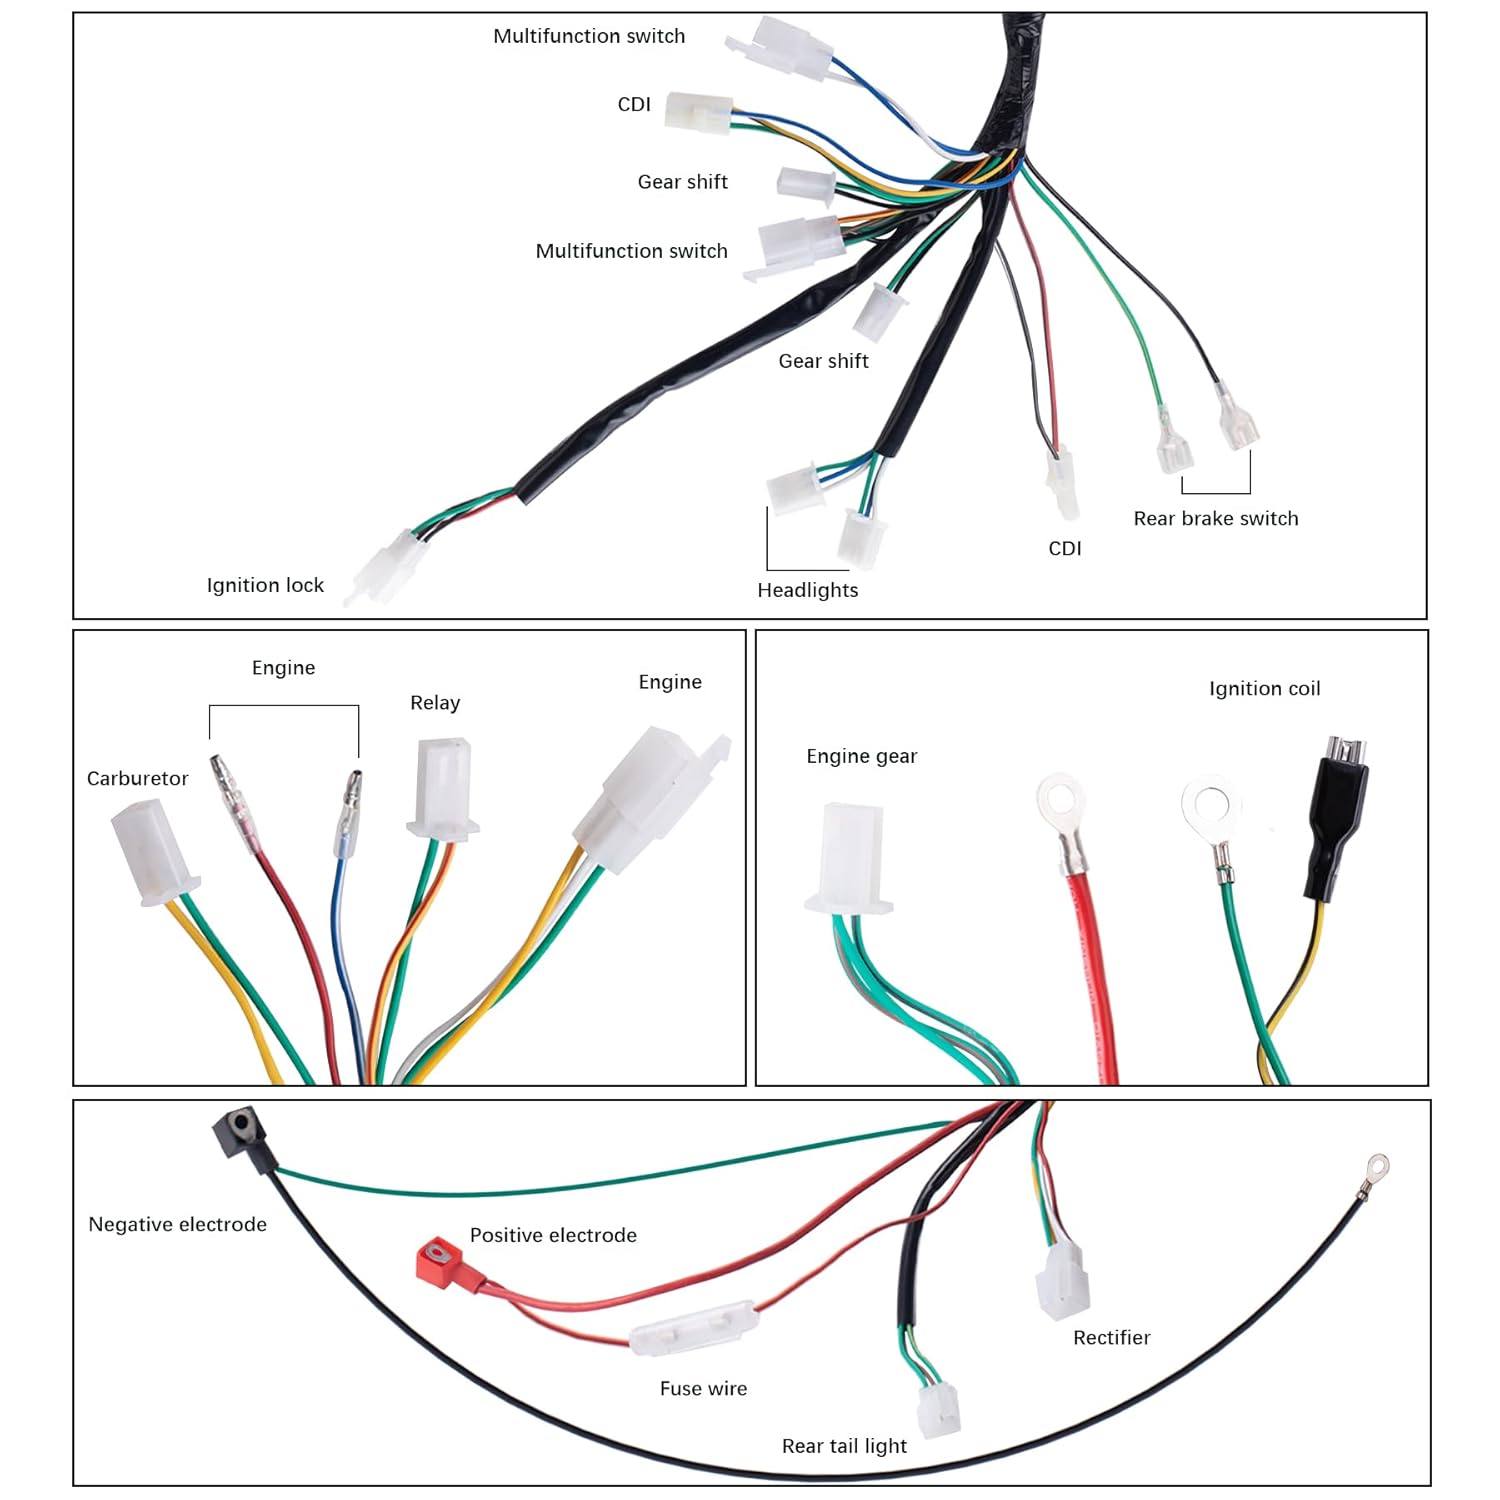
Figure 4: Specific component connections on the harness.
4.2. Important Considerations
- Some wire colors on the harness may not perfectly match existing vehicle wiring. Always refer to the function of the wire as indicated in the diagram rather than relying solely on color.
- Ensure all connectors are fully seated and locked to prevent intermittent electrical issues.
- The harness is designed with weather-resistant materials, but avoid exposing connections to excessive moisture or direct water spray.
5. Operating Instructions (Post-Installation Check)
After successful installation, perform the following checks to ensure the electrical system is functioning correctly:
- Ignition System Check:
- Turn the ignition key to the "ON" position.
- Ensure the engine kill switch is in the "RUN" position.
- With the spark plug removed and grounded against the engine block (or using a spark tester), attempt to crank the engine. Verify a strong, consistent spark.
- Lighting System Check:
- Test headlights (high/low beam), tail lights, and brake lights.
- Verify turn signals (if applicable) are functioning correctly.
- Starter System Check:
- Ensure the brake lever is depressed (a common safety interlock for starting).
- Press the starter button. The engine should crank smoothly.
- Charging System Check:
- Once the engine is running, use a multimeter to check the battery voltage. It should be higher than the static battery voltage (typically around 13.5-14.5V) indicating the rectifier and stator are charging the battery.
6. Maintenance
Proper maintenance of your wiring harness ensures longevity and reliable performance.
- Regular Inspection: Periodically inspect the wiring harness for any signs of wear, fraying, or damage, especially in areas exposed to heat, vibration, or moisture.
- Connection Integrity: Check all electrical connections for tightness and corrosion. Clean any corroded terminals with a wire brush and electrical contact cleaner.
- Secure Routing: Ensure the harness remains securely routed and fastened, preventing it from rubbing against sharp edges or moving parts.
- Fuse Check: Regularly inspect the fuse wire for continuity. Replace blown fuses with one of the correct amperage.
7. Troubleshooting Common Issues
If you encounter issues after installation, consider the following troubleshooting steps:
- No Spark:
- Verify the engine kill switch is in the "RUN" position and fully reset (some switches require pushing in after moving).
- Check all CDI, ignition coil, and stator connections for looseness or corrosion.
- Test the spark plug. Replace if faulty.
- Ensure the ignition switch is functioning correctly.
- Engine Cranks but Does Not Start:
- Confirm spark (as above).
- Check fuel supply.
- Ensure the carburetor connections on the harness are correct.
- No Cranking (Starter Motor Inactive):
- Verify the battery is fully charged and properly connected.
- Ensure the brake switch is depressed (a common safety interlock for the starter solenoid).
- Check the solenoid relay connections and functionality.
- Inspect the fuse wire for continuity.
- Lights Not Working:
- Check bulb integrity.
- Verify connections to the multi-functional switch and light assemblies.
- Ensure the rectifier is properly regulating voltage.
- Wire Color Mismatch:
- Refer strictly to the wiring diagram for connection points and functions, rather than relying solely on wire colors, as these can vary.
If issues persist after troubleshooting, consult a qualified technician.
8. Product Specifications
| Feature | Detail |
|---|---|
| Brand | OTOHANS AUTOMOTIVE |
| Model Number | US-XQZCZX |
| Material | Copper |
| Item Weight | 1.62 Kilograms (3.56 pounds) |
| Connector Type | Din Or Idc |
| Wire Diameter | 1.02 Millimeters |
| Package Dimensions | 9.33 x 5.87 x 5.2 inches |
| UPC | 788601478571 |
9. Customer Support
For further assistance, technical support, or inquiries regarding this product, please contact OTOHANS AUTOMOTIVE customer service through the retailer where the product was purchased. Please have your model number (US-XQZCZX) and purchase details available when contacting support.