Dancover ProShed® Utensil Shed 2.85x3.2x1.92m
Dancover ProShed® Utensil Shed User Manual
Model: 2.85x3.2x1.92m Anthracite
1. Product Overview
The Dancover ProShed® Utensil Shed is designed to provide secure and organized storage for your garden tools and equipment. Constructed from durable zinc-plated steel, this shed offers excellent protection against the elements and features a classic, easy-to-assemble design.
Key features include a large sliding door for easy access, a high inclined ceiling, and integrated ventilation. The anthracite color provides a sleek, modern appearance that blends well with various outdoor environments.

Figure 1: Front view of the Dancover ProShed® Utensil Shed in anthracite.
2. Specifications
| Feature | Detail |
|---|---|
| External Dimensions (L x W x H) | 3.2 m x 2.73 m x 1.91 m (Cap height) |
| Side Height | 1.54 m |
| External Dimensions at Ground Level | 2.67 m x 3.09 m |
| Ground Area | 8.25 m² |
| External Dimensions (including eaves) | 8.84 m² |
| Door Opening Width | 0.96 m (96 cm) |
| Door Opening Height | 1.52 m (152 cm) |
| Material | Zinc plated steel (Wall and Ceiling panels: 0.25mm thickness) |
| Color | Anthracite |
| Waterproof | 100% Waterproof |
| Weight | 85.1 kg |
| Minimum Base Dimensions | 2.69 m x 3.11 m |
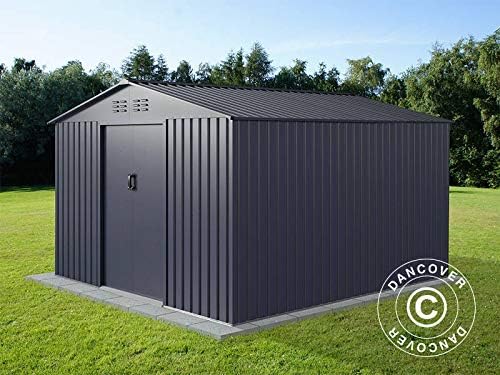
Figure 2: The ProShed® Utensil Shed installed in a garden, demonstrating its size and appearance.
3. Setup and Assembly
The ProShed® Utensil Shed is designed for straightforward assembly. Follow these guidelines for optimal setup:
- Site Preparation: Choose a flat, level surface for installation. Recommended surfaces include concrete, stone slabs, concrete slabs, or wood. If placing on a grass surface, it is recommended to first lay a tarpaulin or similar diaphragm to prevent moisture and then install the shed on top, followed by an internal floor.
- Base Requirements: Ensure your chosen base meets the minimum dimensions of 2.69 m x 3.11 m.
- Anchoring: The shed includes anchor fixings to secure it to the ground, enhancing stability and safety.
- Assembly Process: The shed's simple and elegant design facilitates easy assembly. Refer to the detailed assembly instructions provided in the packaging for step-by-step guidance.
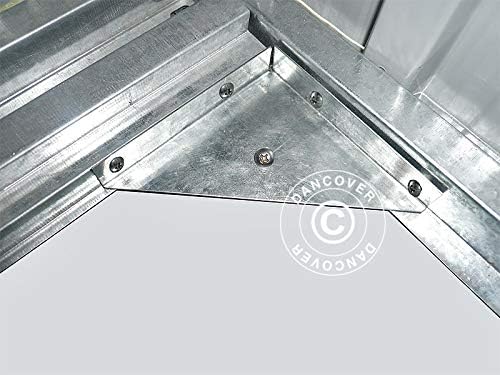
Figure 3: Detail of an internal corner joint, illustrating the shed's structural components.
4. Operating Instructions
Using your ProShed® Utensil Shed is simple and convenient:
- Door Access: The shed features a large sliding door designed for easy access to your stored items.
- Security: The sliding door is equipped with a hole for a handle and padlock. To secure the shed, simply place a padlock (not included) through the designated hole on the handles.
- Ventilation: The panel design provides extra ventilation, helping to prevent condensation and maintain a suitable environment for your stored items.

Figure 4: Close-up view of the shed's door handle, showing the design for padlock placement.

Figure 5: Exterior view of the shed's front gable, highlighting the ventilation openings.
5. Maintenance
Proper maintenance will ensure the longevity and optimal performance of your ProShed® Utensil Shed:
- Cleaning: Regularly clean the exterior of the shed with mild soap and water to remove dirt and debris. Avoid abrasive cleaners or tools that could scratch the zinc-plated steel.
- Door Tracks: Keep the sliding door tracks clear of obstructions (leaves, dirt) to ensure smooth operation. Lubricate tracks periodically if needed.
- Ventilation: Ensure the ventilation openings remain clear to allow for proper airflow and prevent moisture buildup inside the shed.
- Inspection: Periodically inspect all fasteners and connections to ensure they are tight. Re-tighten if necessary.

Figure 6: Interior view showing the roof structure and upper wall with integrated ventilation.
6. Troubleshooting
Here are some common issues and their potential solutions:
- Problem: Door is difficult to slide.
- Solution: Check door tracks for debris and clear them. Apply a silicone-based lubricant to the tracks. Ensure the shed is level and square.
- Problem: Water pooling inside the shed.
- Solution: Verify that the shed is installed on a perfectly flat and level surface. Ensure proper drainage around the base. Check for any gaps or unsealed areas, especially around the base or seams, and seal them if necessary.
- Problem: Condensation inside the shed.
- Solution: Ensure ventilation openings are not blocked. Consider adding a moisture absorber inside the shed if the problem persists, especially in humid climates.
7. Available Accessories
Enhance the functionality and organization of your ProShed® Utensil Shed with separately available accessories:
- Floor Frame: For installing internal floors, providing a clean and stable surface.
- Shelves: To maximize vertical storage space and keep items organized.
- Hooks: For hanging tools and other equipment, keeping them off the floor.
- Dancover Floor Covering Solution: With anti-slip protection and built-in water drainage, ideal for your ProShed® Utensil Shed.
8. Warranty Information
Dancover provides a 10-year rust protection guarantee against perforation for the ProShed® Utensil Shed. This warranty covers defects in materials and workmanship that result in rust perforation under normal use and maintenance. Please retain your proof of purchase for warranty claims.
9. Customer Support
For further assistance, technical support, or inquiries regarding your Dancover ProShed® Utensil Shed, please contact Dancover customer service. Visit the official Dancover website for contact details and additional resources.
Website: www.dancover.com
Ask a question about this manual
Ask about setup, troubleshooting, compatibility, parts, safety, or missing instructions. Manuals+ will review the question and use this page’s manual context to help answer it.