1. Introduction
Thank you for choosing the SREMTCH Soldering Iron Set Model 9160. This manual provides essential information for the safe and proper operation, maintenance, and care of your soldering iron. Please read this manual thoroughly before first use and retain it for future reference.
This soldering iron is designed for various electronic repair tasks, DIY projects, and general soldering applications. It features adjustable temperature control and a quick-heating ceramic element for efficient work.
2. Safety Instructions
WARNING: Failure to follow these safety instructions may result in electric shock, fire, or serious injury.
- Always wear appropriate personal protective equipment, including safety glasses, to protect against solder splashes.
- Ensure the work area is well-ventilated to avoid inhaling solder fumes. Use a fume extractor if available.
- Do not touch the soldering iron tip or heating element when hot. Temperatures can reach up to 450°C and cause severe burns.
- Always place the hot soldering iron in its designated stand when not in use. Never lay it directly on a workbench or flammable surfaces.
- Keep the soldering iron away from flammable materials, liquids, and gases.
- Do not use the soldering iron in damp or wet conditions.
- Unplug the soldering iron from the power outlet when not in use or before changing tips, cleaning, or performing maintenance.
- Keep children and unauthorized persons away from the work area.
- Inspect the power cord for damage before each use. Do not use if the cord is damaged.
- Use only genuine SREMTCH replacement parts and accessories.
3. Package Contents
Verify that all items listed below are included in your package:
- 1 x SREMTCH 60W Adjustable Temperature Soldering Iron with ON/OFF Switch
- 5 x Soldering Iron Tips (various shapes)
- 1 x Y-style Stainless Steel Soldering Stand
- 1 x Solder Wire
- 1 x Yellow Sponge Pad
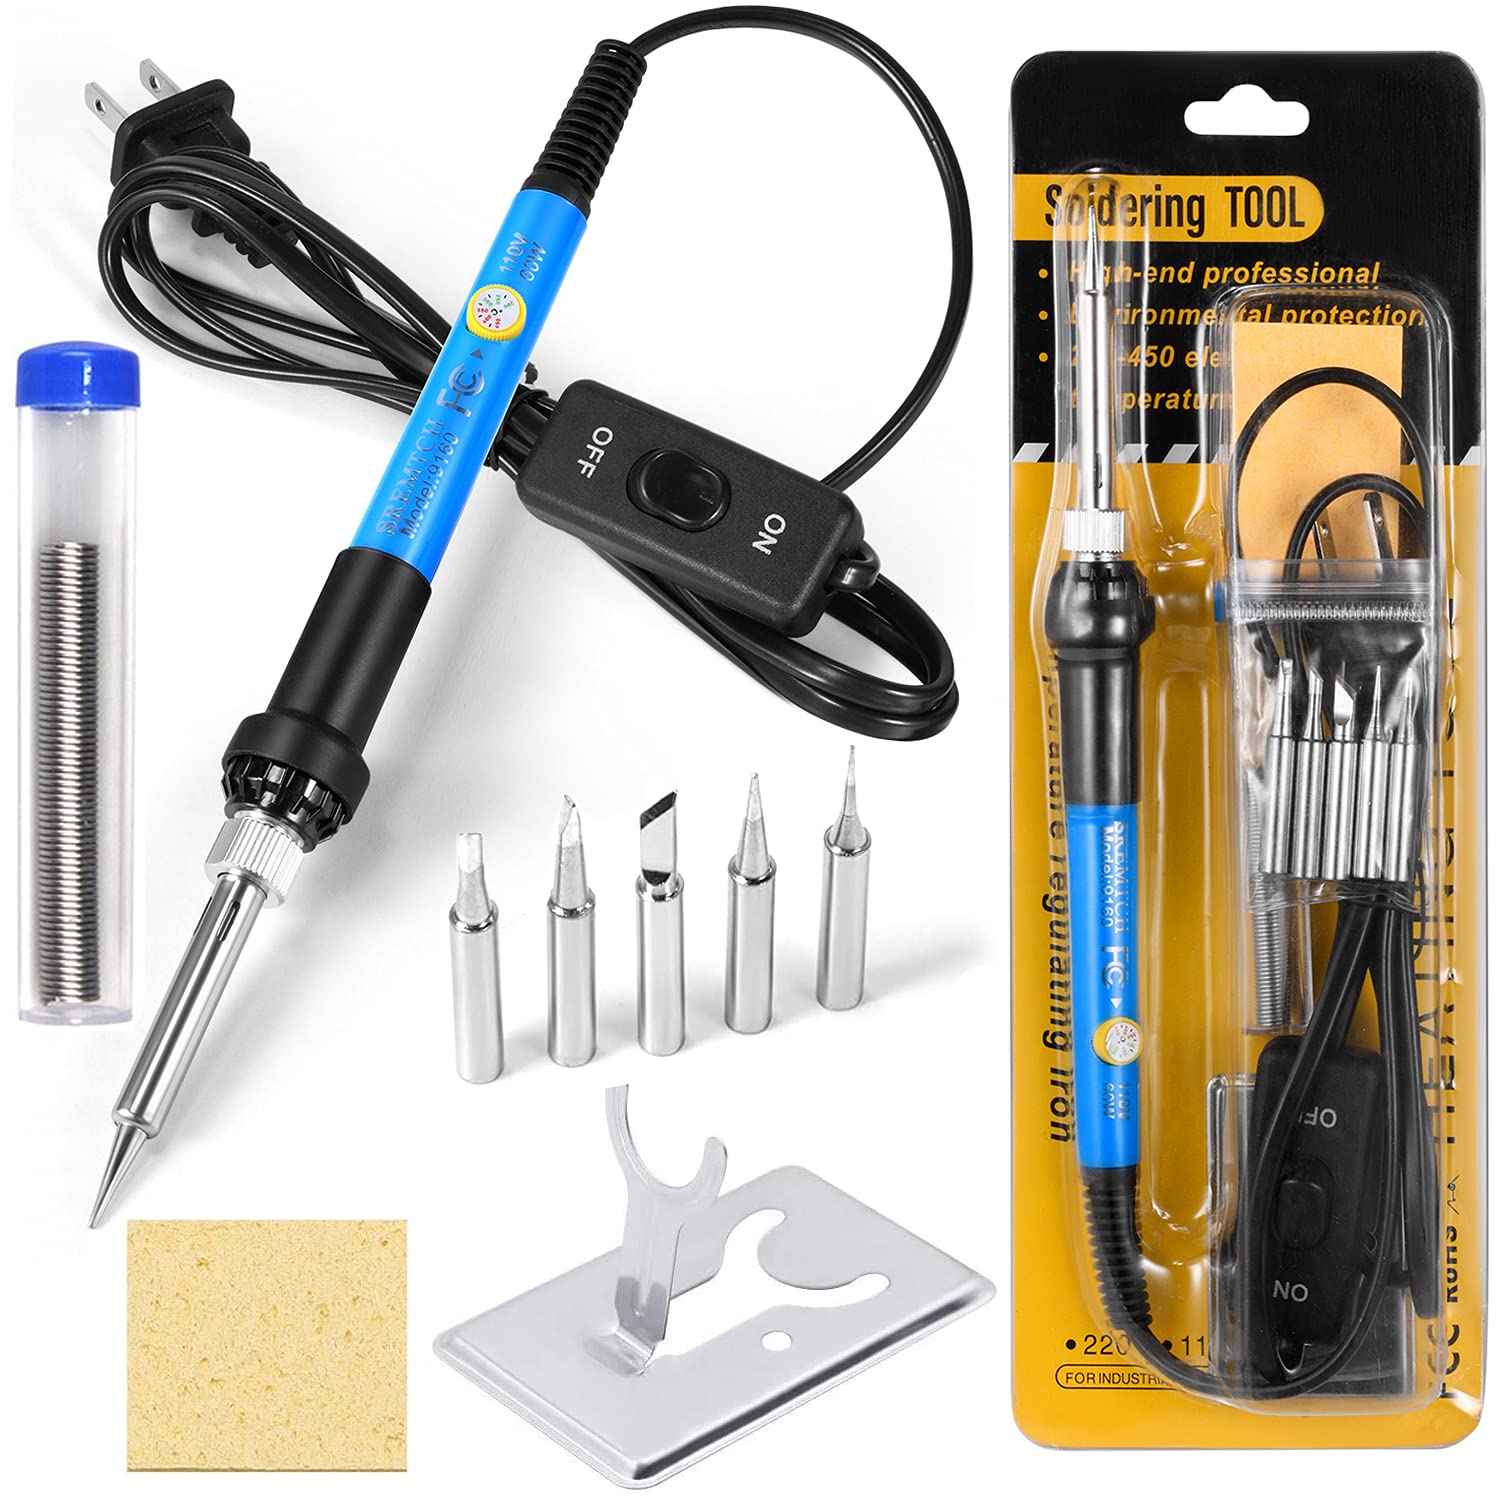
Image 3.1: The complete SREMTCH Soldering Iron Set, including the iron, multiple tips, solder wire, stand, and cleaning sponge.
4. Product Overview
Familiarize yourself with the components of your SREMTCH Soldering Iron:

Image 4.1: Detailed diagram illustrating the key components of the soldering iron.
- Temperature Adjustment Knob: Used to set the desired operating temperature from 200°C to 450°C.
- Fast Heat Dissipation Holes: Ventilation holes in the stainless steel casing designed to cool the iron quickly and prevent overheating.
- Replaceable Tips: The set includes five different soldering tips for various applications.
- Superior Rapid Heating Core: Inner-heated ceramic technology for quick heat-up times.
- Plastic Cover: Protective cover for the plug.
- ON/OFF Switch: Convenient switch on the power cord to turn the soldering iron on or off without unplugging.
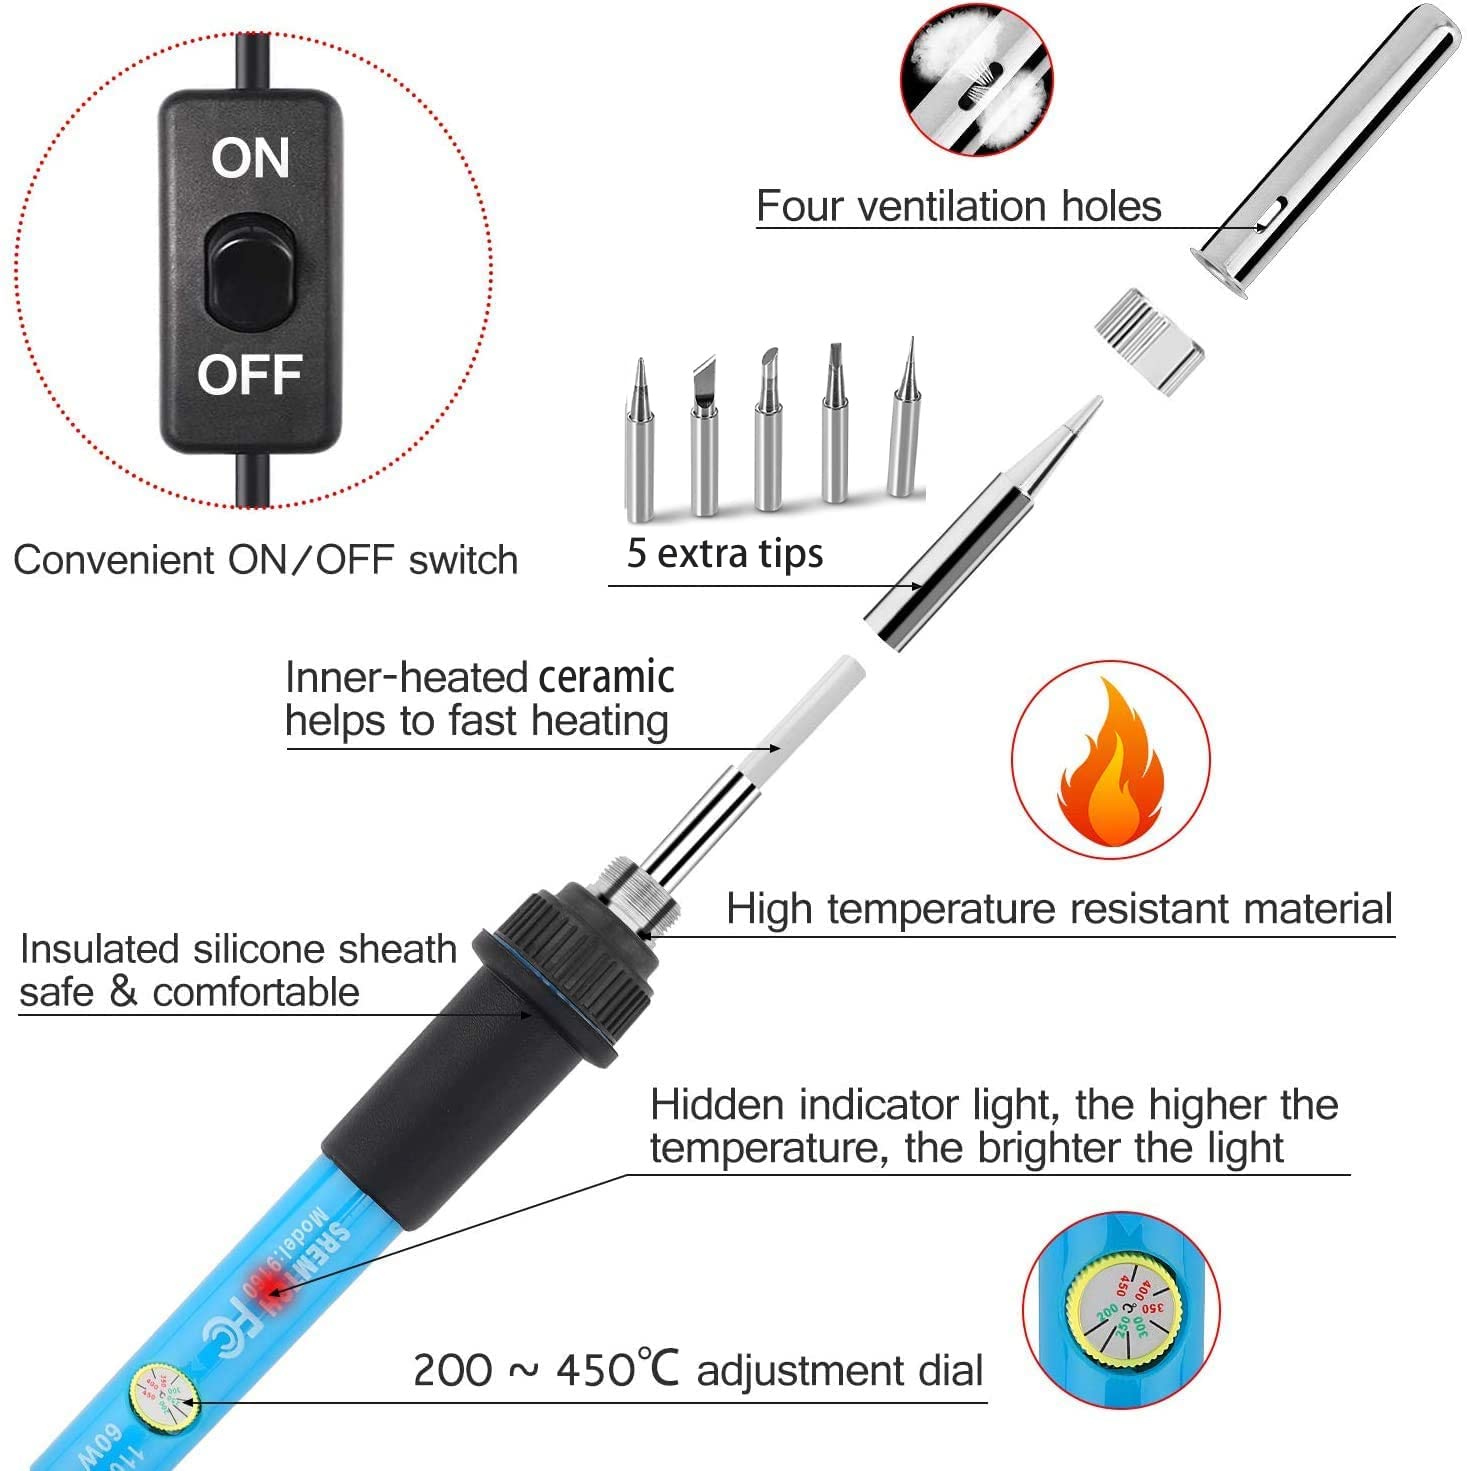
Image 4.2: Exploded view showing the internal ceramic heating element, ventilation holes, and the temperature adjustment dial.
- Inner-heated ceramic: Provides rapid heating.
- High temperature resistant material: Ensures durability and safety.
- Insulated silicone sheath: Offers safe and comfortable handling.
- Hidden indicator light: Illuminates when the iron is heating; its brightness indicates the temperature level.
5. Setup
- Prepare the Work Area: Ensure your workspace is clean, well-lit, and well-ventilated. Remove any flammable materials.
- Assemble the Stand: Place the Y-style stainless steel soldering stand on a stable, heat-resistant surface.
- Prepare the Sponge: Moisten the yellow sponge pad with water. It should be damp, not soaking wet. This sponge is used for cleaning the soldering tip.
- Install a Soldering Tip: Select the appropriate soldering tip for your task. Carefully screw it onto the heating element of the soldering iron. Ensure it is securely fastened but do not overtighten.
- Place Iron in Stand: Rest the soldering iron securely in the stand.

Image 5.1: The soldering iron placed in its stand, with the cleaning sponge correctly moistened and ready for use.
6. Operating Instructions
- Connect Power: Plug the soldering iron into a standard 110V AC power outlet.
- Turn On: Flip the ON/OFF switch on the power cord to the "ON" position. The indicator light on the iron handle will illuminate.
- Set Temperature: Rotate the temperature adjustment knob on the handle to your desired temperature. For most applications, a setting between 300°C and 350°C is suitable. The iron heats up quickly, typically within 1-3 minutes.
- Tinning the Tip (First Use & Maintenance): Before soldering, "tin" the tip. Apply a small amount of solder to the hot tip until it is fully coated. This protects the tip from oxidation and improves heat transfer.
- Soldering:
- Clean the tip on the wet sponge before each use.
- Apply the hot tip to the components or wires you wish to solder, ensuring both are heated simultaneously.
- Once the components are hot enough, apply solder to the joint, not directly to the iron tip. The solder should flow smoothly and create a shiny, conical joint.
- Remove the solder wire, then remove the soldering iron. Allow the joint to cool naturally without disturbance.
- After Use:
- Clean the tip thoroughly on the wet sponge.
- Apply a fresh coat of solder to the tip (tinning) before turning off the iron. This helps protect the tip during storage.
- Flip the ON/OFF switch to the "OFF" position.
- Unplug the iron from the power outlet.
- Allow the iron to cool completely in its stand before storing.

Image 6.1: A user demonstrating the application of the SREMTCH soldering iron for electronic circuit board repair.
7. Maintenance
Proper maintenance extends the life of your soldering iron and ensures optimal performance.
- Tip Cleaning: Regularly clean the soldering tip on the wet sponge during use. A dirty tip will not transfer heat effectively.
- Tip Tinning: Always tin the tip before and after each soldering session. This prevents oxidation, which can render the tip unusable. If the tip turns black and solder won't stick, it needs re-tinning or replacement.
- Tip Replacement: If a tip becomes severely oxidized, pitted, or damaged, replace it with a new one. Ensure the iron is cool and unplugged before changing tips.
- Storage: Store the cooled soldering iron and accessories in a dry, safe place.
- Casing: The soldering iron features a durable stainless steel casing for oxidation resistance and high precision. Keep it clean.

Image 7.1: Close-up view of the soldering iron's tip and its stainless steel casing, highlighting its robust construction.
8. Troubleshooting
- Iron not heating up:
- Check if the power cord is securely plugged in.
- Ensure the ON/OFF switch is in the "ON" position.
- Verify the power outlet is functional.
- Solder not melting or sticking to the tip:
- The tip may be oxidized. Clean and re-tin the tip thoroughly.
- Increase the temperature setting using the adjustment knob.
- Ensure the sponge is damp for effective cleaning.
- Consider replacing the tip if it is severely damaged or corroded.
- Smoke or unusual odor:
- This is normal during initial use as protective coatings burn off. If it persists or is accompanied by sparks, immediately unplug the iron and contact support.
9. Specifications
| Feature | Specification |
|---|---|
| Brand | SREMTCH |
| Model Number | 9160 |
| Power Source | Corded Electric |
| Wattage | 60 Watts |
| Working Voltage | 110V |
| Temperature Range | 200°C - 450°C (392°F - 842°F) |
| Heating Element | Inner-heated Ceramic |
| Handle Material | Rubber |
| Item Weight | 157 Grams |
| Cable Length | 57.5 Inches (approx. 1.46 meters) |
| Product Dimensions | 26.5 x 14.5 x 4 cm |
| UPC | 768430425861 |
10. Warranty and Support
SREMTCH products are manufactured to high-quality standards. For warranty information or technical support, please refer to the documentation included with your purchase or contact SREMTCH customer service directly through their official website or the retailer where the product was purchased.
Please retain your proof of purchase for any warranty claims.
11. Intended Use and Applications
The SREMTCH Soldering Iron Set Model 9160 is suitable for a wide range of soldering tasks, including:
- Welding circuit boards
- Appliance repair
- Home DIY electronics projects
- Jewelry soldering
- Repair of mobile devices and computer hardware
- General electrical connections

Image 11.1: Visual representation of common applications for the SREMTCH soldering iron, including electronics, appliances, and small repairs.