1. Introduction
This manual provides essential information for the proper installation, operation, and maintenance of your ROTINGER Brake Disc Rotors, model RT 4505-GL T5. These front axle brake disc rotors are designed with an anti-corrosion coating to ensure durability and reliable performance. Please read this manual thoroughly before proceeding with any installation or maintenance.

Figure 1: ROTINGER Brake Disc Rotors (Set of 2) with packaging.
2. Safety Information
Always prioritize safety when working with vehicle components. Improper installation or maintenance of brake systems can lead to serious injury or vehicle damage.
- Professional Installation Recommended: Brake system components are critical for vehicle safety. Installation should be performed by a qualified mechanic or technician.
- Wear Protective Gear: Always wear appropriate personal protective equipment, including safety glasses and gloves, when handling brake components.
- Vehicle Support: Ensure the vehicle is securely supported on jack stands before working underneath it. Never rely solely on a jack.
- Cleanliness: Keep brake components free from grease, oil, and dirt. Contaminants can severely impair braking performance.
- Torque Specifications: Always adhere to the vehicle manufacturer's torque specifications for all fasteners.
- Brake Fluid: Handle brake fluid with care as it can damage paint and is harmful if ingested.
3. Product Overview
The ROTINGER RT 4505-GL T5 brake disc rotors are designed for the front axle, offering enhanced braking performance and longevity. Key features include:
- Anti-Corrosion Coating: Provides superior protection against rust and corrosion, extending the lifespan of the rotors.
- Precision Engineering: Manufactured to meet or exceed original equipment (OE) specifications for fit, form, and function.
- Optimized Design: Features specific drilling and slotting patterns (GL T5) for improved heat dissipation, reduced brake fade, and enhanced wet braking performance.
- Quality Assurance: Certified under ISO 9001:2008, ISO/TS 16949:2009, ISO 14001:2004, EAC, TUV Rheinland, TecDoc, and Laximo standards.

Figure 2: Detailed view of the ROTINGER brake disc surface with drilled and slotted design.
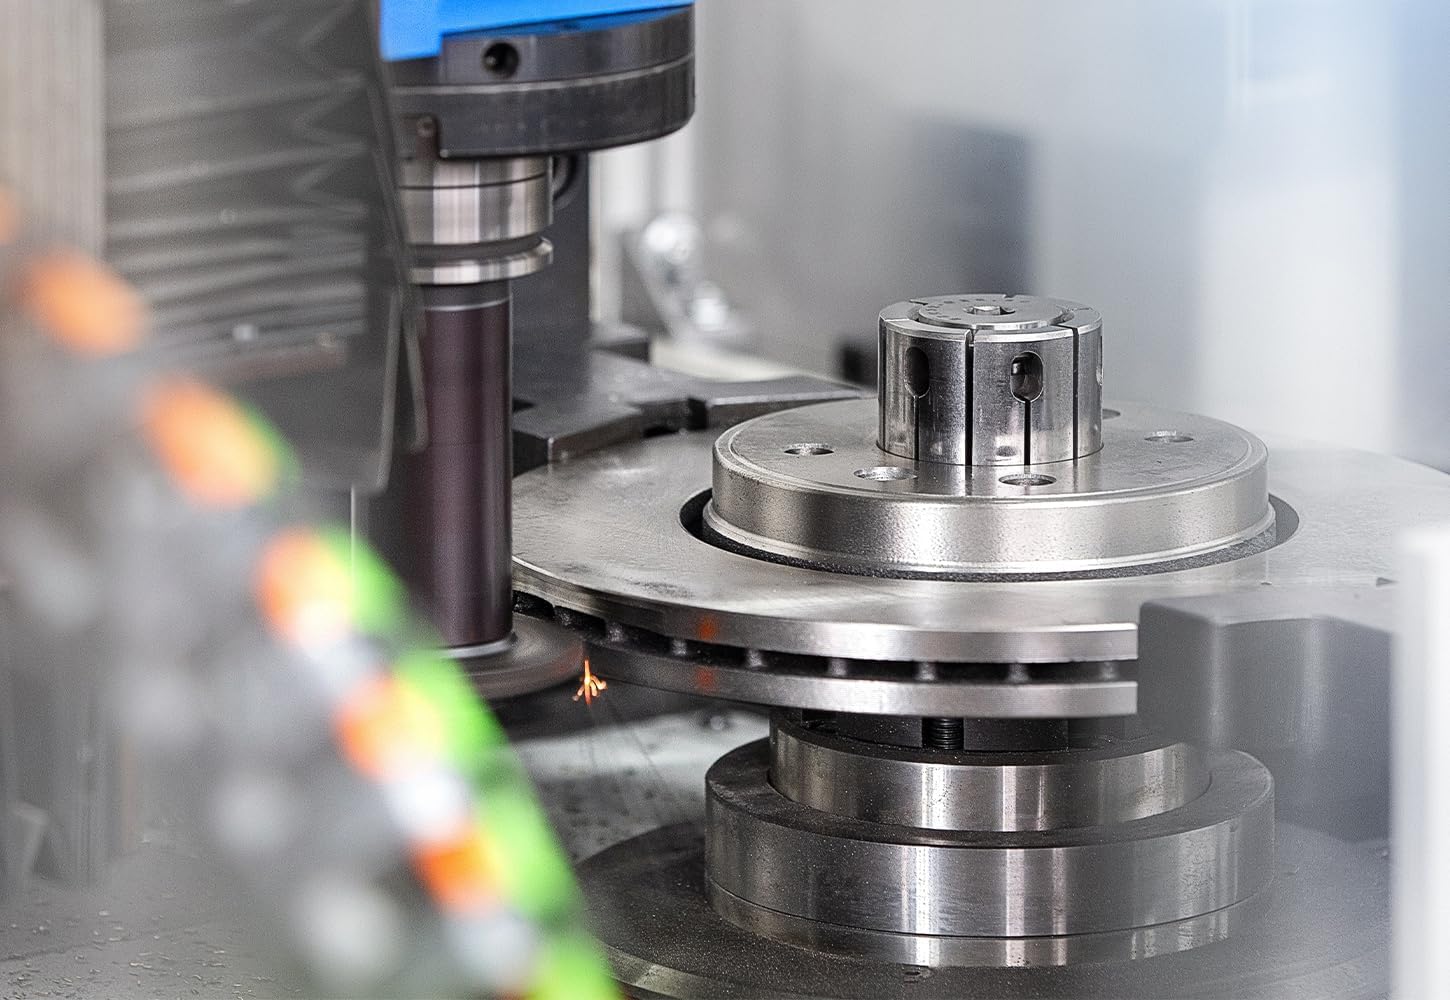
Figure 3: Precision manufacturing process of ROTINGER brake discs.
4. Installation
Installation of brake disc rotors requires specialized tools and knowledge. It is strongly recommended that this procedure be carried out by a certified automotive technician. The following steps are a general guide and should be supplemented by the vehicle manufacturer's service manual.
- Vehicle Preparation: Park the vehicle on a level surface, engage the parking brake, and block the wheels. Loosen the lug nuts on the wheels to be removed.
- Lift and Secure: Safely lift the vehicle and support it with jack stands. Remove the wheels.
- Remove Caliper: Unbolt and carefully remove the brake caliper from its mounting bracket. Do not let the caliper hang by the brake hose; support it with a wire or hook.
- Remove Caliper Bracket: Unbolt and remove the caliper mounting bracket.
- Remove Old Rotor: Remove any retaining screws or clips holding the old brake rotor in place. The rotor may be seized to the hub; use a rubber mallet if necessary to dislodge it.
- Clean Hub Surface: Thoroughly clean the wheel hub mounting surface to remove any rust, dirt, or debris. A clean, flat surface is crucial for proper rotor seating and to prevent runout.
- Install New Rotor: Place the new ROTINGER brake disc rotor onto the wheel hub, ensuring it sits flush.
- Reinstall Caliper Bracket: Reattach the caliper mounting bracket and tighten bolts to the manufacturer's specified torque.
- Install New Brake Pads: It is highly recommended to install new brake pads when replacing rotors to ensure optimal performance and even wear.
- Reinstall Caliper: Reattach the brake caliper, ensuring the brake hose is not twisted. Tighten bolts to the manufacturer's specified torque.
- Bleed Brakes (if necessary): If the brake system was opened, or if air entered the system, bleed the brakes according to the vehicle manufacturer's procedure.
- Reinstall Wheels: Mount the wheels, hand-tighten lug nuts, lower the vehicle, and then torque the lug nuts to specification.
Important: Before purchasing, please provide the Vehicle Identification Number (VIN) to confirm compatibility of the brake discs with your vehicle. This ensures you receive the correct parts for safe and effective braking.

Figure 4: VIN verification message for product compatibility.
5. Operation and Break-in Procedure
After new brake rotors and pads are installed, a proper break-in procedure is crucial to ensure optimal performance, prevent premature wear, and reduce noise. This process helps to transfer an even layer of friction material from the pads to the rotor surface.
- Initial Driving: Drive the vehicle at a moderate speed (e.g., 30-40 mph or 50-60 km/h).
- Moderate Stops: Perform approximately 10-15 moderate stops from this speed, allowing the brakes to cool slightly between stops. Avoid hard braking during this phase.
- Cool Down: After the moderate stops, drive for several minutes without using the brakes excessively to allow them to cool down completely.
- Repeat (Optional): For best results, some manufacturers recommend repeating the process with slightly higher speeds and firmer stops, followed by another cool-down period.
During the break-in period (typically the first 200-300 miles or 300-500 km), avoid sudden, hard braking, prolonged braking (e.g., downhill), and heavy loads. This allows the brake components to seat properly and develop their full friction potential.
6. Maintenance
Regular inspection and maintenance of your brake system are vital for safety and performance. Follow your vehicle manufacturer's recommended service intervals.
- Routine Inspection: Inspect brake rotors and pads for wear, cracks, or damage during tire rotations or at least every 12,000 miles (20,000 km) or 12 months.
- Rotor Thickness: Measure rotor thickness with a micrometer. Replace rotors if they fall below the minimum thickness specification (Th min).
- Surface Condition: Check for deep grooves, excessive scoring, or signs of overheating (blue spots). Minor surface imperfections are normal, but significant damage warrants replacement.
- Cleanliness: Keep brake components clean. Dust and debris can accumulate and affect performance.
- Brake Fluid: Check brake fluid level and condition regularly. Replace brake fluid according to your vehicle manufacturer's recommendations.
7. Troubleshooting Common Issues
If you experience any of the following issues, consult a qualified mechanic immediately.
| Symptom | Possible Cause | Action |
|---|
| Brake Noise (Squealing/Grinding) | Worn brake pads, improper pad/rotor break-in, foreign material, caliper issues. | Inspect pads and rotors, re-evaluate break-in, check for debris, inspect calipers. |
| Vibration/Pulsation during Braking | Rotor runout (warping), uneven pad material transfer, loose wheel bearings, suspension issues. | Check rotor runout, ensure proper break-in, inspect wheel bearings and suspension. |
| Reduced Braking Performance | Worn pads/rotors, contaminated brake surfaces, air in brake lines, faulty caliper. | Inspect all brake components, check for leaks, bleed brake system. |
| Excessive Rust on Rotor Surface | Normal surface rust after rain/washing (wears off quickly), or coating damage. | Minor surface rust is normal. If persistent or deep, inspect coating integrity. |
8. Technical Specifications
The following specifications apply to the ROTINGER Brake Disc Rotors, model RT 4505-GL T5:

Figure 5: Technical drawing with key dimensions for RT 4505-GL T5.
| Parameter | Value |
|---|
| Model Number | RT 4505-GL T5 |
| Axle Position | Front Axle |
| Diameter (Diameter) | 296 mm |
| Thickness (Th) | 26 mm |
| Minimum Thickness (Th min) | 23.4 mm |
| Height (Height) | 44 mm |
| Number of Holes | 5 |
| Center Hole Diameter | 68 mm |
| Weight | 7.3 kg (per disc) |
| OEM Part Numbers | 402060002R, 402064408R, 402066813R, 402066949R, 402067023R |
| Certifications | ISO 9001:2008, ISO/TS 16949:2009, ISO 14001:2004, EAC, TUV Rheinland, TecDoc, Laximo |
9. Warranty and Support
ROTINGER products are manufactured to high-quality standards. The RT 4505-GL T5 brake disc rotors come with a 3-year guarantee, ensuring peace of mind regarding product quality and performance.

Figure 6: ROTINGER 3-Year Guarantee.
For any inquiries regarding product compatibility, technical support, or warranty claims, please contact ROTINGER customer service. When contacting support, please have your Vehicle Identification Number (VIN) and product model number (RT 4505-GL T5) readily available.
Note: The warranty covers manufacturing defects and material flaws under normal operating conditions. It does not cover wear and tear, improper installation, or misuse.