Important Safety Information
Please read and understand all instructions before using this product. Keep this manual for future reference.
- Strangulation Hazard: Keep cords out of reach of children. Never place the camera or cords within 3 feet (1 meter) of the crib or playpen. Secure cords to a wall or floor using clips to prevent entanglement.
- Choking Hazard: This product contains small parts. Keep out of reach of children.
- Overheating: Do not cover the monitor or camera with clothing, blankets, or other objects. Ensure proper ventilation.
- Water and Moisture: Do not expose the product to rain or moisture. Do not use near water (e.g., bathtub, sink).
- Power Source: Use only the AC power adapters provided. Using other adapters may damage the device and void the warranty.
- Interference: This product operates on a 2.4 GHz frequency. Keep away from other 2.4 GHz devices (e.g., Wi-Fi routers, microwaves) to avoid interference.
- Temperature: Operate and store the product within the recommended temperature range (0°C to 40°C / 32°F to 104°F).
Package Contents
Verify that all items are present in your package:
- Parent Unit (Monitor)
- Baby Unit (Camera)
- Power Adapter for Parent Unit
- Power Adapter for Baby Unit
- Quick Reference Guide

Image: All components included in the Dragon Touch DT40 baby monitor package, including the monitor, camera, two power adapters, and a quick reference guide.
Product Overview
Parent Unit (Monitor)
The parent unit features a 4.3-inch color LCD screen for clear video monitoring. It includes controls for volume, brightness, menu navigation, two-way audio, and lullaby playback.
Baby Unit (Camera)
The baby unit is equipped with a camera that provides video and audio feedback. It includes infrared LEDs for automatic night vision, a temperature sensor, and a microphone for two-way communication. The camera can be manually adjusted for optimal viewing angles.

Image: The baby unit camera, illustrating its ability for manual rotation of 360 degrees horizontally and 60 degrees vertically for flexible positioning.
Setup
1. Charging the Parent Unit
- Connect the small end of the parent unit power adapter to the DC input port on the side of the parent unit.
- Plug the other end of the adapter into a standard electrical outlet.
- Charge the parent unit for at least 8 hours before first use to ensure optimal battery performance. The battery icon on the screen will indicate charging status.
2. Powering the Baby Unit
- Connect the small end of the baby unit power adapter to the DC input port on the back of the baby unit.
- Plug the other end of the adapter into a standard electrical outlet. The baby unit will power on automatically.
3. Camera Placement
Place the baby unit on a flat surface, such as a dresser or shelf, or mount it on a wall. Ensure it is at least 3 feet (1 meter) away from the baby's crib or playpen. Adjust the camera angle manually to get the best view of your baby.

Image: An illustrative floor plan showing how multiple cameras can be strategically placed in different rooms for comprehensive monitoring.
4. Pairing (If Necessary)
The parent and baby units are pre-paired at the factory. If the connection is lost or you are adding additional cameras, follow these steps:
- On the parent unit, press the Menu button.
- Navigate to the Camera icon and select Add Camera.
- Press the Pair button on the back of the baby unit within 10 seconds.
- The parent unit will display a confirmation message once pairing is successful.
Operating Instructions
Power On/Off
- To power on the parent unit, press and hold the Power button until the screen illuminates.
- To power off, press and hold the Power button until the screen turns off.
- The baby unit powers on automatically when connected to power.
Volume Adjustment
Use the Volume Up (+) and Volume Down (-) buttons on the parent unit to adjust the listening volume.
Brightness Adjustment
Access the menu on the parent unit and navigate to the Brightness setting to adjust the screen's illumination.
Two-Way Audio
Press and hold the Talk button on the parent unit to speak to your baby through the camera's speaker. Release the button to hear your baby again.

Image: A couple in a kitchen, with an inset showing a baby in a room and the monitor displaying the baby, illustrating the two-way talk audio feature.
Lullabies
Press the Lullaby button on the parent unit to play soothing melodies. Press again to cycle through available lullabies or turn them off.
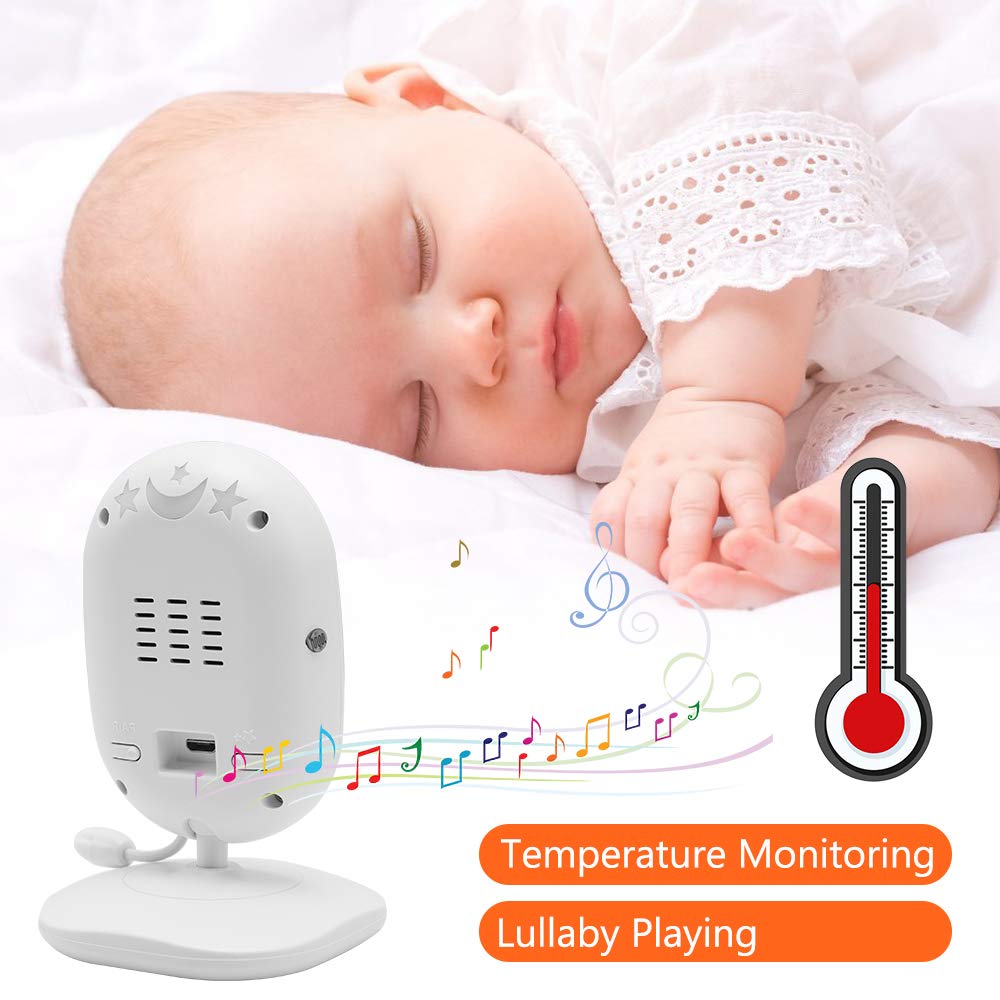
Image: A sleeping baby with the baby unit camera, musical notes, and a thermometer icon, highlighting the lullaby playing and temperature monitoring features.
VOX Mode (Voice Operated Exchange)
VOX mode conserves battery by turning off the screen when no sound is detected from the baby unit. The screen will automatically turn on when sound is detected.
- To activate/deactivate VOX mode, press the VOX button on the parent unit or navigate through the menu.
- You can adjust the VOX sensitivity level in the menu settings.

Image: A split image showing the monitor screen in VOX ON mode (screen off with sleeping baby) and VOX OFF mode (screen on with active baby), demonstrating the voice activation feature.
Night Vision
The baby unit automatically activates infrared night vision in low-light conditions, providing a clear black-and-white image on the parent unit.

Image: A comparison of the monitor display in night vision (black and white, sleeping baby) and day vision (color, sleeping baby), highlighting the automatic night vision capability.
Temperature Monitoring
The baby unit's built-in temperature sensor monitors the room temperature and displays it on the parent unit's screen. You can set temperature alerts in the menu.
Multi-Camera View (If Applicable)
If you have multiple cameras paired, use the Scan button or navigate through the menu to switch between camera views or activate auto-scan mode.
Maintenance
- Cleaning: Use a soft, dry cloth to clean the surfaces of the parent and baby units. Do not use cleaning sprays or liquid cleaners.
- Battery Care: To prolong battery life, fully charge the parent unit before first use. Avoid completely draining the battery frequently. If storing the unit for an extended period, charge it periodically.
- Storage: Store the product in a cool, dry place away from direct sunlight and extreme temperatures.
Troubleshooting
| Problem | Possible Cause | Solution |
|---|---|---|
| No picture/sound on parent unit | Parent unit is off or battery is low. Baby unit is not powered on. Units are out of range. | Ensure parent unit is charged and powered on. Verify baby unit is plugged in and powered. Move parent unit closer to baby unit. |
| Poor picture/sound quality | Interference from other devices. Units are too far apart. Obstructions between units. | Move units away from other 2.4 GHz devices. Reduce distance between units. Remove obstacles like thick walls. |
| Parent unit battery drains quickly | VOX mode is off. Screen brightness is too high. Battery degradation over time. | Activate VOX mode. Reduce screen brightness. Ensure initial full charge. Consider battery replacement if unit is old. |
| Cannot pair camera | Pairing process not followed correctly. | Repeat pairing steps carefully, ensuring the pair button on the camera is pressed within the time limit. |
Specifications
- Model: DT40
- Screen Size: 4.3 Inches
- Connectivity Technology: Wireless (2.4 GHz FHSS)
- Video Capture Resolution: 720p
- Special Features: Night Vision, Two-Way Audio, Temperature Monitoring, Lullabies, VOX Mode
- Power Input: 5 Volts
- Batteries Required: Yes (for Parent Unit)
- Mounting Type: Wall Mount (for Camera)
- Item Weight: Approximately 1.1 pounds
- UPC: 818537028769
Warranty and Support
Dragon Touch products come with a limited warranty. For detailed warranty information, technical support, or customer service inquiries, please refer to the warranty card included in your package or visit the official Dragon Touch website. Please have your model number (DT40) and purchase information ready when contacting support.