Introduction
This manual provides essential instructions for the installation, operation, and maintenance of the Perlick 1008503 Qc Control Replacement Kit 440. This kit is a genuine OEM replacement part designed for specific Perlick equipment, ensuring proper function and compatibility. Please read this manual thoroughly before proceeding with installation or operation.
Safety Information
WARNING: Electrical shock hazard. Always disconnect power to the equipment before installing, servicing, or removing this control kit. Failure to do so can result in serious injury or death.
- Installation should only be performed by a qualified technician.
- Ensure all local and national electrical codes are followed.
- Do not operate the equipment with damaged wiring or components.
- Keep hands and tools clear of moving parts and electrical connections.
Package Contents
Verify that all components are present and undamaged before beginning installation.
- Qc Control Unit (Digital Controller)
- Temperature Sensor Probe
- Wiring Harness with connectors
- Power Adapter/Plug
- Mounting Hardware (if applicable, not explicitly listed but often included)

Figure 1: Overview of the Perlick 1008503 Qc Control Replacement Kit components.
Setup and Installation
This replacement kit is designed for specific Perlick equipment. Refer to your equipment's service manual for detailed, model-specific installation instructions. The following steps are general guidelines.
- Disconnect Power: Ensure the Perlick equipment is completely disconnected from its power source.
- Access Control Area: Locate and open the control panel or access area where the existing Qc control unit is installed.
- Document Existing Connections: Before disconnecting, take clear photos or make detailed diagrams of all wiring connections to the old control unit. Note the position and color of each wire.
- Remove Old Unit: Carefully disconnect all wires and the temperature sensor from the old control unit. Remove any mounting hardware and extract the old unit.
- Install New Unit: Mount the new Perlick 1008503 Qc Control unit in the same location as the old one, using appropriate mounting hardware.
- Connect Wiring: Following your documented connections, carefully attach the wiring harness to the new control unit. Ensure all connections are secure and correctly matched.
- Connect Temperature Sensor: Insert the new temperature sensor probe into its designated location within the equipment. Connect the sensor wiring to the control unit.
- Secure Connections: Double-check all electrical connections for tightness and proper insulation.
- Close Access Panel: Securely close any access panels or control covers.
- Restore Power: Reconnect power to the Perlick equipment.
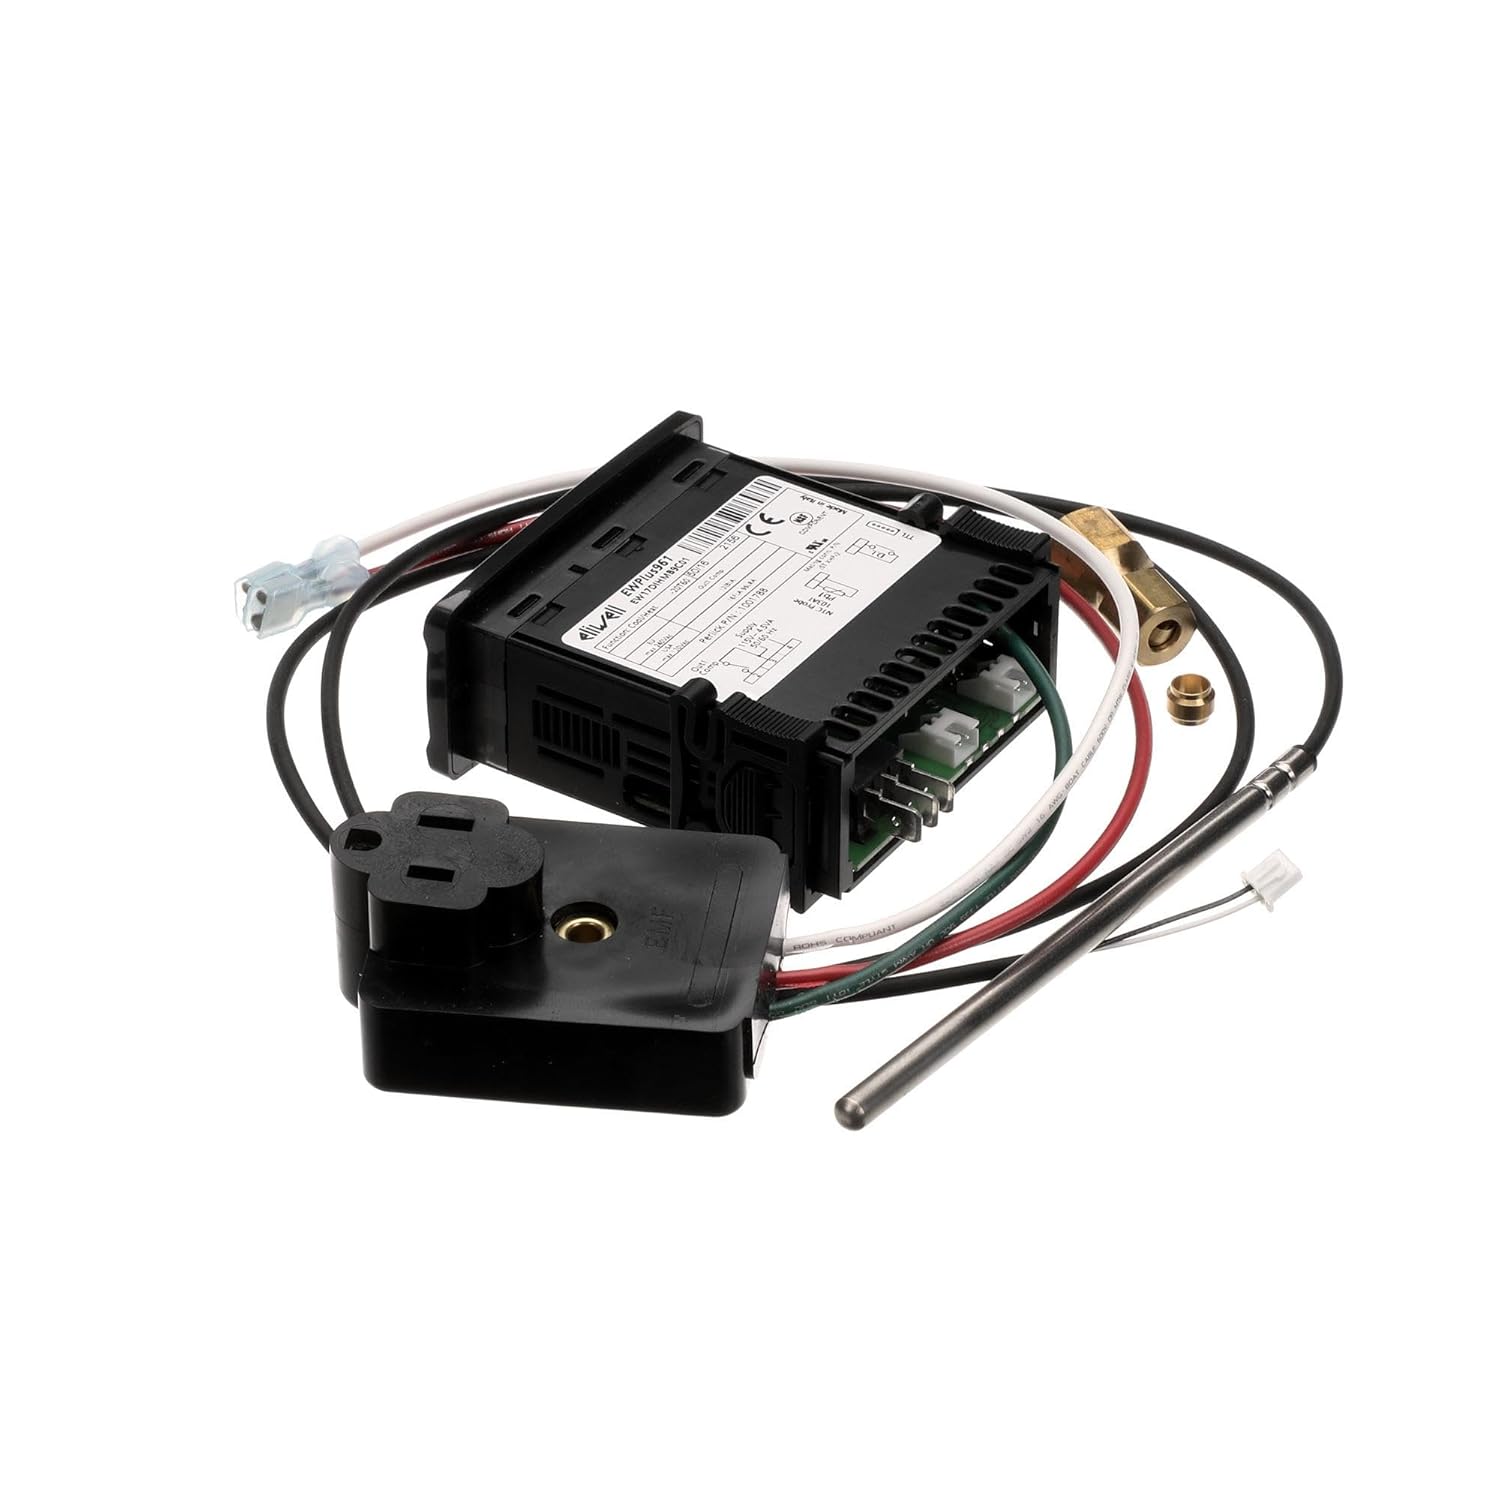
Figure 2: Rear view of the control unit, highlighting wiring terminals.
Operation
The Perlick 1008503 Qc Control is a digital controller designed to monitor and regulate specific parameters within your Perlick equipment, typically temperature. Once installed and powered, the unit will display current readings and allow for parameter adjustments.
Basic Functions:
- Display: The front panel features a digital display showing the current measured value (e.g., temperature).
- Buttons: Typically, there are buttons for adjusting set points, navigating menus, and confirming selections. Common buttons include "SET", "UP", and "DOWN" or similar directional controls.
- Set Point Adjustment: To change the desired operating parameter (e.g., target temperature), press the "SET" button, use the UP/DOWN buttons to adjust the value, and press "SET" again to confirm.
- Indicator Lights: The unit may have indicator lights to show operational status, such as heating/cooling cycles, alarms, or power.
For detailed programming and advanced operational settings, consult the specific user manual for the Perlick equipment in which this control kit is installed, as settings can vary.

Figure 3: Front view of the control unit, showing the display and buttons.
Maintenance
The Perlick 1008503 Qc Control Replacement Kit is designed for reliable operation with minimal maintenance. However, periodic checks can help ensure longevity and proper function.
- Cleaning: Gently wipe the exterior of the control unit with a soft, damp cloth. Do not use abrasive cleaners or solvents. Ensure no liquid enters the unit.
- Wiring Inspection: Periodically inspect all wiring connections for signs of wear, corrosion, or looseness. Ensure all connections remain secure.
- Sensor Check: Verify that the temperature sensor probe is clean and properly positioned within the equipment.
- Environmental Conditions: Ensure the control unit is operating within its specified environmental conditions (temperature, humidity) to prevent damage.
If any issues are observed during maintenance, refer to the Troubleshooting section or contact Perlick customer support.
Troubleshooting
This section addresses common issues you might encounter with the Perlick 1008503 Qc Control. For complex problems, contact a qualified service technician.
| Problem | Possible Cause | Solution |
|---|---|---|
| Unit does not power on. | No power supply; loose wiring connection; faulty unit. | Check power source. Verify all wiring connections are secure. If power is present and connections are good, the unit may be faulty and require replacement. |
| Incorrect temperature reading. | Sensor improperly installed; faulty sensor; wiring issue. | Ensure the sensor is correctly positioned and clean. Check sensor wiring for damage or loose connections. Replace sensor if faulty. |
| Equipment not responding to control settings. | Incorrect set point; wiring issue to controlled component; faulty control unit. | Verify set points are correctly programmed. Check wiring from the control unit to the controlled component (e.g., compressor, fan). If all else fails, the control unit may be faulty. |
| Display shows error code. | Specific system fault. | Refer to the specific Perlick equipment service manual for a list of error codes and their corresponding solutions. |

Figure 4: Side view of the control unit, illustrating wiring entry points.
Specifications
| Feature | Detail |
|---|---|
| Product Type | Food Service Supply Replacement Part |
| Model Number | 1008503 |
| Brand | Perlick |
| Product Dimensions | 8 x 7 x 0.2 inches |
| Product Weight | 11.68 ounces |
| Shipping Package Dimensions | 7.0" L x 9.0" W x 9.0" H |
| Shipping Package Weight | 0.8 lbs |
| Country of Origin | United States |
| First Available | February 25, 2019 |
Warranty and Support
For specific warranty information regarding the Perlick 1008503 Qc Control Replacement Kit 440, please refer to the documentation provided with your original Perlick equipment or contact Perlick customer service directly. As an OEM replacement part, its warranty typically aligns with the original equipment's terms.
For technical support, replacement parts, or service inquiries, please visit the official Perlick website or contact their authorized service providers.