1. Introduction
Thank you for purchasing the Myra TouYinGer X20 LED Projector. This manual provides essential information for setting up, operating, and maintaining your projector. Please read it thoroughly before use to ensure proper operation and to extend the lifespan of your device.
2. Safety Information
- Use the projector in a dark and cool environment for optimal performance and extended product life.
- Avoid using the projector in dusty or humid conditions.
- Do not block the ventilation openings of the projector.
- Do not look directly into the projector lens when the lamp is on.
- This projector is not recommended for office presentations or educational use.
- Ensure the power supply matches the projector's requirements (AC110V~240V 50Hz/60Hz).
3. Package Contents
Carefully unpack the box and ensure all items listed below are present and in good condition. If any items are missing or damaged, please contact customer support.
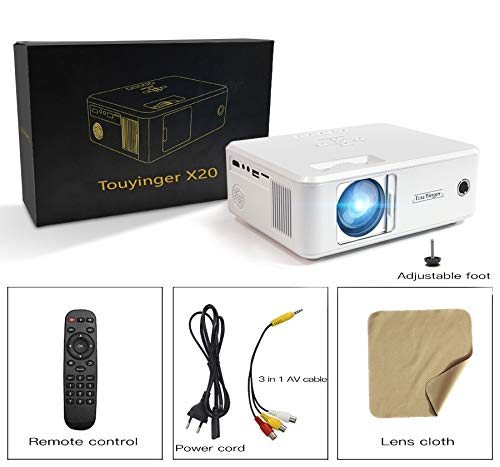
Image: The Myra TouYinGer X20 Projector shown with its packaging box and included accessories: remote control, power cord, 3-in-1 AV cable, and a lens cleaning cloth.
- Myra TouYinGer X20 LED Projector
- Remote Control
- Power Cord
- 3-in-1 AV Cable
- Lens Cleaning Cloth
- User Manual (this document)
4. Product Overview
4.1 Dimensions and Components
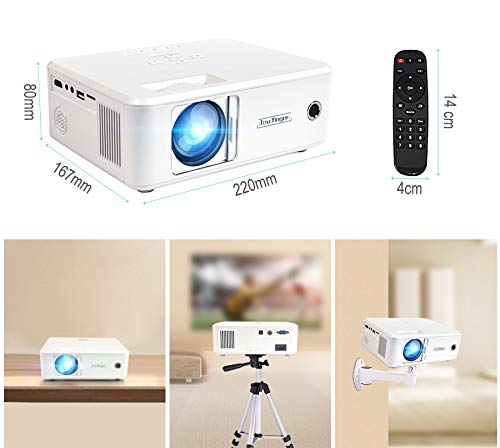
Image: Top view of the Myra TouYinGer X20 Projector showing its dimensions (220mm length, 167mm width, 80mm height). Also shown are the remote control dimensions (14cm length, 4cm width) and examples of projector placement: tabletop, tripod mount, and wall mount.
The projector features a compact design with various ports for connectivity. Key components include the lens, focus ring, keystone correction, input ports (HDMI, USB, VGA, AV, SD card slot), and power input.
4.2 Interfaces
- HDMI: For connecting to devices like laptops, gaming consoles, and Blu-ray players.
- USB: For connecting USB flash drives to play media files. (Note: Supports Pendrive only, not hard disks or phones).
- VGA: For connecting to computers.
- AV: For connecting to older devices using the included 3-in-1 AV cable.
- SD Card Slot: For playing media files directly from an SD card.
- 3.5mm Audio Port: For connecting external speakers or headphones.
5. Setup
5.1 Placement
Position the projector on a stable, flat surface or mount it using a compatible tripod or ceiling mount. Ensure there is adequate ventilation around the projector. The projection distance ranges from 1.2 to 3.8 meters, yielding a screen size of 37 to 130 inches. For best results, use in a dark environment.
5.2 Power Connection
- Connect the power cord to the projector's power input.
- Plug the other end of the power cord into a suitable electrical outlet (AC110V~240V, 50Hz/60Hz).
- The power indicator light on the projector will illuminate.
5.3 Connecting Input Sources
Connect your desired media source (e.g., laptop, USB drive, DVD player) to the corresponding port on the projector.
- HDMI: Connect an HDMI cable from your device to the projector's HDMI port.
- USB/SD: Insert a USB flash drive or SD card into the respective slot.
- VGA: Connect a VGA cable from your computer to the projector's VGA port.
- AV: Use the provided 3-in-1 AV cable to connect to devices with RCA outputs.
5.4 Focus and Keystone Adjustment
- Focus: Rotate the focus ring on the projector lens until the projected image is clear and sharp.
- Keystone Correction: Use the keystone adjustment dial (±12 vertical) to correct trapezoidal distortion if the projector is not perfectly perpendicular to the screen.
6. Operating Instructions
6.1 Power On/Off
- Power On: Press the power button on the projector or the remote control. The LED lamp will turn on.
- Power Off: Press the power button again. Allow the projector to cool down before unplugging it.
6.2 Source Selection
Use the 'Source' button on the remote control or projector to cycle through available input sources (HDMI, USB, VGA, AV, SD).
6.3 Media Playback (USB/SD)
When a USB drive or SD card is inserted, navigate the on-screen menu using the remote control to select the desired media type (Video, Music, Photo, Text) and then browse for your files.
- Supported Audio Formats: MP3, WMA, AAC
- Supported Video Formats: MPEG1, MPEG2, MPEG4, H264, RM, RMVB, MOV, MJPEG, VC1, DIVX, FLV (Note: AC3 audio is not supported).
- Supported Picture Formats: JPEG, BMP, PNG
6.4 3D Functionality
The projector supports Red & Blue 3D format. To view 3D content, you will need compatible Red & Blue 3D glasses (not included).
7. Maintenance
7.1 Lens Cleaning
Use the provided lens cleaning cloth or a soft, lint-free cloth to gently wipe the projector lens. Avoid using abrasive cleaners or excessive force.
7.2 Dust Protection
The projector features an embedded lens cover for better lens and dust protection. Always replace the lens cover when the projector is not in use. Regularly clean the projector's exterior with a soft, dry cloth.
7.3 Lamp Life
The LED lamp has an estimated lifespan of 20,000 hours. Proper ventilation and operating conditions will help maximize lamp life.
8. Troubleshooting
If you encounter issues with your projector, please refer to the following common problems and solutions:
| Problem | Possible Cause | Solution |
|---|---|---|
| No image on screen | Incorrect input source selected; Loose cable connection; Power issue | Select the correct input source; Check all cable connections; Ensure projector is powered on. |
| Image is blurry | Focus not adjusted; Projector too far/close to screen | Adjust the focus ring; Adjust projection distance. |
| Image is trapezoidal | Projector not perpendicular to screen | Adjust keystone correction dial. |
| No sound | Volume too low; Audio format not supported; External speakers not connected | Increase volume; Check if audio format is supported (AC3 not supported); Connect external speakers if needed. |
| USB drive not recognized | Unsupported device; Corrupted files | Ensure it's a USB Pendrive (hard disks/phones not supported); Check file system and integrity. |
9. Specifications
| Feature | Specification |
|---|---|
| Model | X20 |
| Display Technology | TFT-Single LCD Panel + LED Technology |
| Native Resolution | 800 x 600 dpi (Supports 720p, 1080p) |
| Brightness | 2200 Lumens |
| Contrast Ratio | 1500:1 |
| Lamp Type | LED Lamp |
| Lamp Life | 20,000 hours |
| Displayable Colors | 16.7K |
| Lens | F=126 mm (Manual focusing) |
| Keystone Correction | ±12° Vertical (Manual) |
| Projection Screen Size | 37-130 inches |
| Projection Distance | 1.2-3.8 meters |
| Aspect Ratio | 16:9 Native, 4:3 Compatible |
| Multimedia Interface | 1*VGA, 1*USB, 1*SD, 1*HDMI, 1*3.5mm Audio port, 1*AV, 1*TV |
| Power Supply | AC110V~240V 50Hz/60Hz |
| Dimensions | 212mm x 150mm x 78mm |
| Weight | 1.5 kg |
| Special Features | Portable, Red & Blue 3D Support |
10. Warranty and Support
The Myra TouYinGer X20 LED Projector comes with a 1 Year Warranty from the date of purchase.
For warranty claims, technical support, or any inquiries, please contact Myra customer service:
- Phone: 8955589977
- Email: myrakhmshop@gmail.com
Please have your product model (X20) and purchase details ready when contacting support.