1. Introduction
Thank you for purchasing the Fujimi Model 1/700 Ship Next Series No. 3 Japanese Navy Battleship Kii plastic model kit. This kit allows you to construct a detailed replica of the fantastic battleship "Kii," a super Yamato-type battleship designed to push the limits of naval technology. The Ship Next Series is engineered for ease of assembly and realistic detail, featuring color-coded parts and a snap-fit design that eliminates the need for paint or glue.
This manual provides comprehensive instructions to guide you through the assembly process, ensuring a rewarding building experience. Please read all instructions carefully before beginning.
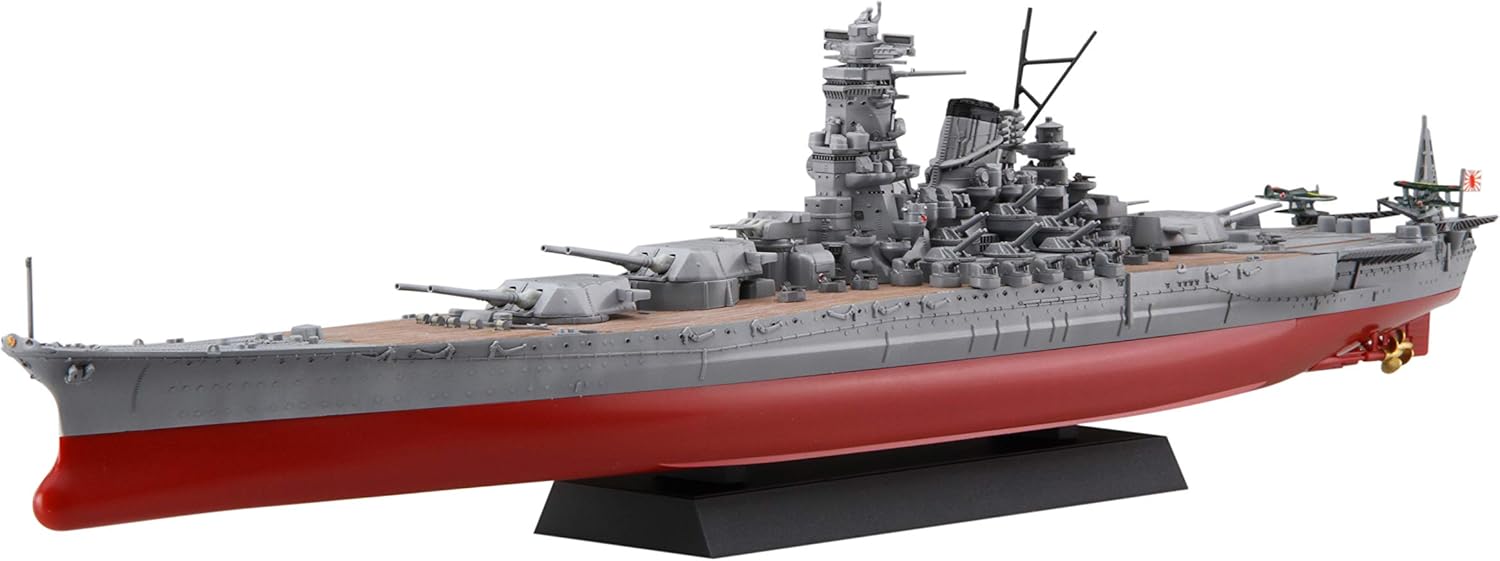
Image 1.1: Fully assembled Fujimi 1/700 Battleship Kii model.
2. Safety Information
This product is a plastic model kit and contains small parts. Please observe the following safety guidelines:
- Recommended Age: This kit is recommended for individuals aged 15 years and above.
- Small Parts: Keep all small parts out of reach of young children to prevent choking hazards.
- Sharp Edges: Exercise caution when detaching parts from the sprues, as some edges may be sharp. Use appropriate tools like hobby nippers.
- Ventilation: While glue is not required, if you choose to use plastic cement for additional reinforcement, ensure adequate ventilation.
- Disposal: Dispose of plastic waste and packaging materials responsibly.
3. Package Contents
Before starting assembly, verify that all components are present. Your kit should include:
- Multiple plastic sprues (color-coded)
- Sticker sheet for fine details
- Instruction Guide (this manual)
- Display stand (renewed design, can be used for part storage during assembly)

Image 3.1: Overview of the color-coded plastic parts included in the kit.

Image 3.2: Sticker sheet for reproducing small details and an example of the assembled model.
4. Assembly Instructions (Setup)
This model utilizes a snap-fit system, requiring no glue for basic assembly. Parts are pre-colored, eliminating the need for painting. However, separate tools such as hobby nippers and tweezers are highly recommended for precise assembly.
4.1. Required Tools
- Hobby Nippers: For cleanly detaching parts from the sprues.
- Tweezers: Essential for handling small parts and applying stickers.
- Hobby Knife (Optional): For trimming excess plastic (nubs) if necessary.
4.2. General Assembly Steps
- Identify Parts: Refer to the instruction guide's part diagram to identify each component.
- Detach Parts: Carefully cut parts from the sprues using hobby nippers. Avoid pulling or twisting, which can damage parts.
- Clean Nubs: Gently trim any remaining plastic nubs from the detached parts using a hobby knife or fine sandpaper for a smooth finish.
- Snap-Fit Assembly: Align the pins and holes of corresponding parts and press them together firmly until they snap into place.
- Apply Stickers: Use tweezers to carefully apply the provided stickers to designated areas for enhanced detail.
4.3. Key Assembly Areas
- Hull Assembly: The hull is designed with a left and right split. Assemble these sections first, ensuring a tight fit. The fender side features reproduced molds for details like the fender window and monkey ladder.
- Main Guns (51cm): The kit includes three 20.1-inch (51 cm) consecutive guns. Assemble these according to the instructions, paying attention to the barrel orientation.

Image 4.1: Detailed view of the main 51cm gun turrets.
- High-Angle Guns (10cm): Assemble the twelve 10 cm long sequential high-angle guns, which significantly increase the model's air fighting power.
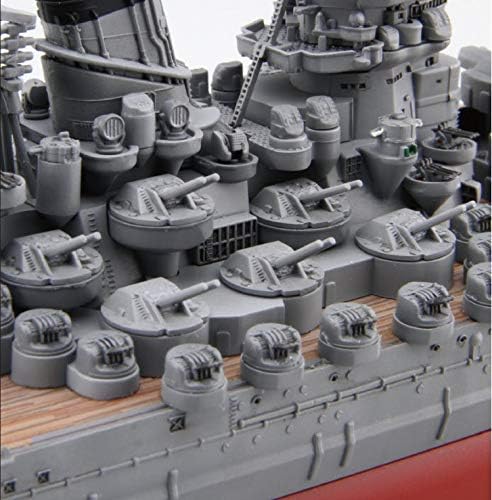
Image 4.2: Close-up of secondary and anti-aircraft gun emplacements.
- Bridge Assembly: The Kanbridge (bridge) utilizes a slide mold, with intricate details engraved on each of its four sides. Assemble this section carefully.
- Display Stand: Assemble the renewed display stand. During assembly, the stand can be inverted and used as a temporary storage tray for small parts.
4.4. Waterline Model Option
The kit allows for the construction of either a full-hull model or a waterline model. If you wish to recreate the waterline model, carefully remove the designated lower hull section as indicated in the detailed diagrams within the printed instruction guide.

Image 4.3: Comparison of full-hull and waterline model options.
5. Operating (Display)
Once assembled, your Fujimi Battleship Kii model is designed for static display. The included display stand provides a stable base for showcasing your completed model. Ensure the model is placed on a flat, stable surface away from direct sunlight, extreme temperatures, and high humidity to preserve its condition.
The display stand can also be used to store small parts during the assembly process by flipping it over, providing a convenient workspace.
6. Maintenance
To maintain the appearance of your model, follow these simple guidelines:
- Cleaning: Dust the model regularly with a soft, dry brush or a microfiber cloth. Avoid using harsh chemicals or abrasive materials, which can damage the plastic.
- Storage: If storing the model for an extended period, place it in a sealed container to protect it from dust and environmental factors.
- Handling: Handle the model by its base or main hull whenever possible to avoid damaging delicate parts.
7. Troubleshooting
While the Ship Next Series is designed for straightforward assembly, you may encounter minor issues. Here are some common troubleshooting tips:
- Parts Not Fitting: Ensure you are using the correct parts as indicated in the instruction guide. Check for any excess plastic (flash) on the connecting pins or holes and carefully trim it with a hobby knife.
- Loose Parts: If a snap-fit connection feels too loose, a very small amount of plastic cement can be applied to the connecting surfaces for a more secure bond. Apply sparingly to avoid damaging the plastic.
- Lost Small Parts: Due to the intricate nature of model kits, small parts can be easily misplaced. Work in a well-lit, organized area and consider placing a cloth or mat on your workspace to prevent parts from bouncing away if dropped.
- Sticker Application Issues: Use fine-tipped tweezers for precise sticker placement. If a sticker does not adhere well, ensure the surface is clean and dry.
8. Specifications
| Feature | Detail |
|---|---|
| Brand | Fujimi |
| Model Number | NX-3 (艦NX-3) |
| Scale | 1/700 |
| Material | Plastic |
| Assembly Type | Snap-fit (no glue required) |
| Paint Type | Pre-colored (no painting required) |
| Assembled Dimensions (L x W x H) | 380mm x 60mm x 77mm (approx. 14.96 x 2.36 x 3.03 inches) |
| Recommended Age | 15 years and up |
| Included Components | Instruction Guide, Display Stand |
| Special Features | Color-coded parts, snap-fit design, renewed display table, made in Japan |
9. Warranty and Support
Specific warranty information for this product is not provided within the available documentation. For any questions regarding missing parts, manufacturing defects, or assembly assistance, please contact Fujimi customer support directly. Refer to the product packaging or the official Fujimi website for the most current contact information.