
DrKea JPD-HA101
DrKea Upper Arm Blood Pressure Monitor
Model: JPD-HA101
Introduction
Thank you for choosing the DrKea Upper Arm Blood Pressure Monitor. This device is designed to provide accurate and reliable blood pressure and pulse rate measurements for adults. Please read this manual thoroughly before using the device to ensure proper operation and to understand all safety precautions.
This manual provides detailed instructions on how to set up, operate, maintain, and troubleshoot your blood pressure monitor. Keep this manual for future reference.
Safety Information
Please observe the following safety precautions to ensure safe and effective use of your blood pressure monitor:
- Consult your physician before using this device if you have any medical conditions or are taking medications.
- Do not use this device on infants, children, or individuals who cannot express their consent.
- Do not use this device for purposes other than measuring blood pressure and pulse rate.
- Avoid taking measurements in a moving vehicle or during physical activity.
- Do not attempt to repair or modify the device yourself. Refer all servicing to qualified personnel.
- Keep the device and cuff away from water and extreme temperatures.
- Dispose of batteries according to local regulations.
Product Overview
Components
The DrKea Blood Pressure Monitor package typically includes:
- Blood Pressure Monitor Unit
- Large Upper Arm Cuff (fits arm size 9"-17")
- Storage Bag
- 4x AAA Batteries

Figure 1: Contents of the DrKea Blood Pressure Monitor package, showing the main unit, large cuff, storage bag, and AAA batteries.
Monitor Display and Buttons
The monitor features a clear LED backlit screen and intuitive buttons for easy operation.

Figure 2: Detailed view of the DrKea Blood Pressure Monitor's LED backlit screen, highlighting key indicators such as Time/Date, Battery level, Systolic blood pressure (SYS), Diastolic blood pressure (DIA), Pulse rate, Blood pressure range indicator, Memory, Arrhythmia reminder, User 1 & 2 indicators, Cuff detection, and Wrong operation alert. The main buttons for Users, Power, and Memory are also shown.
Key display elements include:
- SYS (Systolic Pressure): The top number, indicating the pressure in your arteries when your heart beats.
- DIA (Diastolic Pressure): The bottom number, indicating the pressure in your arteries between beats.
- PUL (Pulse Rate): Your heart rate in beats per minute.
- Blood Pressure Range Indicator: A visual scale (e.g., green, yellow, red) indicating your blood pressure category based on WHO classification.
- Memory Indicator: Shows when readings are stored.
- User Indicators: Displays which user (1 or 2) is currently selected.
- Arrhythmia Reminder: Alerts to irregular heartbeat detection.
- Cuff Detection: Indicates if the cuff is correctly applied.
- Battery Level: Shows remaining battery power.
The monitor features three main buttons:
- Users Button: To switch between User 1 and User 2.
- Power Button (Start/Stop): To turn the device on/off and start/stop a measurement.
- Memory Button: To review stored measurements.
Setup
1. Install Batteries
- Open the battery compartment cover on the back of the monitor.
- Insert the 4 AAA batteries provided, ensuring the correct polarity (+/-) as indicated inside the compartment.
- Close the battery compartment cover securely.
2. Connect the Cuff
- Locate the air tube connector on the side of the monitor unit.
- Firmly insert the air tube plug from the cuff into the connector port until it clicks into place.
Operating Instructions
1. Prepare for Measurement
- Sit comfortably with your back supported and feet flat on the floor.
- Rest your arm on a table so that the cuff is at heart level.
- Relax for 5 minutes before taking a measurement. Avoid talking or moving during the measurement.
2. Apply the Cuff
Proper cuff placement is crucial for accurate readings.

Figure 3: Demonstrates the comfortable and large cuff, designed to fit upper arm sizes from 9" to 17", ensuring a snug fit with small inflation to reduce discomfort.
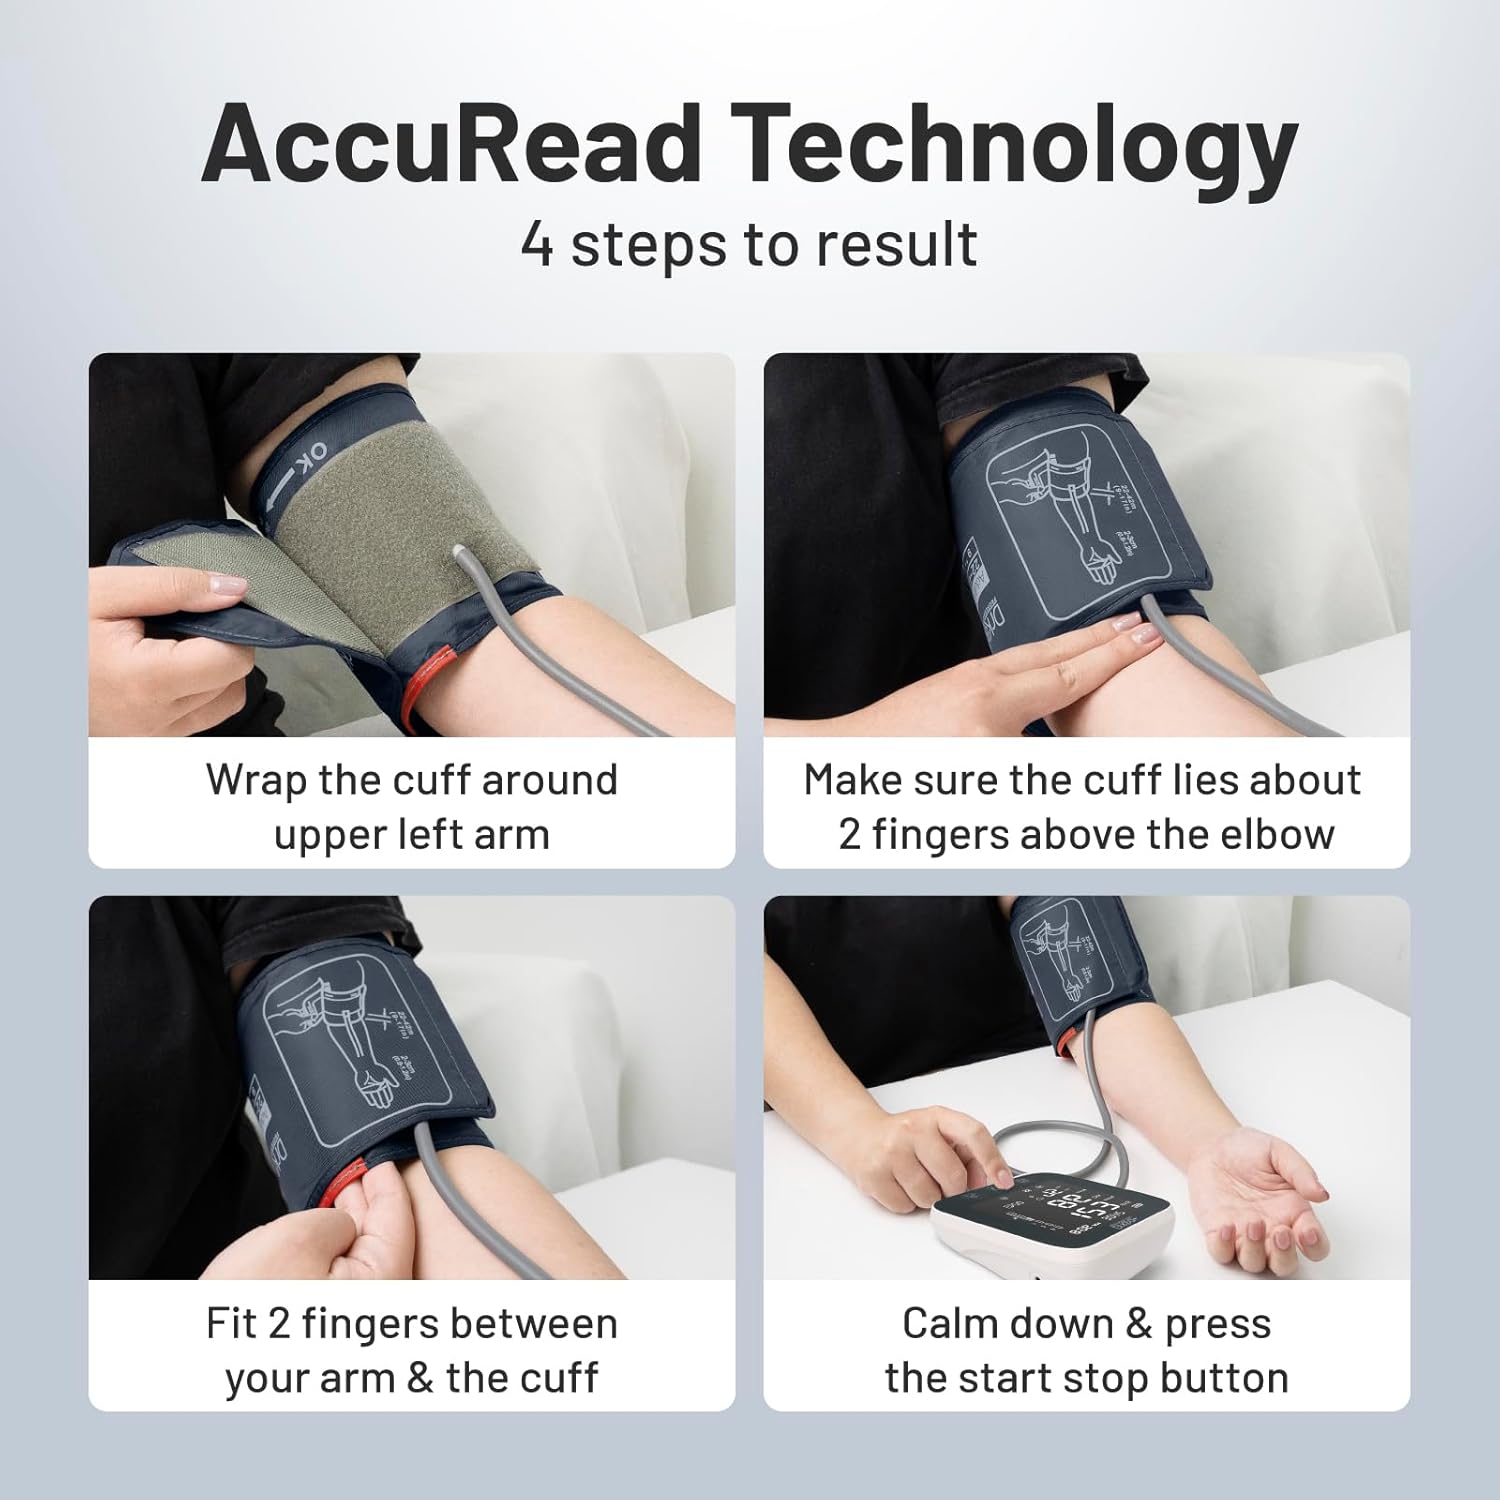
Figure 4: AccuRead Technology: A four-step visual guide for proper cuff application. 1. Wrap the cuff around the upper left arm. 2. Make sure the cuff lies about 2 fingers above the elbow. 3. Fit 2 fingers between your arm and the cuff. 4. Calm down & press the start/stop button.
- Wrap the cuff around your bare upper left arm, approximately 2 cm (0.8 inches) above the elbow joint.
- Ensure the air tube runs down the center of your arm in line with your middle finger.
- The cuff should be snug but not too tight; you should be able to insert two fingers between the cuff and your arm.
3. Take a Measurement
- Press the 'Users' button to select User 1 or User 2.
- Press the 'Power' (Start/Stop) button. The cuff will automatically inflate.
- Remain still and silent during the measurement.
- Once the measurement is complete, the cuff will deflate, and your Systolic, Diastolic, and Pulse readings will be displayed on the screen.
4. Understanding Your Results
The monitor displays your Systolic (SYS), Diastolic (DIA) blood pressure, and Pulse (PUL) rate. It also provides a color-coded indicator based on WHO (World Health Organization) classification for easy interpretation.

Figure 5: WHO classification indicators: Red for Severe/High hypertension, Yellow for Mild hypertension, and Green for High-normal/Normal/Optimal blood pressure.
5. Dual User Mode and Memory Function
The device supports two users, each with 99 memory sets, allowing for individual tracking of blood pressure trends.

Figure 6: The monitor supports two users, each with 99 memory sets, enabling easy switching between users with a single click.
To review past measurements:
- Ensure the monitor is off.
- Press the 'Memory' button. The most recent reading will be displayed.
- Press the 'Memory' button repeatedly to scroll through older readings.
Maintenance
Cleaning
- Wipe the monitor and cuff with a soft, dry cloth.
- If necessary, use a cloth lightly dampened with water or a mild detergent. Do not use abrasive cleaners or immerse the device in water.
Storage
- Store the device and cuff in the provided storage bag when not in use.
- Keep the device in a cool, dry place, away from direct sunlight and extreme temperatures.
- If the device will not be used for an extended period, remove the batteries to prevent leakage.

Figure 7: The compact and portable size of the DrKea monitor, with screen dimensions of 3.1" (7.8cm) x 3.7" (9.3cm) and overall dimensions of 4.5" (11.5cm) x 5.3" (13.5cm), making it perfect for traveling and easy memory setting.
Troubleshooting
If you encounter issues with your DrKea Blood Pressure Monitor, refer to the following common problems and solutions:
| Problem | Possible Cause | Solution |
|---|---|---|
| No display when powered on | Batteries are dead or incorrectly inserted. | Replace batteries with new ones, ensuring correct polarity. |
| Error message (e.g., 'E-1', 'E-2') | Cuff not applied correctly, movement during measurement, or air leakage. | Reapply the cuff correctly. Remain still and silent. Check cuff connection. Try again. |
| Inaccurate readings | Improper cuff placement, talking/moving during measurement, or incorrect body position. | Ensure proper cuff placement and body position. Avoid movement and talking during measurement. Take multiple readings. |
| Cuff does not inflate or inflates too little | Air tube disconnected or kinked, or cuff leakage. | Check that the air tube is securely connected and not kinked. Inspect cuff for damage. |
If the problem persists after trying these solutions, please contact DrKea customer support.
Specifications
| Feature | Specification |
|---|---|
| Model Number | DrKea - JPD-HA101 |
| Brand | DrKea |
| Power Source | Battery (4x AAA batteries required) |
| Product Dimensions | 16.51 x 13 x 8.99 cm; 260 g |
| Cuff Size | Large Cuff (fits arm size 9"-17" / 22-42 cm) |
| Memory Capacity | 2 users, 99 sets of memory each |
| Display | LED Backlit Screen |
| Age Range (Description) | Adult |
| UPC | 810019220029, 810019229732 |
| First Available Date | November 27, 2020 |
Warranty and Support
For information regarding warranty coverage and customer support, please refer to the warranty card included with your product or visit the official DrKea website. If you have any questions or require assistance, do not hesitate to contact DrKea customer service.
Please retain your purchase receipt as proof of purchase for warranty claims.
Ask a question about this manual
Ask about setup, troubleshooting, compatibility, parts, safety, or missing instructions. Manuals+ will review the question and use this page’s manual context to help answer it.