
1. Introduction
This manual provides essential information for the safe and correct assembly, operation, and maintenance of your Venture All Stars DUO Lite Baby Playpen. Please read these instructions thoroughly before use and retain them for future reference. The Venture All Stars DUO Lite Playpen is designed to provide a secure and engaging play area for toddlers, featuring a spacious design, an interactive activity panel, and easy assembly.
2. Safety Information
Your child's safety is paramount. This playpen complies with safety standard BS EN 12227:2010. Always adhere to the following safety guidelines:
- Never leave your child unattended in the playpen. Constant supervision is required.
- Ensure all panels are securely connected and the door panel is locked before placing your child inside.
- Do not use the playpen if any part is broken, torn, or missing.
- The maximum weight capacity for this playpen is 50 pounds (approximately 22.7 kg).
- Do not place the playpen near open flames, heaters, or other heat sources.
- Keep small objects that could pose a choking hazard out of the playpen.
- Only use accessories and replacement parts approved by Venture.
- Regularly inspect the playpen for any signs of wear or damage.
3. Package Contents
Please verify that all components are present before beginning assembly:
- High-density polyethylene (HDPE) playpen panels (various sizes, including a door panel and an activity panel).
- EVA play mats (interlocking pieces).
- Instruction Manual.
Note: Plastic play balls are mentioned in the composition but are not included with the playpen.
4. Setup and Assembly
The Venture All Stars DUO Lite Playpen features click-together panels for easy assembly without the need for tools.
- Unpack Components: Carefully remove all panels and mats from the packaging.
- Arrange Panels: Lay out the playpen panels in your desired configuration. The playpen is expandable, allowing for various shapes and sizes. Ensure the door panel and activity panel are placed in accessible positions.
- Connect Panels: Align the connectors on the sides of two panels. Push them together firmly until you hear a 'click', indicating a secure connection. Repeat this process for all panels to form the perimeter of the playpen.
- Install Door Panel: Ensure the door panel is securely connected to adjacent panels. Test the locking mechanism to confirm it functions correctly.
- Place Activity Panel: Connect the activity panel in the same manner as other panels.
- Lay Play Mats: Once the playpen structure is complete, interlock the EVA play mats and place them inside the playpen to create a soft, cushioned floor.
- Final Check: Before use, thoroughly check all connections to ensure they are secure and stable. The playpen should be firm and not wobble.

Image 1: The fully assembled Venture All Stars DUO Lite Baby Playpen, showcasing its pink and white panels, activity panel, and interlocking floor mats.

Image 2: Detail of the playpen's gate, featuring the 'DUO' logo and a secure locking mechanism, ensuring child safety.
5. Operating Instructions
Using your Venture All Stars DUO Lite Playpen is straightforward:
- Door Operation: To open the door, disengage the lock mechanism. To close, swing the door shut and ensure the lock clicks into place. Always verify the door is securely locked when your child is inside.
- Activity Panel: The integrated activity panel offers interactive elements designed to engage and entertain your child. Encourage exploration of the shapes, colors, and movable parts.
- Expanding the Playpen: Additional Venture playpen panels (sold separately) can be added to increase the play area. Simply connect them using the same click-together method described in the assembly section.
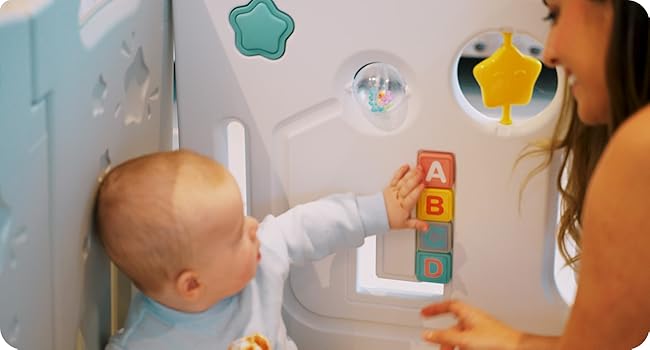
Image 3: A detailed view of the interactive activity panel, featuring a star, moon, and sliding blocks for child engagement.

Image 4: A child reaching for the interactive elements on the activity panel, demonstrating its use.
6. Maintenance
Maintaining the cleanliness of your playpen is simple:
- Cleaning Panels: Wipe down the plastic panels with a damp cloth and mild soap. Rinse thoroughly with a clean, damp cloth to remove any soap residue.
- Cleaning Mats: The EVA play mats can be wiped clean with a damp cloth and mild soap. Allow them to air dry completely before reassembling.
- Avoid Harsh Chemicals: Do not use abrasive cleaners, bleach, or strong detergents, as these can damage the materials or pose a risk to your child.
- Storage: When not in use, the playpen can be disassembled for compact storage. Store in a clean, dry place away from direct sunlight.

Image 5: A close-up view of the interlocking EVA play mats, providing a soft and easy-to-clean surface for the playpen.
7. Troubleshooting
If you encounter any issues with your playpen, please refer to the following common solutions:
- Playpen is unstable/wobbly: Ensure all panels are fully clicked into place. Disassemble and reassemble any loose connections. Verify the playpen is on a flat, even surface.
- Door not locking: Check for any obstructions preventing the door from closing completely. Ensure the locking mechanism is aligned and engaged properly.
- Panels not connecting: Ensure the connectors are aligned correctly. Apply firm, even pressure until a click is heard. If a panel is damaged, do not force it.
8. Specifications
| Model Number | V356 |
| Dimensions (L x W x H) | 114 x 114 x 63 cm (44.9 x 44.9 x 24.8 inches) |
| Weight | 12.9 kg (28.4 lbs) |
| Maximum Supported Weight | 50 lbs (22.7 kg) |
| Materials | High-density polyethylene (HDPE) panels, EVA mats |
| Color | Pink/White |
| Floor Surface Area | 24.9 square feet |
| Age Range (Description) | Toddler |
| Safety Standard | BS EN 12227:2010 |
9. Warranty and Support
For information regarding product warranty, returns, or customer support, please refer to the documentation provided at the time of purchase or contact Venture directly through their official website or customer service channels. Please have your model number (V356) and purchase details ready when contacting support.


