XENOCAM A6708NH
XENOCAM 8CH 1080N Hybrid 5-in-1 AHD DVR User Manual
Model: A6708NH
1. Introduction
This manual provides comprehensive instructions for the installation, configuration, and operation of your XENOCAM 8-channel 1080N Hybrid 5-in-1 AHD Digital Video Recorder (DVR). This DVR supports multiple video input formats including Analog, AHD, HD-TVI, CVI, and IP (NVR) cameras, offering versatile surveillance solutions. Please read this manual thoroughly before operating the device to ensure proper usage and optimal performance.
2. Safety Information
- Ensure the power supply voltage matches the DVR's requirements.
- Do not expose the DVR to moisture, rain, or extreme temperatures.
- Avoid placing the DVR in direct sunlight or near heat sources.
- Do not open the DVR casing; refer all servicing to qualified personnel.
- Install the DVR in a well-ventilated area to prevent overheating.
3. Package Contents
Verify that all items are present in the package:
- XENOCAM 8CH 1080N Hybrid 5-in-1 AHD DVR Unit
- Power Adapter
- USB Mouse
- Screws for Hard Drive Installation
- User Manual (Quick Start Guide)
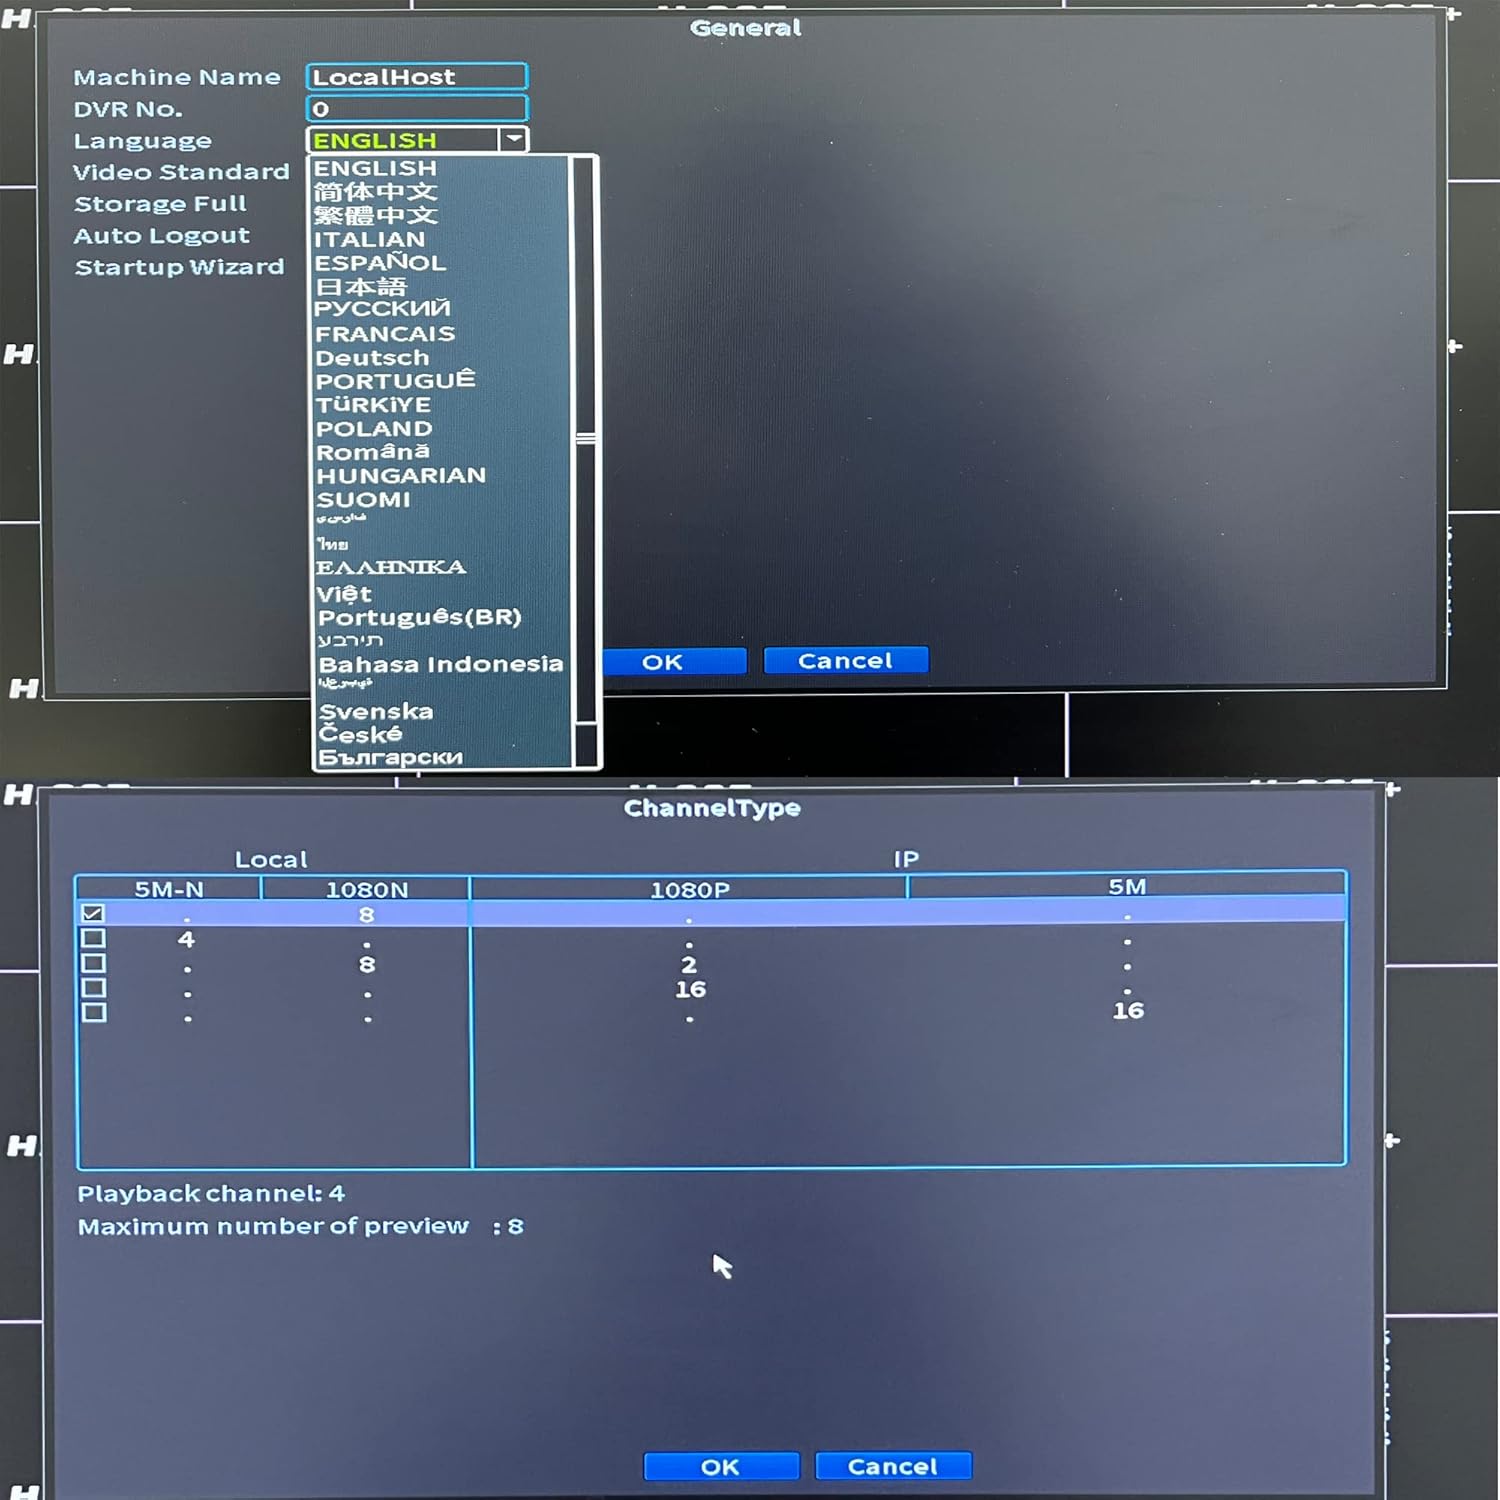
Figure 3.1: Included accessories for the XENOCAM DVR system.
4. Product Overview
4.1 Front and Rear Panels
Familiarize yourself with the ports and indicators on the DVR unit.

Figure 4.1: Front and Rear Panels of the DVR.
- Front Panel: Power indicator, HDD activity indicator, Alarm indicator, IR receiver, Navigation buttons (ESC, Enter, Menu).
- Rear Panel:
- VIDEO IN (1-8): BNC connectors for analog, AHD, HD-TVI, CVI camera inputs.
- AUDIO IN/OUT: RCA connectors for audio input and output.
- HD-port (HDMI): Video output to monitor/TV.
- VGA: Video output to monitor/TV.
- USB: Ports for mouse, USB backup devices.
- NET (RJ45): Ethernet port for network connection.
- DC 12V: Power input.
4.2 Product Dimensions
The physical dimensions of the DVR unit are important for installation planning.

Figure 4.2: DVR Dimensions (Length: 9.96 in, Width: 9.37 in, Height: 1.65 in).
5. Setup
5.1 Hard Drive Installation (HDD not included)
A hard drive is required for recording video footage. Ensure the DVR is powered off before installation.
- Unscrew and remove the top cover of the DVR.
- Connect the SATA power and data cables from the DVR to the hard drive.
- Secure the hard drive to the DVR chassis using the provided screws.
- Replace the top cover and secure it with screws.
5.2 Camera and Monitor Connection
Connect your cameras and a monitor to the DVR as illustrated below.
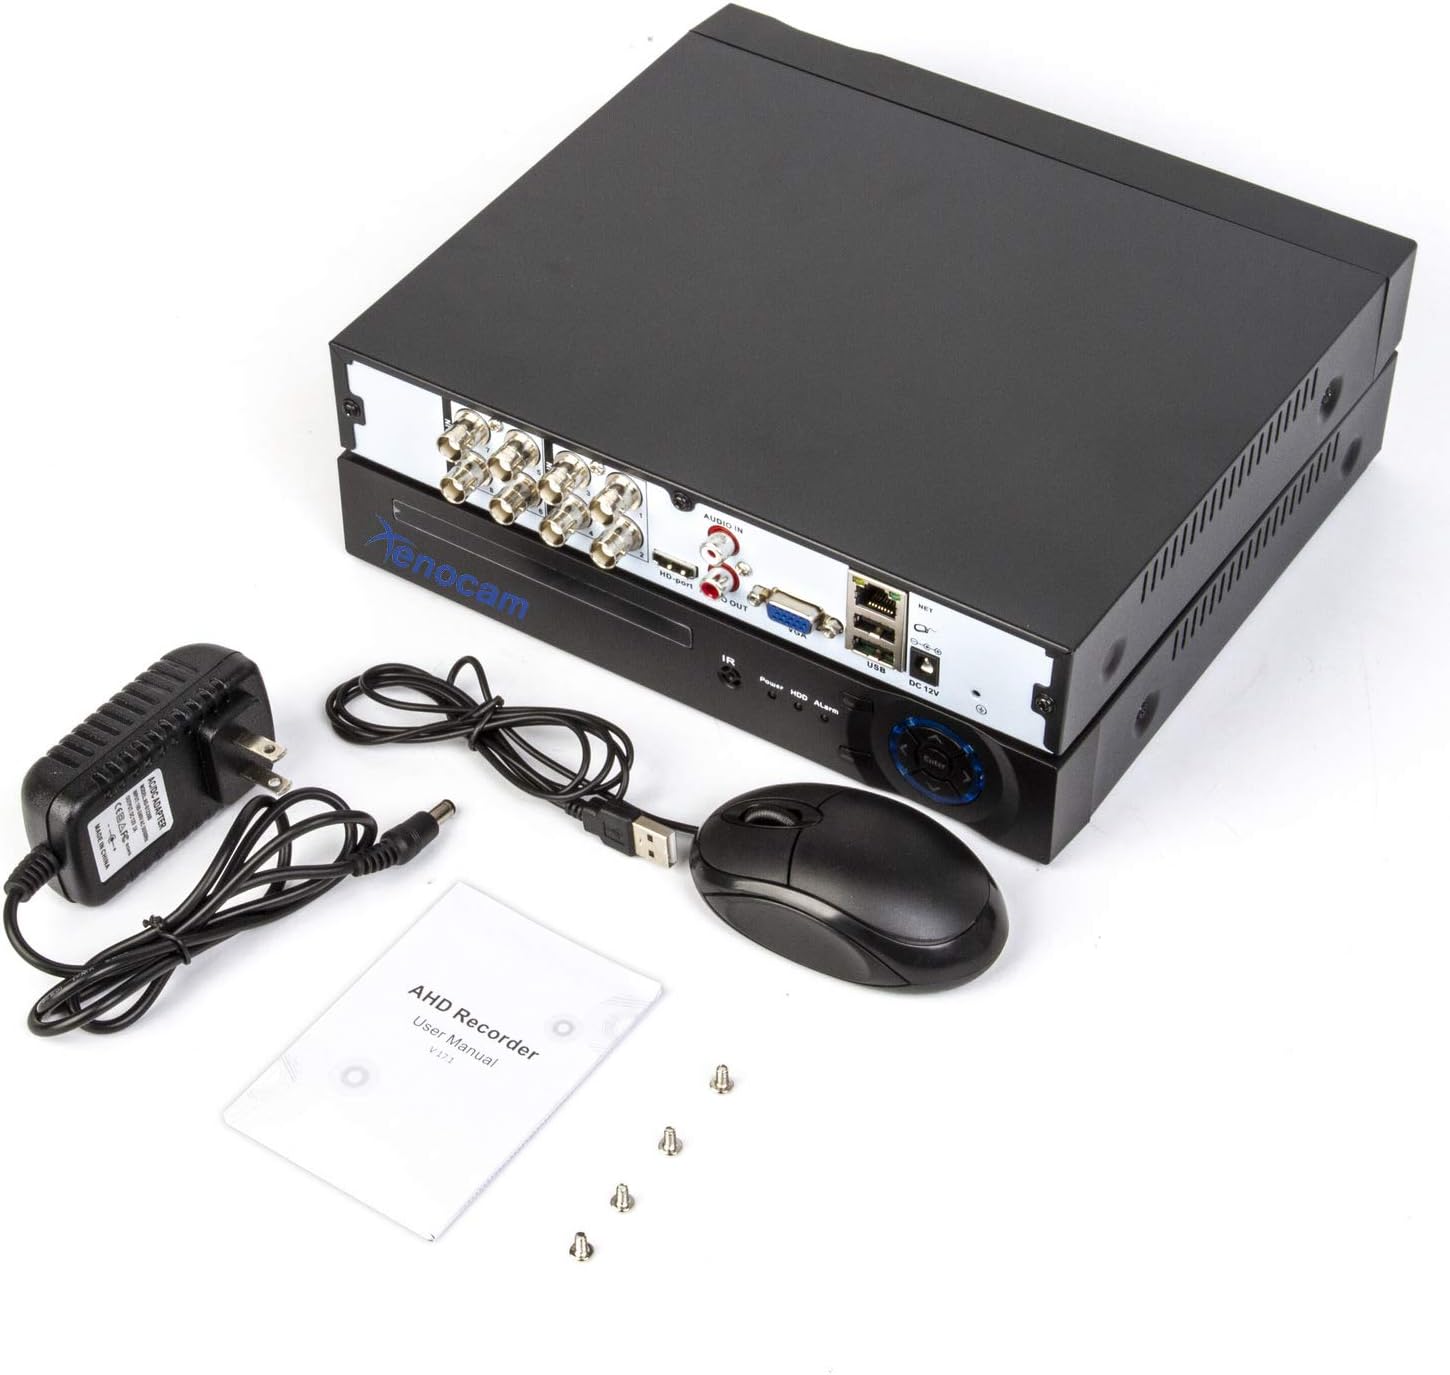
Figure 5.1: System Connection Diagram.
- Connect BNC cables from your cameras to the "VIDEO IN" ports (1-8) on the DVR.
- Connect a monitor or TV to the DVR using either the HDMI or VGA port.
- Connect the USB mouse to a USB port on the DVR.
- For remote viewing, connect an Ethernet cable from the DVR's "NET" port to your router.
- Connect the power adapter to the "DC 12V" input and then to a power outlet.
5.3 Initial Power-Up and Configuration
Upon first power-up, the DVR will guide you through an initial setup wizard.
- Power on the DVR.
- Follow the on-screen prompts to set the language, date/time, and network settings.
- If a new hard drive is installed, the system may prompt you to format it. Confirm to proceed.
- Configure the channel type to match your connected cameras (Analog, AHD, TVI, CVI, IP).

Figure 5.2: Language and Channel Type Configuration Interface.
Note: To enable IP cameras (NVR mode), you may need to select a hybrid channel type that supports IP inputs. Refer to the on-screen options for specific configurations like "IP" or "Hybrid" modes.
6. Operating Instructions
6.1 User Interface Navigation
Use the connected USB mouse to navigate the DVR's graphical user interface (GUI).

Figure 6.1: Main Menu Interface.
- Right-click: Access the main menu or return to the previous screen.
- Left-click: Select options or confirm actions.
- Main Menu: Provides access to system settings, recording, playback, network, and advanced features.
6.2 Live View
After successful camera connection, the live view will display video feeds from all active channels. You can switch between single-channel view and multi-channel grid views.
6.3 Recording Configuration
Access "Record Conf" from the main menu to set up recording schedules and motion detection.

Figure 6.2: System Menu Interface.
- Schedule Recording: Set continuous recording or specific time periods for each channel.
- Motion Detection: Enable motion-triggered recording for selected channels. Configure sensitivity and detection areas. This feature can significantly extend recording times.
- Alarm: Configure alarm actions such as email notifications or mobile push alerts upon motion detection.
6.4 Playback
Select "PlayBack" from the main menu to review recorded footage.
- Choose the date and time range for playback.
- Select the desired channels to view.
- Use the playback controls (play, pause, fast forward, rewind) to navigate through the footage.
6.5 Remote Access (Xmeye App)
The Xmeye app allows live viewing and playback on smartphone devices via Wi-Fi, 2G, 3G, or 4G networks.
- Download the "Xmeye" app from your smartphone's app store.
- Register an account or log in.
- Add your DVR device by scanning the QR code (usually found in the DVR's network settings) or manually entering the device ID.
- Ensure your DVR is connected to the internet via the Ethernet port.
6.6 Backup
To back up video footage, connect a USB flash drive to one of the DVR's USB ports. Navigate to the "Backup" option in the main menu to select footage and initiate the transfer.
7. Maintenance
- Hard Drive Management: Regularly check the hard drive status in the system settings. Format the hard drive periodically if needed, ensuring important footage is backed up first.
- Cleaning: Keep the DVR unit clean and free from dust. Use a soft, dry cloth. Do not use liquid cleaners.
- Firmware Updates: Periodically check the XENOCAM official website for available firmware updates. Follow the provided instructions carefully for any updates.
8. Troubleshooting
| Problem | Possible Cause | Solution |
|---|---|---|
| No video display on monitor. | Loose video cable, incorrect monitor input, DVR not powered on. | Check HDMI/VGA cable connections. Ensure monitor is on correct input. Verify DVR power. |
| No camera image. | Camera power issue, faulty cable, incorrect channel type setting. | Check camera power supply. Inspect BNC cables. Verify DVR channel type matches camera type. |
| Cannot access DVR remotely. | No network connection, incorrect app settings, firewall issues. | Ensure DVR is connected to router. Check network settings on DVR and app. Verify router firewall settings. |
| DVR not recording. | No hard drive, hard drive full/faulty, recording schedule not set. | Install/check HDD. Format HDD if necessary (backup data first). Configure recording schedule. |
9. Specifications
- Model: A6708NH
- Video Input: 8 Channels (Analog, AHD, HD-TVI, CVI, 1080P NVR)
- Video Resolution: 1080N (1080P Lite), 960H, 720P, 1080P (IP)
- Video Output: HDMI, VGA
- Audio Input/Output: RCA
- Hard Disk Support: Up to 6 TB (HDD not included)
- Connectivity: Ethernet (RJ45), USB, Wi-Fi (via USB Wi-Fi adapter, if supported)
- Remote Access: Xmeye App (iOS/Android)
- Power Supply: DC 12V
- Product Dimensions: 9.96"L x 9.37"W x 1.65"H (25.3 cm x 23.8 cm x 4.2 cm)
- Item Weight: 2.53 pounds (1.15 kg)
10. Warranty and Support
XENOCAM products typically come with a limited warranty. For specific warranty terms, technical support, or service inquiries, please refer to the warranty card included with your product or visit the official XENOCAM website. Keep your purchase receipt as proof of purchase.
For further assistance, you may contact XENOCAM customer support through their official channels.
Ask a question about this manual
Ask about setup, troubleshooting, compatibility, parts, safety, or missing instructions. Manuals+ will review the question and use this page’s manual context to help answer it.