1. Introduction
This manual provides instructions for the proper installation and care of the Panasonic Strada CN-R300WD Digital Terrestrial Film Antenna and 3M Double-Sided Tape Set. This product is designed to replace existing film antennas for car navigation systems, ensuring optimal reception of terrestrial digital broadcasts.
2. Safety Information
- Ensure the vehicle's ignition is off and the battery is disconnected before installation to prevent electrical hazards.
- Handle the film antennas carefully to avoid creasing or damaging the conductive elements.
- Use appropriate tools and wear protective gloves if necessary.
- Keep small parts out of reach of children.
- Do not obstruct the driver's view or interfere with airbag deployment when installing the antenna.
3. Package Contents
Verify that all items are present in the package:
- Genuine Panasonic Digital Terrestrial Film Antennas (2 for left side, 2 for right side, total 4 pieces)
- 3M Ultra-Strong Acrylic Foam Double-Sided Tapes (4 pieces, pre-cut to dedicated shapes)
Note: Antenna connection cables are not included in this set and must be purchased separately if needed.
4. Installation Guide
Follow these steps for proper installation of the film antennas and double-sided tape. It is recommended to perform installation in a clean, dry environment.
4.1 Preparation
- Clean the Installation Surface: Thoroughly clean the inner surface of the windshield where the antennas will be applied. Use an alcohol-based cleaner to remove any dirt, grease, or residue. Allow the surface to dry completely.
- Identify Antenna Positions: Refer to your car navigation system's manual for the exact placement of the left (B) and right (A) film antennas on the windshield. Ensure they do not obstruct your view or interfere with other vehicle components.
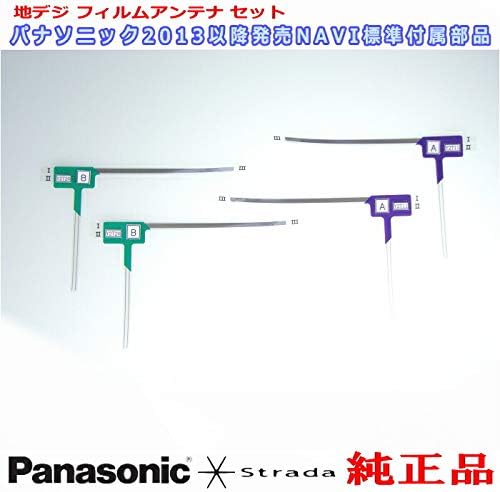
Image 1: Overview of the Panasonic Strada digital terrestrial film antennas. Note the 'A' and 'B' markings indicating left and right side placement.
4.2 Applying the Double-Sided Tape
- Attach Tape to Antenna: Carefully peel one side of the protective backing from a 3M double-sided tape piece. Align and firmly press it onto the designated area on the back of a film antenna element. Ensure there are no air bubbles.
- Repeat for all Antennas: Apply the remaining three double-sided tape pieces to the other three film antenna elements.
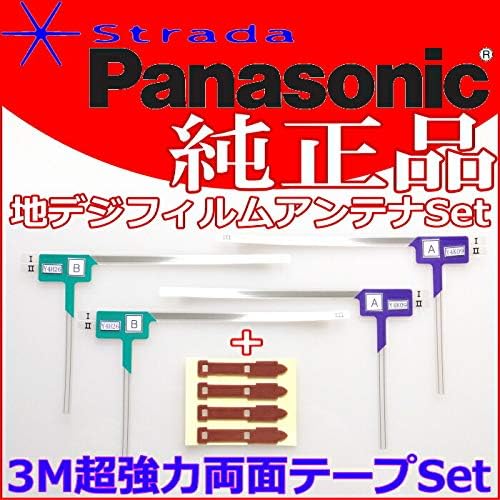
Image 2: The film antenna elements shown alongside the pre-cut 3M double-sided adhesive tapes.
4.3 Installing Antennas on Windshield
- Position Antenna: Peel off the remaining protective backing from one antenna's double-sided tape. Carefully align the antenna with its intended position on the windshield.
- Apply Firmly: Once aligned, press the antenna firmly onto the glass, working from one end to the other to avoid trapping air bubbles. Apply even pressure across the entire adhesive area.
- Connect Cables (Sold Separately): After all film antennas are securely attached, connect the corresponding antenna cables (not included) to the terminals on each film antenna. Route the cables neatly to the car navigation unit.

Image 3: The complete kit, including the film antennas, 3M tapes, and a Japanese instruction sheet illustrating antenna placement and connection.
5. Operating Considerations
While these are passive components, proper installation is key to their "operation":
- Signal Reception: Ensure the antenna elements are fully adhered to the glass and free from obstructions for optimal signal reception.
- Cable Connection: Verify that all antenna cables (sold separately) are securely connected to both the film antennas and the car navigation unit. Loose connections can lead to poor signal quality.
- Testing: After installation, turn on your car navigation system and test the terrestrial digital broadcast reception in various locations to confirm proper functionality.
6. Maintenance
The film antennas require minimal maintenance:
- Cleaning: If the antenna surface on the windshield becomes dirty, gently wipe it with a soft, damp cloth. Avoid abrasive cleaners or harsh chemicals that could damage the film.
- Inspection: Periodically inspect the antennas for any signs of peeling or damage. If an antenna begins to peel, re-adhere it carefully or replace it if necessary to maintain signal integrity.
7. Troubleshooting
| Problem | Possible Cause | Solution |
|---|---|---|
| Poor or no digital TV reception |
|
|
| Antenna peeling off windshield |
|
|
8. Specifications
- Product Type: Digital Terrestrial Film Antenna Set
- Brand: Panasonic
- Compatible Model: Strada CN-R300WD (and other compatible Panasonic Strada models)
- Antenna Type: Film Antenna (4 pieces: 2 left, 2 right)
- Adhesive: 3M Acrylic Foam Double-Sided Tape (4 pieces)
- Manufacturer Reference: PD32TSet(512(T04--R300WD
9. Warranty and Support
For warranty information and technical support, please refer to the documentation provided with your Panasonic car navigation system or contact Panasonic customer service directly. This antenna and tape set is designed as a replacement part and typically follows the warranty terms of the primary navigation unit or is covered by a limited replacement warranty for manufacturing defects.
For further assistance, please visit the official Panasonic support website or consult an authorized service center.