1. Introduction
The WAVLINK-AC1200 WN575A3 is a versatile networking device designed to enhance your wireless network coverage and performance. It functions as a WiFi Range Extender (Repeater), Wireless Access Point (AP), and Wireless Router, offering flexible solutions for various networking needs. With dual-band technology (2.4GHz and 5GHz) and a combined speed of up to 1200Mbps, it provides a stable and high-speed internet connection for your devices.
2. Product Overview
2.1 Key Features
- Dual-Band AC1200: Simultaneous 2.4GHz (300Mbps) and 5GHz (867Mbps) for a total of 1200Mbps Wi-Fi speed.
- 3-in-1 Functionality: Supports Repeater, Access Point, and Router modes to meet diverse networking requirements.
- High Power Design: Equipped with four external antennas for extended Wi-Fi coverage and improved signal penetration.
- Easy Setup: Simple configuration via web browser or WPS button.
- Ethernet Ports: Includes two 10/100Mbps Ethernet ports for wired connections.
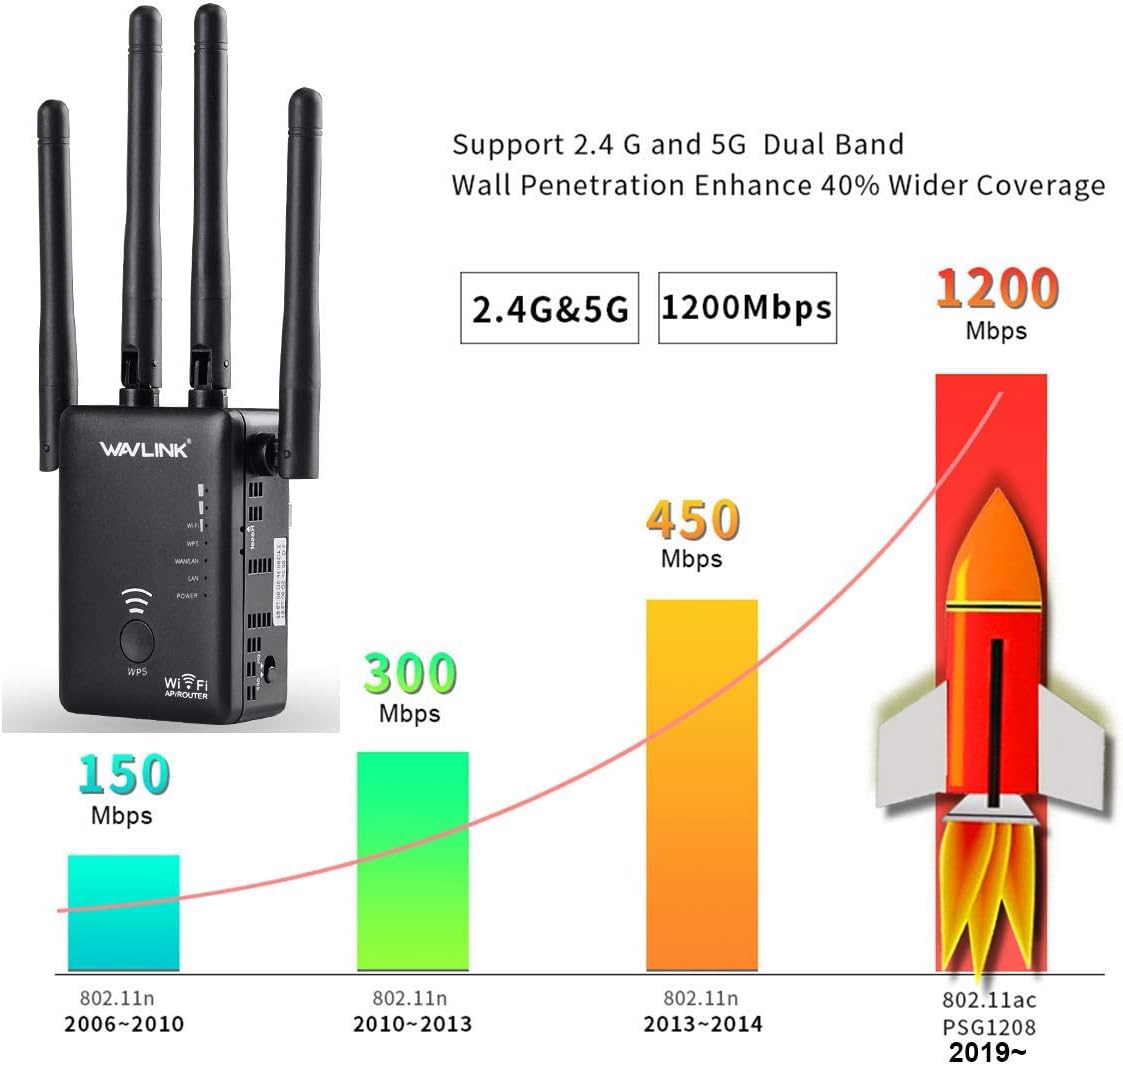
Image: The WAVLINK-AC1200 WN575A3 device highlighting its dual-band capabilities (2.4G and 5G) and speed performance up to 1200Mbps, demonstrating its ability to enhance network speed and coverage.
2.2 Package Contents
- 1 x WAVLINK-AC1200 WN575A3 WiFi Range Extender
- 1 x RJ45 Networking Cable
- 1 x Quick Installation Guide
2.3 Device Layout

Image: Front view of the WAVLINK-AC1200 WN575A3 WiFi Range Extender, showing the WPS button and various LED indicators for power, Wi-Fi, LAN, and WAN status.
The device features several LED indicators and ports:
- Power LED: Indicates power status.
- WPS Button: For quick and secure connection to a router.
- Wi-Fi LEDs: Indicate 2.4GHz and 5GHz Wi-Fi activity.
- LAN/WAN Ports: Two Ethernet ports for wired connections, functioning as LAN or WAN depending on the operating mode.
- Reset Button: Used to restore factory default settings (usually a small pinhole button).
3. Setup
Before starting, ensure your main router is powered on and functioning correctly. The WAVLINK-AC1200 WN575A3 can be set up via a web browser or using the WPS function.
3.1 Powering On and Initial Connection
- Plug the WAVLINK-AC1200 WN575A3 into a power outlet.
- Wait for the Power LED to turn solid.
- Connect your computer or mobile device to the extender's default Wi-Fi network (e.g., "WAVLINK_EXT" or similar, check the device label). No password is required for the initial connection.
3.2 Repeater Mode Setup (Extending Existing Wi-Fi)
Repeater mode extends the coverage of your existing wireless network.
- After initial connection, open a web browser and enter the default IP address (e.g., http://192.168.10.1) or domain name (e.g., http://ap.setup) found on the device label.
- Log in with the default username and password (usually 'admin' for both).
- Select "Repeater Mode" from the setup wizard.
- The device will scan for available Wi-Fi networks. Select your main router's Wi-Fi network (SSID) from the list.
- Enter the password for your main router's Wi-Fi network.
- You can choose to keep the same SSID for the extended network or create a new one.
- Confirm settings and wait for the device to restart.
- Relocate the extender to an optimal position between your router and the desired coverage area. Ensure the signal strength from your main router is at least 70% (3 bars) at the extender's location for best performance.

Image: A diagram illustrating the recommended placement for the WiFi repeater. It shows that the repeater should be positioned between the main router and the weak signal area, ideally where it can receive at least three bars of Wi-Fi signal from the router.
3.3 Access Point (AP) Mode Setup (Creating a New Wi-Fi Network)
AP mode converts a wired internet connection into a wireless network.
- Connect the WAVLINK-AC1200 WN575A3 to your modem or router using an Ethernet cable plugged into the LAN/WAN port.
- Follow steps 1-2 from Repeater Mode Setup to access the web interface.
- Select "AP Mode" from the setup wizard.
- Configure the new Wi-Fi network's SSID (name) and password.
- Confirm settings and wait for the device to restart.
3.4 Router Mode Setup (Primary Router Functionality)
Router mode allows the device to act as a primary router, connecting directly to your modem.
- Connect the WAVLINK-AC1200 WN575A3 to your modem using an Ethernet cable plugged into the LAN/WAN port.
- Follow steps 1-2 from Repeater Mode Setup to access the web interface.
- Select "Router Mode" from the setup wizard.
- Choose your internet connection type (e.g., PPPoE, Dynamic IP, Static IP) and enter the required details provided by your ISP.
- Configure the new Wi-Fi network's SSID (name) and password.
- Confirm settings and wait for the device to restart.
4. Operating Modes
4.1 Repeater Mode
In Repeater mode, the device wirelessly connects to your existing router and re-broadcasts its signal, effectively extending the Wi-Fi coverage to areas with weak or no signal. This mode is ideal for eliminating Wi-Fi dead zones in your home or office.
4.2 Access Point (AP) Mode
AP mode transforms a wired network connection into a wireless one. If you have an Ethernet port in a room but no Wi-Fi, you can connect the WN575A3 to the Ethernet port, and it will create a new Wi-Fi hotspot, allowing wireless devices to connect.
4.3 Router Mode
In Router mode, the WN575A3 acts as a standalone wireless router. It connects directly to your modem via an Ethernet cable and creates a new private network, providing internet access to all connected devices, both wired and wireless. This is suitable for small offices or homes without an existing router.
5. Maintenance
- Optimal Placement: Place the extender in an open area, away from obstructions like thick walls, metal objects, and large electrical appliances that can interfere with Wi-Fi signals.
- Firmware Updates: Regularly check the WAVLINK official website for firmware updates. Updating the firmware can improve performance, add new features, and fix bugs.
- Cleaning: Keep the device clean and free from dust. Use a soft, dry cloth for cleaning. Do not use liquid cleaners.
- Ventilation: Ensure the device has adequate ventilation to prevent overheating. Do not cover the ventilation holes.
- Security: Use strong, unique passwords for your Wi-Fi network and the extender's administration page.
6. Troubleshooting
6.1 No Internet Access After Setup
- Check Main Router: Ensure your main router has an active internet connection.
- Re-configure: Re-run the setup wizard, ensuring you select the correct Wi-Fi network and enter the correct password for your main router.
- Signal Strength: In Repeater mode, ensure the extender is placed within a good signal range of your main router (at least 3 bars).
- IP Address Conflict: If using Router mode, ensure there is no IP address conflict with your modem.
6.2 Weak or Unstable Signal
- Relocate Extender: Move the extender closer to your main router, ensuring it's still halfway between the router and the desired coverage area.
- Avoid Interference: Keep the extender away from devices that emit strong electromagnetic interference (e.g., microwaves, cordless phones).
- Adjust Antennas: Try adjusting the position of the external antennas for better signal reception.
6.3 Cannot Access Web Management Page
- Verify Connection: Ensure your device is connected to the extender's Wi-Fi network or via an Ethernet cable.
- Correct IP/Domain: Double-check the IP address or domain name (e.g., http://192.168.10.1 or http://ap.setup).
- Clear Browser Cache: Clear your web browser's cache and cookies, or try a different browser.
- Reset Device: If all else fails, perform a factory reset by pressing and holding the Reset button for 5-10 seconds while the device is powered on. This will revert all settings to default, and you will need to reconfigure the device.
7. Specifications
| Feature | Description |
|---|---|
| Model Number | WN-575A3 |
| Wireless Standard | 802.11a/b/g/n/ac |
| Frequency Band | Dual-Band (2.4GHz & 5GHz) |
| Data Transfer Rate | Up to 1200 Mbps (300Mbps 2.4GHz + 867Mbps 5GHz) |
| Antennas | 4 x External Antennas |
| Ethernet Ports | 2 x 10/100Mbps LAN/WAN Ports |
| Product Dimensions | 4.75 x 3.75 x 5 inches |
| Item Weight | 8 ounces |
8. Warranty and Support
WAVLINK products typically come with a manufacturer's warranty. Please refer to the warranty card included in your package or visit the official WAVLINK website for detailed warranty terms and conditions. For technical support, troubleshooting assistance, or further inquiries, please contact WAVLINK customer support through their official website or the contact information provided in your product documentation.
Official WAVLINK Website: www.wavlink.com


