
KOMSHINE FX37
Komshine FX37 Fusion Splicer Core Alignment Fiber Splicing Machine User Manual
Model: FX37
1. Introduction
The Komshine FX37 Fusion Splicer is a precision instrument designed for optical fiber splicing. It features real core-to-core alignment, ensuring low splicing loss, and is suitable for various fiber types including 250µm, 900µm, flat cable, and fiber jumpers. This manual provides essential information for the safe and efficient operation, maintenance, and troubleshooting of your FX37 Fusion Splicer.
2. Safety Information
Please read and understand all safety instructions before operating the Komshine FX37 Fusion Splicer. Failure to follow these instructions may result in injury or damage to the equipment.
- Electrical Safety: Use only the provided AC adapter. Do not operate the splicer with wet hands or in damp environments.
- Arc Discharge: The splicer uses an electric arc for fusion. Keep hands and flammable materials away from the splicing area during operation.
- Optical Fiber Handling: Optical fibers are fragile and can produce sharp shards when cleaved. Always wear safety glasses and dispose of fiber scraps properly.
- Battery Safety: Use only the specified battery pack. Do not expose the battery to high temperatures or attempt to disassemble it.
- Cleaning: Use only recommended cleaning agents and methods. Avoid using abrasive materials that could damage optical components.
3. Package Contents
Verify that all items listed below are present in your Komshine FX37 Fusion Splicer package:
- FX37 Arc Fusion Splicer (1 unit)
- AC Adapter (1 unit)
- FIS Fiber Stripper (1 unit)
- Spare Electrodes (1 pair)
- Battery Pack (1 unit)
- Alcohol Pump Bottle (1 unit)
- Cleaning Wipes (1 pack)
- Flat Cable Stripper (1 unit)
- Cooling Tray (1 unit)
- Fiber Cleaver (1 unit)
- Instruction Manual (1 unit)
- Carrying Case (1 unit)
- Protection Sleeves 60mm (200 units)
- Calibration Certificate (1 unit)
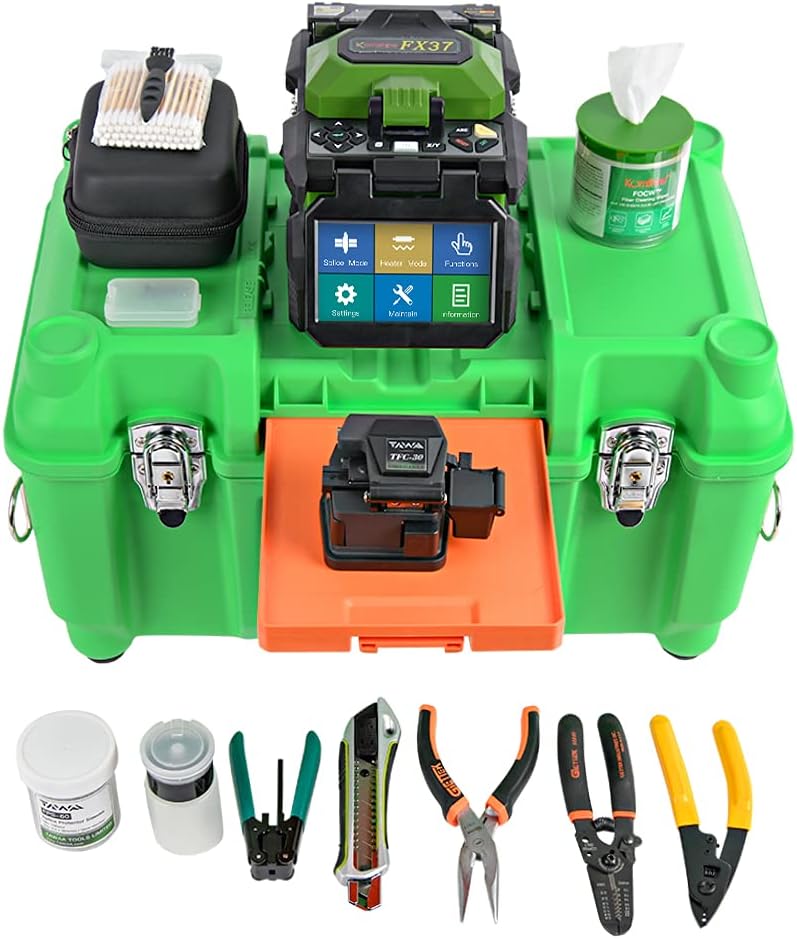
Figure 3.1: Complete Komshine FX37 Fusion Splicer kit with included accessories, neatly arranged in its carrying case.

Figure 3.2: An alternative view of the Komshine FX37 Fusion Splicer alongside its essential tools, including strippers and cleaver.
4. Setup and Initial Operation
4.1 Charging the Battery
Before first use, ensure the battery pack is fully charged. Connect the AC adapter to the splicer and a power outlet. The charging indicator will illuminate. A full charge provides approximately 300 splicing and heating cycles.

Figure 4.1: Rear view of the FX37 splicer, highlighting the removable battery pack and its connection point.
4.2 Powering On/Off
Press and hold the power button to turn the splicer on or off. The display will show the main menu upon startup.

Figure 4.2: Detailed view of the FX37 control panel and display, showing various mode selections.
5. Operating Instructions
5.1 Fiber Preparation
- Strip the Fiber: Use the FIS Fiber Stripper to remove the fiber coating, exposing the bare fiber. Ensure the stripped length is appropriate for cleaving (typically 8-16mm).
- Clean the Fiber: Apply alcohol from the pump bottle to a cleaning wipe and thoroughly clean the bare fiber to remove any residue.
- Cleave the Fiber: Place the cleaned, stripped fiber into the Fiber Cleaver (e.g., TAIWA FC-30). Ensure a precise, perpendicular cleave. A good cleave is crucial for low splicing loss.

Figure 5.1: The TAIWA FC-30 Fiber Cleaver, used for precise cutting of optical fibers before splicing.
5.2 Splicing Process
- Open the Wind Protector: Lift the wind protector cover of the splicer.
- Place Fibers: Carefully place the prepared fibers into the V-grooves of the splicer. Ensure the fiber ends are positioned correctly near the electrodes.
- Close the Wind Protector: Gently close the wind protector. The splicer will automatically begin the alignment process.
- Automatic Splicing: The FX37 will perform core-to-core alignment, followed by arc discharge to fuse the fibers. The splicing process typically takes 7 seconds.
- Inspect Splice: After splicing, the splicer will display the estimated splice loss. Visually inspect the splice for any imperfections.

Figure 5.2: The FX37 splicer with its wind protector open, revealing the fiber placement area and electrodes for splicing.
5.3 Heat Shrinking Protection
- Position Protection Sleeve: Slide a protection sleeve over the spliced joint.
- Place in Heater: Open the heating oven cover and carefully place the fiber with the protection sleeve into the heater.
- Start Heating: Close the heater cover. The splicer will automatically begin the heating process, typically taking 30 seconds.
- Cooling: Once heating is complete, remove the fiber and place it on the cooling tray to allow the sleeve to solidify.
5.4 Fiber Link Testing (Optional)
After splicing and protecting the fiber, a Visual Fault Locator (VFL) can be used to test the integrity of the fiber link and identify any breaks or poor connections. Connect the VFL to one end of the fiber and observe the other end for light leakage, which indicates a fault.

Figure 5.3: The Komshine KFL-11M Visual Fault Locator, a tool used to detect breaks or bends in optical fibers by emitting a visible red light.
6. Maintenance
Regular maintenance ensures optimal performance and extends the lifespan of your Komshine FX37 Fusion Splicer.
6.1 Cleaning
- V-Grooves and Clamps: Regularly clean the V-grooves and fiber clamps with a cotton swab moistened with alcohol to prevent dust and fiber debris from affecting alignment.
- Electrodes: Keep the electrodes clean. If they become contaminated, gently wipe them with a clean, lint-free cloth.
- Objective Lenses: Use a specialized lens cleaning solution and cloth to clean the objective lenses if necessary. Avoid touching them directly.
6.2 Electrode Replacement
The electrodes have a typical lifespan of 4000 splices. When the splicer indicates electrode wear or splicing performance degrades, replace them using the spare electrodes provided.
- Power off the splicer and disconnect the AC adapter.
- Carefully remove the old electrodes according to the instructions in the detailed manual.
- Install the new electrodes, ensuring they are correctly seated.
- Perform an arc calibration after electrode replacement.
7. Troubleshooting
This section addresses common issues you might encounter with your FX37 Fusion Splicer.
| Problem | Possible Cause | Solution |
|---|---|---|
| High Splice Loss | Poor fiber cleave, dirty fiber ends, dirty V-grooves, worn electrodes. | Re-cleave and clean fibers. Clean V-grooves and electrodes. Replace electrodes if necessary. |
| Splicer Fails to Align Fibers | Dirty V-grooves, damaged fiber clamps, fiber not seated correctly. | Clean V-grooves. Ensure fibers are properly placed. Check for physical damage. |
| Battery Not Charging | Faulty AC adapter, battery not connected properly, battery fault. | Check AC adapter connection. Re-seat battery. Contact support if issue persists. |
| Splicer Does Not Power On | Depleted battery, power button malfunction. | Charge battery. Connect to AC power. If still unresponsive, contact support. |
8. Specifications
| Feature | Detail |
|---|---|
| Applicable Fibers | SM / MM / DS / NZDS / BIF & UBIF (G.657) |
| Return Loss | >60dB |
| Operation Methods | Auto, Manual |
| Cutting Length | 8~16mm (Fiber diameter: <250um) / 16mm (Fiber diameter: 250~1000um) |
| Applicable Sleeve | 60mm / 40mm / 20mm or etc. |
| Battery Life Cycle | 300~500 charge / discharge cycles |
| Dimension (L×W×H) | 53.15 inch × 62.99 inch × 59.06 inch (mm) (Note: The provided unit 'mm' for these large values appears to be a data discrepancy. Please refer to the product's physical dimensions for accurate measurements.) |
| Weight | 3.97 LB (without battery), 5.07 LB (with battery) |
| Splicing Time | 7 seconds (typical) |
| Heating Time | 30 seconds (typical) |
| Electrode Life | 4000 splices |
| Battery Capacity | 5200mAh (up to 300 splicing & heating cycles) |
| Alignment Method | Core-to-Core Alignment (4 Motors, 3 Axle) |
| Special Features | Shake Proof, Dust Proof, Water Proof, HD CMOS sensor, Night Light |
9. Warranty and Support
For warranty information and technical support, please refer to the warranty card included in your package or contact Komshine customer service. Keep your purchase receipt and calibration certificate for warranty claims.
Komshine Customer Service: Please visit the official Komshine website or refer to the contact information provided in your product documentation for support.
Related Documents - FX37
 |
KomShine FX39 Trunk Optical Fiber Fusion Splicer - High-Speed Splicing and Heating Discover the KomShine FX39, a powerful trunk optical fiber fusion splicer featuring 6-second fast splicing, 16-second rapid heating, and an average splice loss of 0.01dB. Learn about its durable design, high-definition LCD display, and 7800mAh battery. |
 |
Komshine FX39 Fiber Optic Fusion Splicer: Features, Specs, and Performance Explore the Komshine FX39, a high-performance fiber optic fusion splicer. Discover its rapid splicing (6s), low loss (0.01dB), durable design, 7800mAh battery, and advanced alignment technologies. |
 |
Komshine GX39 FTTH Fiber Optic Fusion Splicer - Product Overview & Specifications Explore the features and specifications of the Komshine GX39 FTTH Fiber Optic Fusion Splicer. A compact, lightweight, and fast splicing solution for fiber optic networks. |
 |
Komshine QX43 FTTx-OTDR Quick Guide - Optical Time-Domain Reflectometer Concise guide to the Komshine QX43 FTTx-OTDR, covering its features, test setup, curve manipulation, event list, file management, and event type meanings for optical fiber testing. |
 |
KLS-35 Stable Light Source Instruction Manual - Komshine Comprehensive instruction manual for the Komshine KLS-35 stable fiber optic light source. Covers device functions, power-saving settings, backlight control, wavelength and carrier selection, LED flashlight, product introduction, features, detailed specifications, usage environment, important tips, standard kit contents, and contact information for Komshine Technologies Limited. Ideal for FTTX network and fiber optic testing. |
 |
Komshine KLS-35 Stable Light Source: User Manual and Specifications Comprehensive instruction manual for the Komshine KLS-35 stable light source, detailing its features, specifications, operation, and safety guidelines for fiber optic testing. |
Ask a question about this manual
Ask about setup, troubleshooting, compatibility, parts, safety, or missing instructions. Manuals+ will review the question and use this page’s manual context to help answer it.