1. Introduction
This manual provides essential information for the installation, operation, and maintenance of the Brocade FastIron SX 800 modular chassis. Please read this manual thoroughly before proceeding with any installation or operation procedures.
2. Product Overview
The Brocade FastIron SX 800 is a high-performance modular chassis designed for networking environments. It supports various modules for flexible configuration.
2.1 Key Components
- SX 800 8-Slot Chassis: The main enclosure for all modules.
- Switch Fabric Module: Provides high-speed data switching capabilities.
- System AC Power Supply: Delivers power to the chassis and its components.
- Interface Panels: For connecting network cables and other devices.
- Power Supply Panels: Housing for power supply units.
- Fan Tray: Ensures proper cooling and airflow within the chassis.
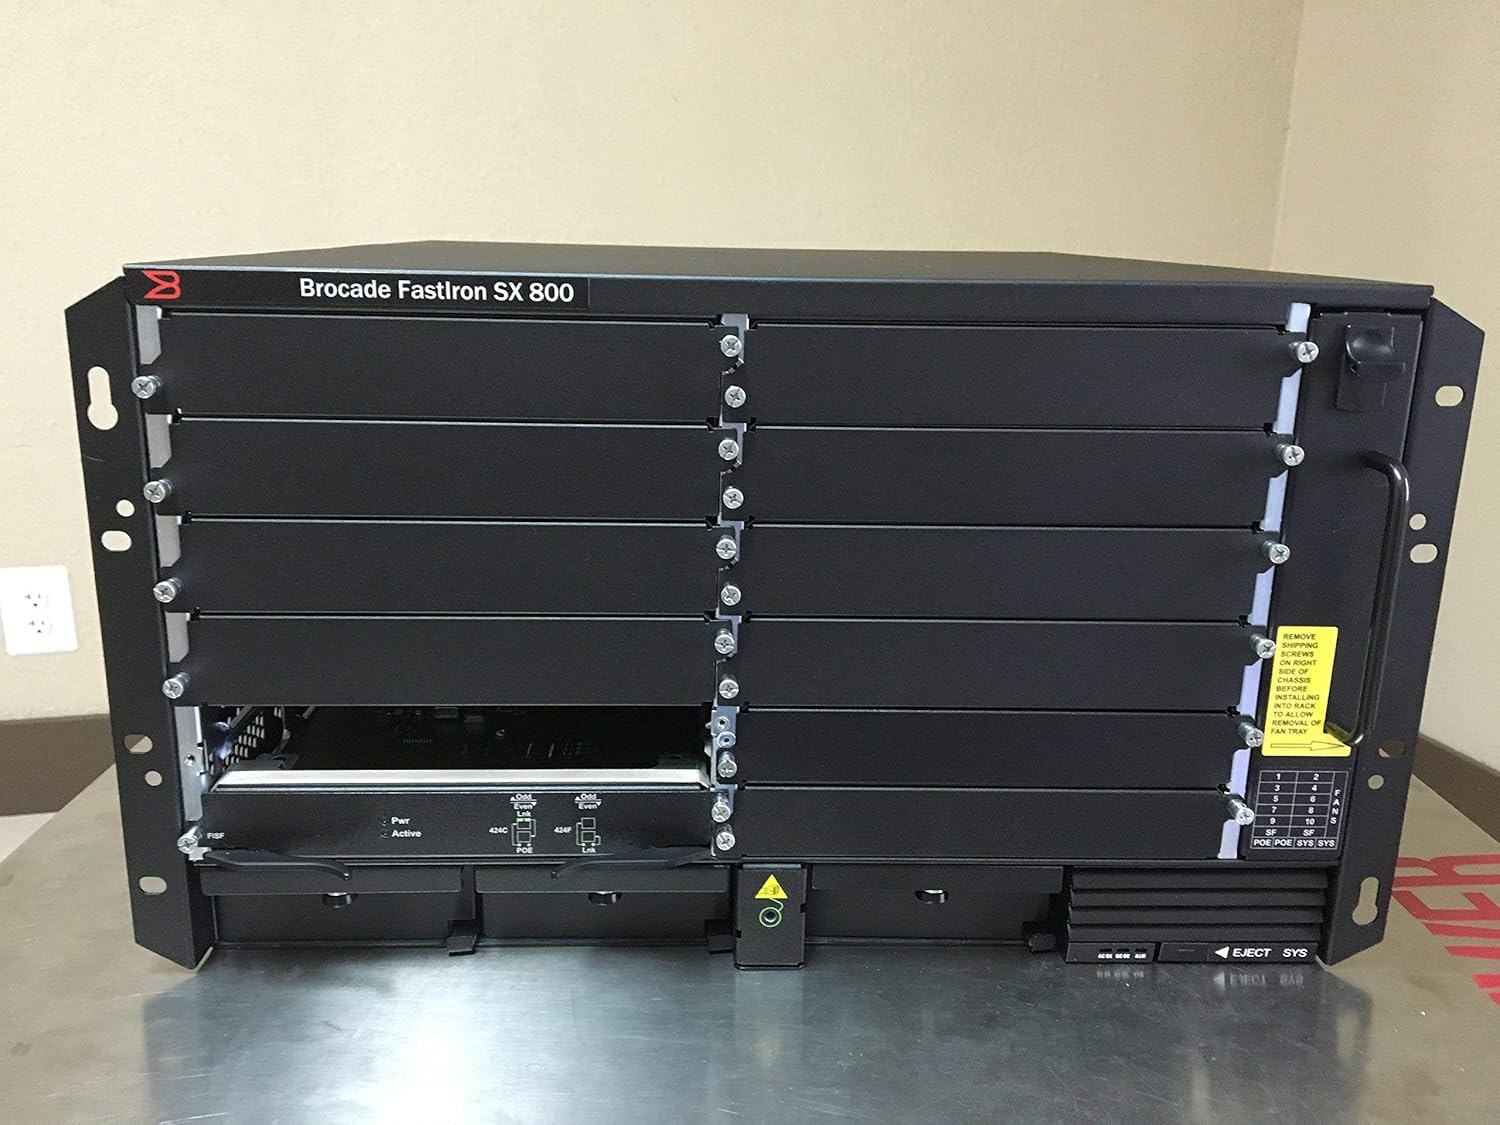
Figure 2.1: Front view of the Brocade FastIron SX 800 chassis, showing the modular slots and power/active indicators. This image displays the main unit with multiple empty slots for modules and a power supply unit installed at the bottom.
3. Unpacking and Inspection
Carefully unpack the Brocade FastIron SX 800 chassis and its components. Inspect all items for any signs of shipping damage. If any damage is found, contact your vendor immediately.
3.1 Unpacking Procedure
- Open the shipping carton and remove any top packing materials.
- Carefully lift the chassis out of the carton.
- Remove all protective wrapping and foam inserts.
- Verify that all listed components are present.

Figure 3.1: An open shipping box revealing custom-fit foam packaging designed to protect the networking equipment during transit.

Figure 3.2: The Brocade FastIron SX 800 chassis, still encased in its protective plastic wrapping, nestled within the foam inserts of its shipping container.

Figure 3.3: Various accessories, including cables and a 'READ ME' document, neatly arranged in a separate compartment within the product's shipping box.
4. Setup
This section outlines the general steps for setting up your Brocade FastIron SX 800 chassis. Specific installation procedures for modules may vary and should be referenced in their respective documentation.
4.1 Rack Mounting
The FastIron SX 800 chassis is designed for standard rack mounting. Ensure the rack is stable and has adequate space for ventilation and cable management. Use appropriate rack mounting hardware (not included unless specified) to secure the chassis.
4.2 Power Connection
- Ensure the power supply units are correctly seated in their bays.
- Connect the AC power cords to the power supply units at the rear of the chassis.
- Plug the other end of the power cords into a grounded power outlet or power distribution unit (PDU).
- Verify that the power indicators on the power supply units illuminate.
4.3 Module Installation
Insert the Switch Fabric module and any other interface or service modules into their designated slots. Ensure each module is firmly seated and secured with its retention mechanisms.
5. Operating Instructions
Once the chassis is set up and powered, it will begin its boot sequence. Monitor the system status indicators for proper operation.
5.1 Powering On/Off
- Power On: After connecting power, the system should automatically power on. Observe the LED indicators for system status.
- Power Off: To power off, disconnect the AC power cords from the power supply units. For controlled shutdown, refer to the software documentation for proper shutdown procedures.
5.2 Status Indicators
Refer to the specific module documentation for detailed information on LED indicators and their meanings. Generally, green indicators signify normal operation, while amber or red may indicate a fault or warning.
6. Maintenance
Regular maintenance helps ensure the longevity and optimal performance of your Brocade FastIron SX 800 chassis.
6.1 Cleaning
Keep the chassis and its surroundings clean and free of dust. Use a soft, dry cloth for external cleaning. Ensure ventilation openings are not obstructed.
6.2 Fan Tray Maintenance
The fan tray is critical for cooling. Periodically inspect the fan tray for dust accumulation and ensure all fans are operating correctly. Refer to the service manual for fan tray replacement procedures if necessary.

Figure 6.1: Side view of the Brocade FastIron SX 800 chassis, highlighting the fan exhaust grilles and a yellow warning label regarding shipping sleeves. This view emphasizes the cooling system's design.
7. Troubleshooting
This section provides basic troubleshooting steps for common issues. For more complex problems, consult the Brocade technical support documentation or contact customer support.
7.1 No Power
- Verify that power cords are securely connected to both the chassis and the power outlet.
- Check the power outlet for functionality.
- Ensure power supply units are fully seated in their bays.
7.2 Module Not Functioning
- Reseat the module to ensure proper connection.
- Check the module's status LEDs for error indications.
- Consult the module's specific documentation for troubleshooting steps.
8. Specifications
The following table details the technical specifications for the Brocade FastIron SX 800 chassis.

Figure 8.1: Rear view of the Brocade FastIron SX 800 chassis, displaying the multiple AC power input ports and a product label with model and electrical specifications.
| Feature | Specification |
|---|---|
| Model Number | FI-SX800-1SF-AC |
| Item Weight | 69 pounds |
| Manufacturer | Brocade Communications Systems, Inc |
| Mounting Type | Panel Mount (Rack Mountable) |
| Compatible Devices | Server |
| UPC | 034722760720 |
| First Available | February 13, 2019 |

Figure 8.2: Side view of the Brocade FastIron SX 800 chassis, showing extensive ventilation grilles along the side panel, crucial for heat dissipation.
9. Warranty and Support
This product is offered as an Amazon Renewed item. For specific warranty and support details, please refer to the Amazon Renewed program terms and conditions.
9.1 Return Policy
The product includes a 90-day return policy for refunds or replacements, as per Amazon Renewed guidelines.
9.2 Customer Support
For any issues or inquiries, please contact Amazon Renewed customer support or the seller, ITS Renew, for assistance.