1. Safety Warnings
Important: Read these instructions carefully before assembling the greenhouse. Use appropriate tools and pay attention to sharp edges. Ensure the greenhouse is properly anchored and ventilated to prevent damage or injury. Respect the UV protection cover and do not use chemical treatments that could damage the cover.
2. Product Overview
The IDMarket Roma 2x3M 6M² Tunnel Greenhouse is designed to help you cultivate fruits and vegetables efficiently in all seasons. It features a robust galvanized steel frame and a durable 130 g/m² reinforced, anti-UV polyethylene cover. This greenhouse is equipped with two ventilation windows and a large zippered door for easy access and optimal air circulation.
- Cultivate year-round with the 6M² greenhouse and its 130 g/m² cover.
- Composed of 2 sections formed by 3 galvanized steel arches for enhanced robustness.
- Features 2 windows (35 x 35 cm) with mosquito nets and a zippered door (80 x 180 cm) with clips to hold it open.
- Protects your crops from cold in winter and boosts growth in spring and summer.
- Overall dimensions: Length 3 M x Width 2 M x Height 2 M.
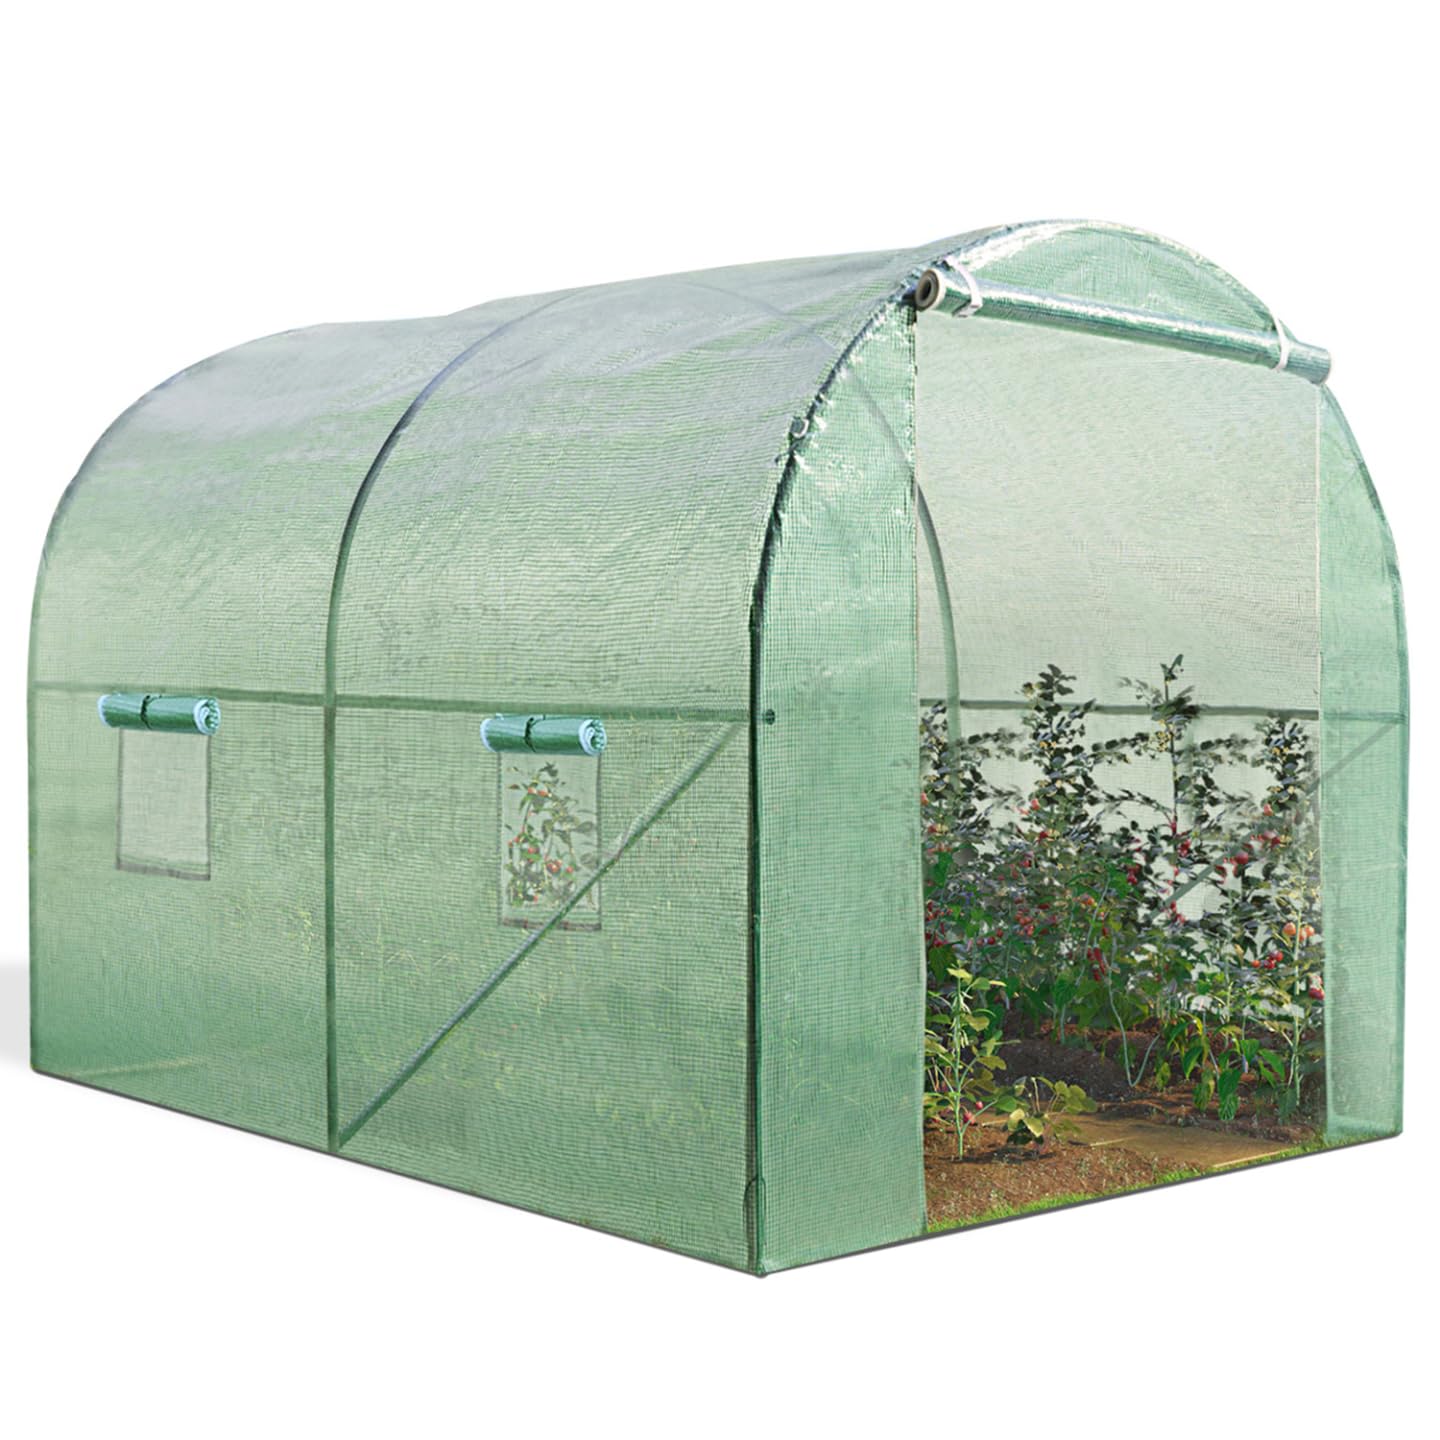
Figure 2.1: Fully assembled IDMarket Roma 2x3M 6M² Tunnel Greenhouse.
3. Setup & Assembly
Assembly requires careful attention to detail. It is recommended to have at least two people for assembly. Ensure you have all components before starting.
3.1. Unpacking and Component Check
Carefully unpack all components. Verify that all parts listed in the packaging contents are present and undamaged. Lay out components on a clean, flat surface.
3.2. Frame Assembly
- Begin by assembling the base frame using the straight galvanized steel tubes and connectors. Ensure all connections are secure.
- Assemble the three arched sections. Each arch consists of several curved tubes connected together.
- Connect the arched sections to the base frame using the provided steel connectors. The greenhouse is composed of 2 sections formed by 3 arches.
- Install the two reinforcement bars (anti-storm) to enhance the structure's stability.
- Ensure all screws and fasteners are tightened securely, but do not overtighten to avoid damaging the tubes.

Figure 3.1: Greenhouse dimensions and structural overview. Length 300 cm, Width 200 cm, Height 200 cm. Door dimensions: 80 cm width, 180 cm height.
3.3. Cover Installation
- Carefully unfold the reinforced anti-UV polyethylene cover.
- Drape the cover over the assembled frame, ensuring it is centered and evenly distributed.
- Secure the cover to the frame using the integrated ties or fasteners. Ensure the cover is taut to prevent flapping in the wind.
- Position the zippered door and secure it according to the instructions.
- Ensure the two windows with mosquito nets are correctly aligned and can be opened/closed.
3.4. Anchoring the Greenhouse
Proper anchoring is crucial for the stability and longevity of your greenhouse, especially in windy conditions. Use ground stakes or other suitable anchoring methods to firmly secure the base of the greenhouse to the ground. Consider adding additional weights or securing the base with heavy objects like gravel slabs for extra stability.
4. Operation
4.1. Door Usage
The greenhouse features a large zippered entrance door (80 cm wide x 180 cm high). To open, simply unzip the door. Two clips are provided to hold the door in an open position, allowing for easy access and increased ventilation when needed.

Figure 4.1: Detail of the robust zipper on the greenhouse door.
4.2. Ventilation
The greenhouse is equipped with two 35 x 35 cm windows, each with a mosquito net. These windows allow for maximum aeration while protecting your crops from insects and other pests. Open the windows during warm periods to regulate temperature and humidity. Close them during colder weather or at night to retain heat.
4.3. Climate Control
Use the greenhouse to protect your plants from cold and harsh weather conditions in winter. In spring and summer, it helps boost plant growth by creating a warmer, more controlled environment. Monitor internal temperatures and adjust ventilation as needed to prevent overheating.
5. Maintenance
5.1. Cleaning the Cover
Regularly clean the polyethylene cover to ensure maximum light penetration. Use mild soap and water with a soft cloth or sponge. Avoid abrasive cleaners or brushes that could damage the material or its UV protective layer. Rinse thoroughly with clean water.
5.2. Frame Inspection
Periodically inspect the galvanized steel frame for any signs of rust, damage, or loose connections. Tighten any loose bolts or screws. Address any rust spots promptly to prevent further corrosion.
5.3. UV Protection and Chemical Treatments
The cover is designed with UV protection. To maintain its effectiveness, avoid using any chemical treatments or harsh cleaning agents on the cover, as these can degrade the UV protective layer and shorten the lifespan of the material.
6. Troubleshooting
6.1. Greenhouse Instability in Wind
If the greenhouse feels unstable in windy conditions:
- Check Anchoring: Ensure the greenhouse is firmly anchored to the ground using appropriate stakes or weights.
- Reinforce Structure: Consider adding additional reinforcement to the frame, especially at the base and upper sections, using strong ties, additional stakes, or heavy objects.
- Tighten Connections: Verify that all frame connections are securely tightened.
6.2. Cover Damage (Tears, Rips)
While the cover is reinforced, extreme conditions or sharp objects can cause damage:
- Immediate Repair: For small tears, use a strong, UV-resistant repair tape specifically designed for greenhouse covers.
- Preventative Measures: Ensure the cover is always taut to reduce wind stress. Avoid placing sharp objects near the cover.
6.3. Poor Ventilation / Overheating
If the greenhouse is too hot or humid:
- Open Windows and Door: Fully open both ventilation windows and the main door to allow for maximum airflow.
- Monitor Temperature: Use a thermometer to monitor the internal temperature and adjust ventilation accordingly.
7. Specifications
| Feature | Detail |
|---|---|
| Brand | IDMarket |
| Model | Roma 2x3M |
| Overall Dimensions (L x W x H) | 300 cm x 200 cm x 200 cm (3L x 2W x 2H meters) |
| Area | 6 M² |
| Frame Material | Galvanized Steel |
| Tube Diameter | 19 mm |
| Cover Material | Reinforced Anti-UV Polyethylene (PE) |
| Cover Density | 130 g/m² |
| Number of Arches | 3 |
| Number of Sections | 2 |
| Door Type | Zippered with 2 holding clips |
| Door Dimensions (W x H) | 80 cm x 180 cm |
| Number of Windows | 2 |
| Window Dimensions | 35 cm x 35 cm with mosquito nets |
| Reinforcement Bars | 2 (anti-storm) |
| Item Weight | 10 Kilograms |
| Color | Green |
| Country of Origin | China |
8. Warranty & Support
For warranty information, product support, or to purchase replacement parts, please contact IDMarket customer service directly or visit their official website. Specific warranty terms may vary by region and purchase date.
IDMarket Contact Information: Please refer to your purchase documentation or the IDMarket official website for the most up-to-date contact details.