
1. Introduction
This manual provides detailed instructions for the installation, operation, and maintenance of your iLive Bluetooth Under Cabinet Radio (Model IKBC384SMP3U). This versatile audio system is designed for kitchen environments, offering FM radio, CD playback, MP3 playback via USB, and Bluetooth connectivity for wireless audio streaming. Please read this manual thoroughly before use to ensure proper functionality and to maximize your enjoyment of the product.
2. Key Features
- Bluetooth Wireless Technology: Supports A2DP (Advanced Audio Distribution Profile) for wireless audio streaming from compatible devices. Features automatic device pairing and a wireless range of up to 60 feet.
- Hands-Free Speakerphone: Built-in microphone for convenient call handling.
- CD Player: Compatible with CD, CD-R/RW, and MP3 CDs.
- USB Music Port: Play audio files directly from your USB flash drive.
- FM Radio: Digital FM tuner for listening to your favorite radio stations.
- AUX Input: 3.5mm auxiliary input for connecting external audio devices.
- Kitchen Timer: Integrated digital kitchen timer function.
- Digital Clock: Clear digital time display.
- Remote Control: Full-function remote for convenient operation.
3. Package Contents
Please check that all items are present upon unpacking:
- iLive Bluetooth Under Cabinet Radio Unit
- Remote Control (with 1 CR2025 battery included)
- AC/DC Power Adapter
- Mounting Template
- Mounting Screws and Spacers
- User Manual
4. Controls and Indicators
4.1. Front Panel Controls

Image: Front panel of the iLive Under Cabinet Radio, displaying power, source, timer, display, memory, skip/tune, volume, and open/close buttons, along with the digital clock and Bluetooth indicator.
- Power Button (⏻): Turns the unit ON/OFF.
- Source Button: Selects input source (FM, CD, Bluetooth, USB, AUX).
- Timer Button: Activates and sets the kitchen timer.
- Display Button: Adjusts display brightness or mode.
- Memory/Program Buttons: Saves and recalls FM radio presets, or programs CD tracks.
- Skip/Tune Buttons (⏮ / ⏭): Skips tracks in CD/USB/Bluetooth mode, or tunes radio frequencies.
- Volume Buttons (+ / -): Adjusts the audio volume.
- Open/Close Button (▲): Opens and closes the CD tray.
- Play/Pause Button (⏸): Plays or pauses audio playback.
- Pair Button: Initiates Bluetooth pairing mode.
4.2. Side Panel Ports

Image: Side panel of the iLive Under Cabinet Radio, featuring the Line In (AUX), USB port, and DC 5V power input.
- LINE IN (AUX) Port: 3.5mm input for connecting external audio devices.
- USB Port: For playing MP3 files from a USB flash drive.
- DC 5V Input: Connect the provided AC/DC power adapter here.
4.3. Remote Control
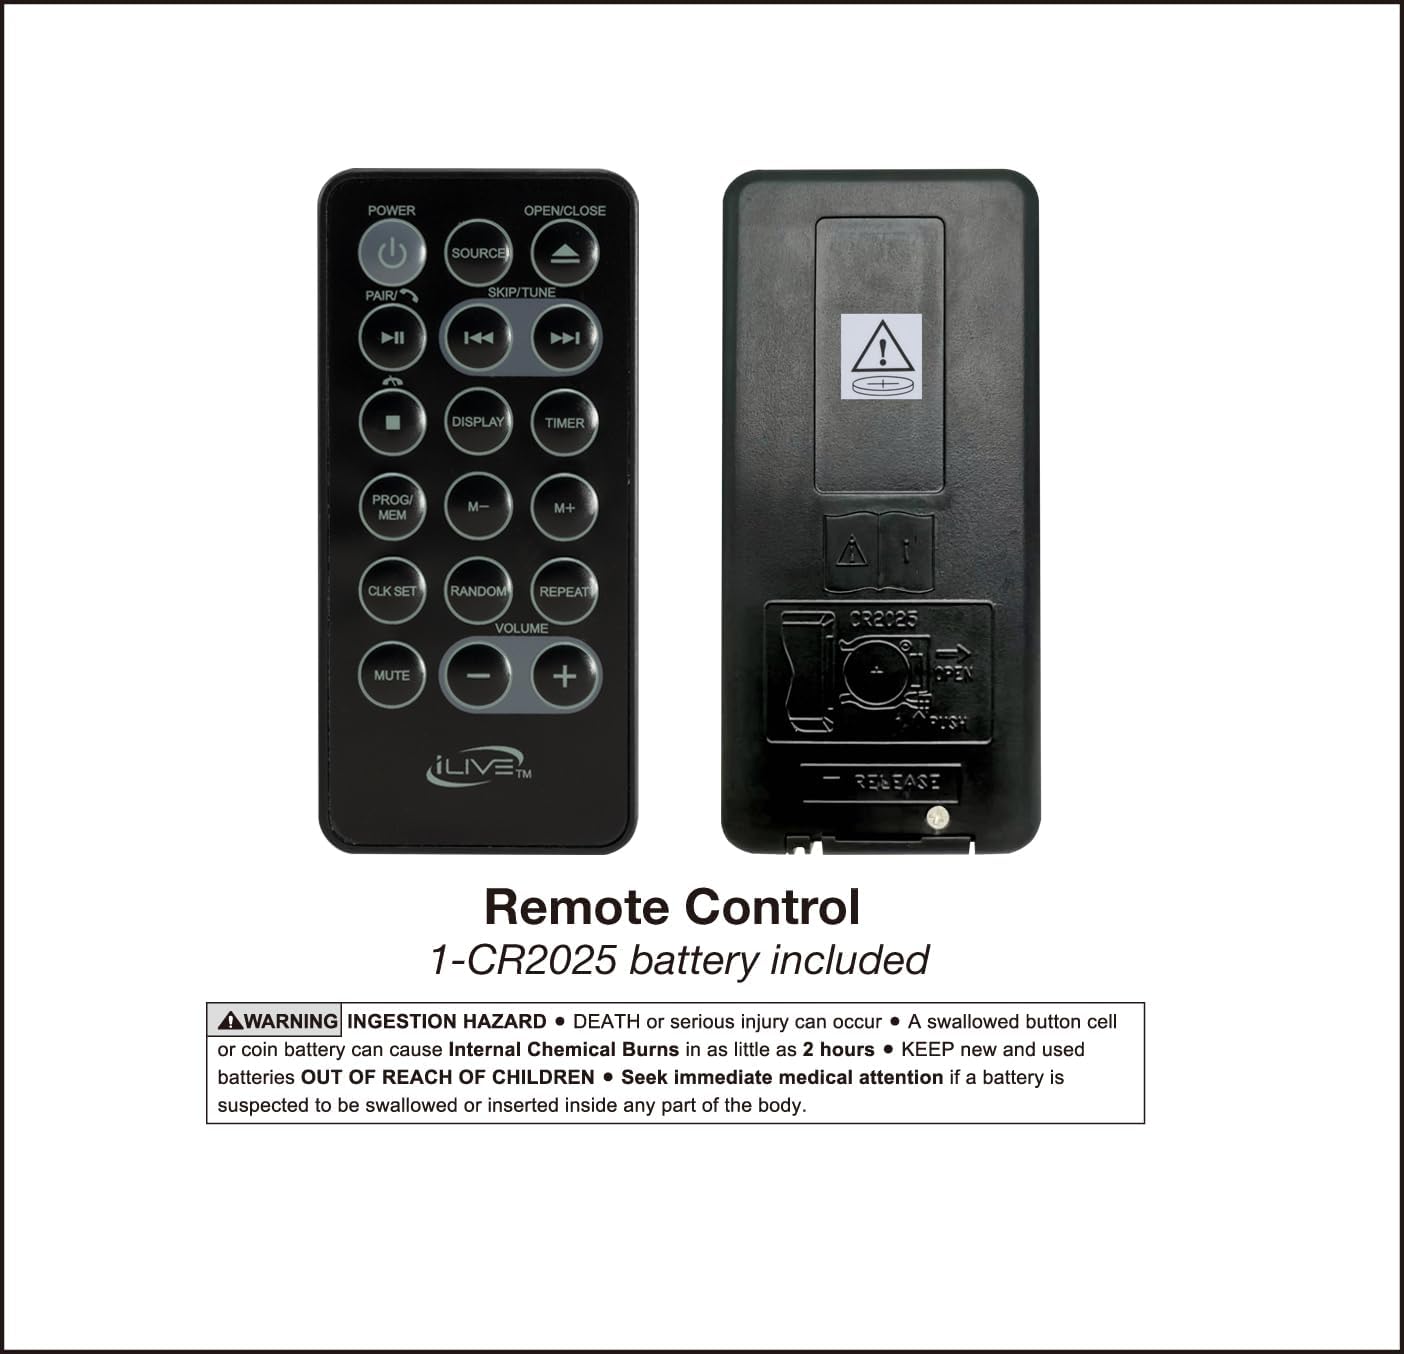
Image: The remote control for the iLive Under Cabinet Radio, showing buttons for power, source, timer, display, volume, skip, play/pause, and CD tray open/close. A warning about the CR2025 battery is also visible.
The remote control provides convenient access to all major functions. Ensure the CR2025 battery is correctly installed. Refer to the diagram for button layout.
5. Setup and Installation
5.1. Mounting the Unit

Image: The iLive Under Cabinet Radio mounted discreetly under a kitchen cabinet, demonstrating its space-saving design.
- Choose Location: Select a flat, sturdy surface under a cabinet. Ensure there is sufficient space for the unit and access to a power outlet.
- Use Template: Use the provided mounting template to mark the screw positions on the underside of the cabinet.
- Drill Pilot Holes: Drill pilot holes at the marked positions.
- Attach Spacers: Place the plastic spacers over the pilot holes.
- Secure Unit: Align the unit with the holes and secure it using the provided mounting screws. Do not overtighten.
5.2. Power Connection
Connect the supplied AC/DC power adapter to the DC 5V input port on the side of the unit. Plug the other end into a standard wall outlet. The unit will power on and the digital clock will display.
6. Operation
6.1. Setting the Clock
- Press and hold the CLK SET button until the hour digits flash.
- Use the Skip/Tune buttons (⏮ / ⏭) to adjust the hour. Press CLK SET again to confirm.
- The minute digits will flash. Use the Skip/Tune buttons to adjust the minutes. Press CLK SET to confirm.
6.2. FM Radio
- Press the Source button repeatedly until "FM" appears on the display.
- Auto Scan: Press and hold the Scan button to automatically scan and save available FM stations as presets.
- Manual Tune: Briefly press the Skip/Tune buttons to manually adjust the frequency.
- Recall Presets: Use the Memory buttons to cycle through saved stations.
6.3. CD Player
- Press the Source button until "CD" appears on the display.
- Press the Open/Close button to open the CD tray.
- Place a CD (label side up) onto the tray and press Open/Close again to close it.
- The CD will begin playing automatically. Use Play/Pause, Skip/Tune, and Volume buttons for control.
6.4. Bluetooth Pairing and Playback
- Press the Source button until "BT" (Bluetooth) appears on the display and the Bluetooth indicator flashes.
- On your Bluetooth-enabled device, enable Bluetooth and search for new devices.
- Select "iLive IKBC384SMP3U" from the list of available devices.
- Once paired, the Bluetooth indicator will glow solid. You can now stream audio from your device to the radio.
- Use the radio's controls or your device's controls for playback (Play/Pause, Skip, Volume).
6.5. USB Playback
- Insert a USB flash drive (containing MP3 files) into the USB port.
- Press the Source button until "USB" appears on the display.
- The unit will automatically begin playing MP3 files from the USB drive.
- Use Play/Pause, Skip/Tune, and Volume buttons for control.
6.6. AUX Input
- Connect one end of a 3.5mm audio cable (not included) to the LINE IN port on the unit.
- Connect the other end to the headphone jack or audio output of your external device.
- Press the Source button until "AUX" appears on the display.
- Play audio from your external device. Control volume using the radio's volume buttons.
6.7. Kitchen Timer
- Press the Timer button. The display will show "00:00" and the minute digits will flash.
- Use the Skip/Tune buttons to set the desired minutes (up to 99 minutes).
- Press Timer again to start the countdown.
- When the timer reaches zero, an alarm will sound. Press any button to stop the alarm.
7. Maintenance
- Cleaning: Wipe the unit with a soft, dry cloth. Do not use abrasive cleaners or solvents.
- CD Player: Keep the CD tray clean and free of dust. Handle CDs by their edges to avoid scratches.
- Remote Control Battery: Replace the CR2025 battery when the remote's range decreases or it stops responding.
8. Troubleshooting
| Problem | Possible Cause | Solution |
|---|---|---|
| No power | Power adapter not connected or outlet not working. | Ensure power adapter is securely connected and the outlet is functional. |
| No sound | Volume too low; incorrect source selected; external device issues. | Increase volume; select correct source (FM, CD, BT, USB, AUX); check external device connection/volume. |
| Bluetooth not pairing | Unit not in pairing mode; device too far; device already paired to another unit. | Ensure unit is in BT pairing mode (flashing indicator); move device closer; disconnect from other devices. |
| CD not playing | CD inserted incorrectly; dirty or scratched CD; incorrect source. | Insert CD label side up; clean CD; select CD source. |
| Poor FM reception | Antenna not extended; interference. | Fully extend the FM antenna; reposition the unit to reduce interference. |
| Remote not working | Battery depleted or inserted incorrectly; obstruction. | Replace CR2025 battery; ensure correct polarity; remove obstructions between remote and unit. |
9. Specifications
- Model: IKBC384SMP3U
- Power Source: AC/DC Adapter (DC 5V)
- Battery (Remote): 1 x CR2025 (included)
- Bluetooth Version: Supports A2DP Profile
- Wireless Range: Up to 60 feet (18 meters)
- Radio Bands: FM
- CD Compatibility: CD, CD-R/RW, MP3 CD
- USB Compatibility: MP3 audio files
- Connectivity: Bluetooth, USB, 3.5mm AUX In
- Product Dimensions: 13.2" L x 12" W x 3.5" H (33.5 cm x 30.5 cm x 8.9 cm)
- Item Weight: 3.8 lbs (1.72 kg)
10. Warranty and Support
For warranty information and customer support, please refer to the warranty card included with your product or visit the official iLive Electronics website. Keep your purchase receipt as proof of purchase for any warranty claims.
Contact Information:
- Brand: iLive Electronics
- Website: iLive Electronics Store on Amazon (for product information)


