1. Introduction
Thank you for purchasing the Mr. Coffee BVMC-DVX41 12-Cup Programmable Coffeemaker. This manual provides important information for the safe and efficient operation of your new appliance. Please read these instructions thoroughly before first use and retain them for future reference.
2. Important Safeguards
When using electrical appliances, basic safety precautions should always be followed to reduce the risk of fire, electric shock, and/or injury to persons, including the following:
- Read all instructions before using this appliance.
- Do not touch hot surfaces. Use handles or knobs.
- To protect against electric shock, do not place cord, plug, or coffeemaker in water or other liquids.
- Close supervision is necessary when any appliance is used by or near children.
- Unplug from outlet when not in use and before cleaning. Allow to cool before putting on or taking off parts, and before cleaning the appliance.
- Do not operate any appliance with a damaged cord or plug, or after the appliance malfunctions or has been damaged in any manner. Return appliance to an authorized service facility for examination, repair, or adjustment.
- The use of accessory attachments not recommended by the appliance manufacturer may result in fire, electric shock, or injury to persons.
- Do not use outdoors.
- Do not let cord hang over edge of table or counter, or touch hot surfaces.
- Do not place on or near a hot gas or electric burner, or in a heated oven.
- To disconnect, turn any control to "off," then remove plug from wall outlet.
- Do not use appliance for other than intended use.
- The carafe is designed for use with this appliance only. It must never be used on a range top.
- Do not place a hot carafe on a wet or cold surface.
- Do not use a cracked carafe or a carafe having a loose or weakened handle.
- Do not clean carafe with cleansers, steel wool pads, or other abrasive materials.
- Scalding may occur if the lid is removed during the brewing cycle.
3. Parts of Your Coffeemaker
Familiarize yourself with the components of your Mr. Coffee BVMC-DVX41 coffeemaker before operation.

Figure 1: Front view of the Mr. Coffee BVMC-DVX41 coffeemaker. This image shows the control panel with digital display, buttons for programming and brewing, the brew basket area, and the glass carafe on the warming plate.
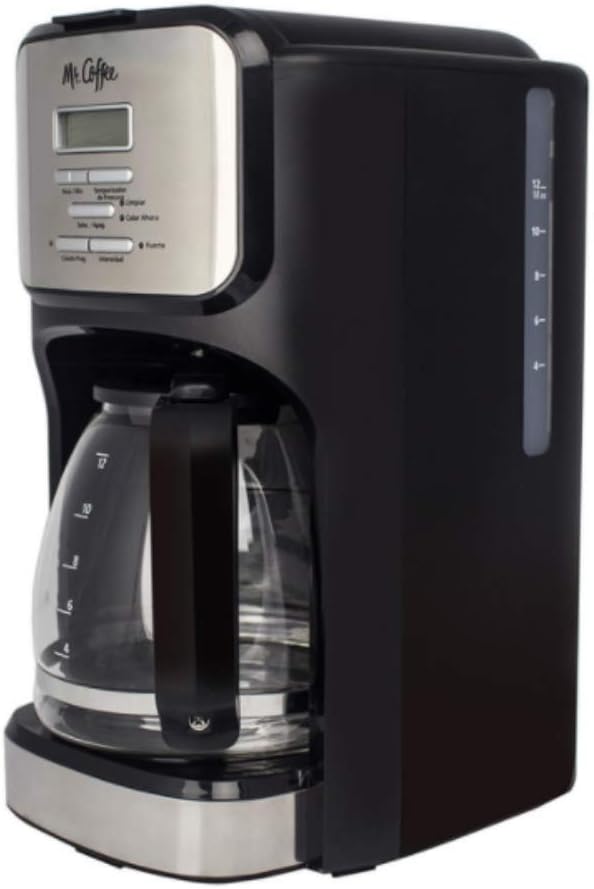
Figure 2: Side view of the Mr. Coffee BVMC-DVX41 coffeemaker. This image highlights the water reservoir with its clear water level indicator, allowing users to easily see how much water is added.
- Lid: Covers the water reservoir and brew basket.
- Water Reservoir: Holds water for brewing. Features a clear level indicator.
- Brew Basket: Holds the coffee filter and ground coffee. Removable for easy cleaning.
- Control Panel: Includes a digital clock/timer display and various function buttons.
- Glass Carafe: 12-cup capacity carafe with handle and lid.
- Warming Plate: Keeps brewed coffee hot.
- Power Cord: For connecting to an electrical outlet.
4. Setup and First Use
4.1 Before First Use
Before brewing your first pot of coffee, it is recommended to clean the coffeemaker to remove any dust or manufacturing residues.
- Wash the carafe and brew basket in warm, soapy water. Rinse thoroughly and dry.
- Fill the water reservoir to the 12-cup mark with fresh, cold water.
- Place an empty paper filter (basket-style) into the brew basket.
- Place the brew basket into its housing and close the lid.
- Place the empty carafe on the warming plate.
- Plug the coffeemaker into an electrical outlet.
- Run a full brewing cycle with only water and the paper filter. Discard the water from the carafe and the used filter.
- Repeat this process once more for optimal cleaning.
4.2 Setting the Clock
The coffeemaker features a programmable clock. Set the current time for accurate programming.
- Plug in the coffeemaker. The display will flash "12:00".
- Press the "HOUR" button repeatedly until the correct hour is displayed. Pay attention to the AM/PM indicator.
- Press the "MINUTE" button repeatedly until the correct minute is displayed.
- The clock is now set. If you do not press any button for 5 seconds, the time will be set automatically.
5. Operating Instructions
5.1 Brewing Coffee
- Ensure the coffeemaker is plugged in and the clock is set.
- Fill the water reservoir with fresh, cold water to your desired number of cups, using the water level indicator on the side. Do not exceed the 12-cup maximum fill line.
- Place a basket-style paper filter into the brew basket.
- Add the desired amount of ground coffee into the filter. A general guideline is one tablespoon of ground coffee per cup, but adjust to your taste.
- Slide the brew basket into its housing and close the lid securely.
- Place the empty carafe with its lid on the warming plate. Ensure it is seated correctly to activate the "Pause 'n Serve" feature.
- Press the "ON/OFF" button to start the brewing cycle. The indicator light will illuminate.
- Once brewing is complete, the coffeemaker will automatically switch to the "Keep Warm" mode. The warming plate will keep the coffee hot for approximately 2 hours before automatically shutting off.
5.2 Programmable Brewing (Delay Brew)
Set your coffeemaker to brew automatically at a later time.
- Follow steps 1-6 from "5.1 Brewing Coffee".
- Press the "PROGRAM" button. The display will show "PROGRAM" and flash "12:00".
- Press the "HOUR" and "MINUTE" buttons to set the desired brew time. Remember to observe the AM/PM indicator.
- Once the desired time is set, press the "PROGRAM" button again to confirm. The "PROGRAM" indicator light will illuminate.
- The coffeemaker will now start brewing automatically at the programmed time.
- To cancel the programmed brew, press the "ON/OFF" button.
5.3 Pause 'n Serve Feature
This feature allows you to pour a cup of coffee before the entire brewing cycle is complete.
- During the brewing cycle, you can temporarily remove the carafe from the warming plate. The flow of coffee will automatically stop.
- Pour your cup of coffee.
- Immediately return the carafe to the warming plate. If the carafe is not returned within 30 seconds, the brew basket may overflow.
6. Care and Maintenance
6.1 Daily Cleaning
Regular cleaning helps maintain the performance and longevity of your coffeemaker.
- Always unplug the coffeemaker and allow it to cool completely before cleaning.
- Remove the brew basket and discard the used coffee filter and grounds.
- Wash the carafe and brew basket in warm, soapy water. These parts are not dishwasher safe. Rinse thoroughly.
- Wipe the exterior of the coffeemaker with a soft, damp cloth. Do not use abrasive cleaners or scouring pads.
- Do not immerse the coffeemaker in water or any other liquid.
6.2 Descaling (Mineral Deposit Removal)
Mineral deposits (calcium and lime) can build up in your coffeemaker over time, affecting its performance. Descale your coffeemaker every 80 brew cycles or every 2-3 months, depending on water hardness.
- Pour 4 cups of undiluted white household vinegar into the water reservoir.
- Place an empty paper filter into the brew basket.
- Place the empty carafe on the warming plate.
- Press the "ON/OFF" button to start a brewing cycle. Allow half of the vinegar solution to brew into the carafe, then press "ON/OFF" to turn off the coffeemaker.
- Let the coffeemaker soak for at least 15 minutes to allow the vinegar to clean the internal components.
- After soaking, press "ON/OFF" again to complete the brewing cycle with the remaining vinegar solution.
- Discard the vinegar solution from the carafe and the used filter.
- Fill the water reservoir with fresh, cold water (12 cups) and run two full brewing cycles with only water to rinse out any remaining vinegar taste.
7. Troubleshooting Guide
Review the following common issues and their solutions before contacting customer service.
| Problem | Possible Cause | Solution |
|---|---|---|
| Coffeemaker does not turn on. | Not plugged in; power outage; faulty outlet. | Ensure the coffeemaker is securely plugged into a working electrical outlet. Check your circuit breaker. |
| Coffee is not brewing. | Water reservoir empty; brew cycle not started; carafe not on warming plate. | Fill water reservoir. Press "ON/OFF" button. Ensure carafe is properly seated on the warming plate. |
| Coffee tastes weak or too strong. | Incorrect coffee-to-water ratio; coffee grind too coarse/fine. | Adjust the amount of ground coffee. Use a medium grind for drip coffeemakers. |
| Brew basket overflows. | Too much coffee grounds; filter not seated correctly; carafe removed too long during Pause 'n Serve; coffeemaker needs descaling. | Reduce coffee grounds. Ensure filter is properly seated. Return carafe quickly. Descale the coffeemaker. |
| Coffee is not hot enough. | Warming plate not functioning; coffeemaker needs descaling. | Ensure the warming plate is on. Descale the coffeemaker to improve heating efficiency. |
8. Product Specifications
- Model Number: BVMC-DVX41
- Brand: Mr. Coffee
- Capacity: 12 Cups
- Coffee Maker Type: Drip Coffee Machine
- Special Feature: Programmable
- Voltage: 120 Volts
- Operation Mode: Fully Automatic
- Included Components: Carafe, Filter
- Product Dimensions: 15 x 14 x 9 inches (approximate)
- Item Weight: 5.06 pounds (approximate)
- Exterior Finish: Metallic
- Human Interface Input: Buttons
- Is Dishwasher Safe: No (for main unit, carafe and brew basket are hand-wash only)
9. Warranty and Customer Support
For detailed warranty information, please refer to the warranty card included with your product packaging or visit the official Mr. Coffee website. If you experience any issues not covered in this manual, or require further assistance, please contact Mr. Coffee customer support.
Online Support: Visit the official Mr. Coffee website for FAQs and support resources.
Telephone Support: Refer to your product packaging or the official website for current contact numbers.


