Olimpia Splendid 01921
Olimpia Splendid Dolceclima Compact 10P Portable Air Conditioner User Manual
Brand: Olimpia Splendid
Model: 01921
Introduction
The Olimpia Splendid Dolceclima Compact 10P is a portable air conditioner designed to provide efficient cooling and dehumidification for your living spaces. Featuring a compact design and advanced functionalities, it ensures a comfortable indoor environment. This manual provides essential information for the safe and effective operation and maintenance of your appliance.
Key features include a cooling capacity of 10,000 BTU/h, compact dimensions (70 cm high, 35 cm wide), and multiple operating modes such as Fan, Dehumidification, Auto, Sleep, and Turbo. It utilizes R290, an environmentally friendly refrigerant with low global warming potential. The unit also features automatic condensate drainage and comes with a multi-function remote control and a 12-hour timer.
Important Safety Information
Please read all safety warnings and instructions carefully before using this appliance to prevent injury or damage. Keep this manual for future reference.
- Ensure the power supply matches the voltage specified on the appliance's rating label.
- Do not operate the air conditioner with a damaged cord or plug.
- Do not block air inlets or outlets. Maintain adequate clearance around the unit for proper airflow.
- Do not insert fingers or objects into the air outlet.
- Always unplug the unit before cleaning or performing any maintenance.
- This appliance is for indoor use only. Do not use it in bathrooms or very humid environments.
- Keep the unit upright during transport and operation to prevent refrigerant leakage.
- Do not attempt to repair or modify the appliance yourself. Contact qualified service personnel.
- The appliance contains R290 refrigerant, which is flammable. Handle with care and ensure proper ventilation.
Package Contents
Verify that all items are present and in good condition upon unpacking:
- Olimpia Splendid Dolceclima Compact 10P Portable Air Conditioner Unit
- Exhaust Hose
- Window Kit (Adjustable window slider, hose adapter, window exhaust adapter)
- Remote Control
- Drainage Hose (for continuous drainage)
- User Manual

Figure 1: Included accessories and components for the portable air conditioner.
Setup and Installation
1. Unit Placement
Place the air conditioner on a flat, stable surface, ensuring there is at least 30 cm (12 inches) of clearance from walls or other objects to allow for proper airflow. Avoid placing the unit in direct sunlight or near heat sources.

Figure 2: Front view of the portable air conditioner.
2. Exhaust Hose Installation
The exhaust hose is crucial for expelling hot air outside the room. Proper installation ensures efficient cooling.
- Screw the exhaust hose adapter onto one end of the exhaust hose.
- Connect the other end of the exhaust hose to the air outlet port on the back of the unit. Ensure it is securely fastened.
- Insert the window exhaust adapter into the other end of the exhaust hose.
- Open a window or sliding door and place the adjustable window slider kit into the opening. Extend the slider to fit the window securely.
- Insert the window exhaust adapter into the opening of the window slider kit, ensuring a tight seal to prevent hot air from re-entering the room.
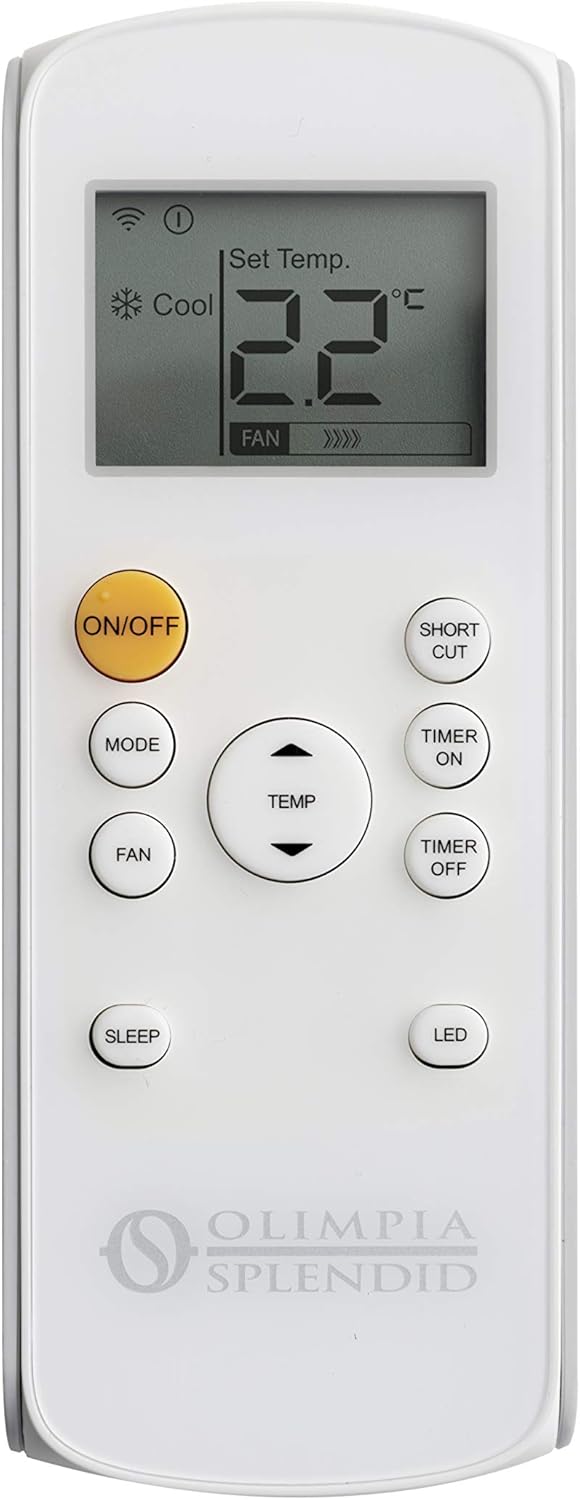
Figure 3: Exhaust hose connected to the unit and extended towards a window.

Figure 4: Rear view of the unit with exhaust hose connection.
3. Power Connection
Plug the power cord into a grounded electrical outlet. Ensure the outlet meets the power requirements of the unit.
Operating Instructions
Your Dolceclima Compact 10P can be operated using the control panel on the unit or the multi-function remote control.

Figure 5: Control panel on the unit.

Figure 6: Multi-function remote control.
Control Panel and Remote Control Functions
- Power Button (ON/OFF): Turns the unit on or off.
- Mode Button (MODE): Cycles through operating modes:
- Cooling Mode: Provides powerful cooling. Set your desired temperature using the temperature adjustment buttons.
- Fan Mode: Circulates air without cooling. Adjust fan speed as desired.
- Dehumidification Mode: Removes excess moisture from the air. The unit will automatically drain condensate.
- Auto Mode: Automatically selects the operating mode (cooling, fan, or dehumidification) based on the ambient room temperature.
- Sleep Mode: Optimizes operation for quietness and energy saving during sleep.
- Turbo Mode: Provides maximum cooling power for rapid temperature reduction.
- Temperature Adjustment Buttons (+ / -): Adjusts the desired temperature in Cooling and Auto modes.
- Fan Speed Button (FAN): Adjusts fan speed (Low, Medium, High) in Fan and Cooling modes.
- Timer Button (TIMER ON/OFF): Sets a timer for automatic power on or off within a 12-hour period.
- LED Button (LED): Controls the illumination of the display panel.
Using the Remote Control
Point the remote control directly at the receiver on the air conditioner unit. Ensure there are no obstructions between the remote and the unit. The remote control requires batteries (included).
Maintenance
Regular maintenance ensures optimal performance and extends the lifespan of your air conditioner. Always unplug the unit before cleaning.
1. Cleaning the Air Filter
The air filter, located on the back of the unit, should be cleaned every two weeks or more frequently depending on usage and air quality.
- Turn off the unit and unplug it from the power outlet.
- Gently remove the filter panel and pull out the filter.
- Clean the filter using a vacuum cleaner to remove dust. For heavy dirt, wash it with lukewarm water (below 40°C) and a mild detergent. Rinse thoroughly.
- Allow the filter to dry completely before re-installing it. Do not expose it to direct sunlight.
- Slide the dry filter back into its position and close the panel.
2. Draining Condensate Water
The Dolceclima Compact 10P features automatic condensate drainage. However, in high humidity conditions or during dehumidification mode, manual drainage may be required if the internal tank fills up. The unit has two drainage outlets: one higher for continuous drainage and one lower for complete tank emptying.
- Turn off the unit and unplug it.
- Place a shallow pan or container under the drainage outlet.
- Remove the rubber stopper from the drainage outlet. Water will begin to flow out.
- Once all water has drained, replace the rubber stopper firmly.
- For continuous drainage, connect the provided drainage hose to the higher drainage outlet and direct it to a suitable drain.
3. Cleaning the Unit Exterior
Wipe the exterior of the unit with a soft, damp cloth. Do not use harsh chemicals, abrasives, or solvents, as these can damage the surface.
Troubleshooting
| Problem | Possible Cause | Solution |
|---|---|---|
| Unit does not turn on. | No power supply; Power cord not plugged in; Circuit breaker tripped. | Check power outlet; Ensure plug is fully inserted; Reset circuit breaker. |
| Unit cools insufficiently. | Air filter clogged; Exhaust hose not properly installed; Room too large; Doors/windows open. | Clean air filter; Ensure exhaust hose is sealed; Close doors/windows; Consider room size. |
| Unit is noisy. | Unit not on a flat surface; Air filter clogged; Internal components vibrating. | Place on a flat surface; Clean air filter; Contact service if noise persists. |
| Water leakage. | Drainage plug loose; Unit tilted; Condensate tank full (in some models). | Ensure drainage plug is secure; Place unit on level surface; Drain water manually if applicable. |
| Remote control not working. | Batteries dead or incorrectly inserted; Obstruction between remote and unit. | Replace batteries; Ensure correct polarity; Remove obstructions; Point directly at unit. |
If the problem persists after attempting these solutions, please contact customer support.
Technical Specifications
| Feature | Detail |
|---|---|
| Model Number | 01921 |
| Cooling Capacity | 10,000 BTU/h |
| Refrigerant | R290 (Environmentally friendly) |
| Power Supply | 220 Volts |
| Power Consumption | 1000 Watts |
| Noise Level | 63 dB |
| Product Dimensions (L x W x H) | 34.5 x 35.5 x 70.3 cm |
| Item Weight | 24.7 Kilograms |
| Energy Efficiency Rating | A |
| Seasonal Energy Efficiency Ratio (SEER) | 2.6 |

Figure 8: Product dimensions.
Warranty and Support
Olimpia Splendid products are manufactured to high-quality standards. For information regarding warranty coverage, please refer to the warranty card included with your product or visit the official Olimpia Splendid website.
For technical assistance, troubleshooting beyond this manual, or spare parts, please contact Olimpia Splendid customer service. Have your model number (01921) and purchase date ready when contacting support.
You can find more information and support on the Olimpia Splendid Store on Amazon.