Introduction
The Fanvil X4S is an enterprise-grade VoIP IP phone designed for professional communication environments. It features a 2.8-inch main color screen and a secondary 2.4-inch DSS color screen, enhancing user experience and productivity. This manual provides detailed instructions for the proper setup, operation, and maintenance of your Fanvil X4S IP Phone.
Package Contents
Before proceeding with the installation, please verify that all items are present in the package:
- Fanvil X4S IP Phone Unit
- Handset and Handset Cord
- Ethernet Cable
- Power Adapter (X4S-AC model)
- Desk Stand
- Quick Installation Guide
Physical Description
The Fanvil X4S features a modern design with dual color screens. The primary display is a 2.8-inch color screen for call information and menu navigation. A secondary 2.4-inch DSS color screen provides dynamic DSS/BLF functions, offering up to 30 virtualized DSS keys across five pages. The phone supports both desktop and wall-mount installation.
Setup
1. Power Connection
The Fanvil X4S IP Phone can be powered using either the included AC power adapter or Power over Ethernet (PoE).
- Using AC Power Adapter: Connect the small end of the power adapter cable to the DC 12V port on the back of the phone. Plug the other end of the power adapter into a standard electrical outlet.
- Using Power over Ethernet (PoE): If your network switch supports PoE, connect an Ethernet cable from the network switch to the LAN port on the back of the phone. The phone will receive power directly through the Ethernet cable, eliminating the need for the AC power adapter.
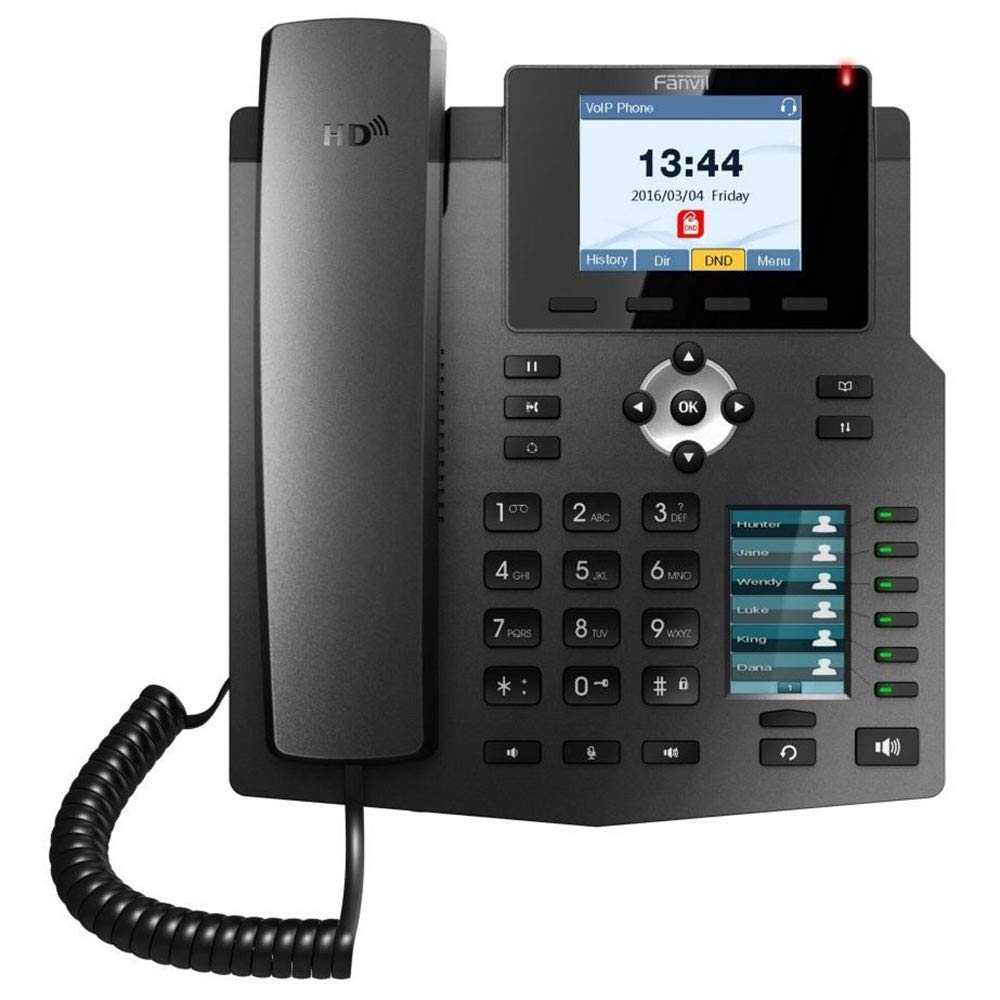
Image: The included AC power adapter for the Fanvil X4S IP Phone. This adapter is used to supply power to the device when PoE is not available.
2. Network Connection
Connect one end of the Ethernet cable to the LAN port on the back of the phone and the other end to an available port on your network switch or router. If you are connecting a computer through the phone, connect a second Ethernet cable from the PC port on the phone to your computer's Ethernet port.
3. Handset and Headset Connection
- Handset: Connect the coiled handset cord to the handset port on the side of the phone and to the handset itself.
- Headset: For hands-free communication, connect a compatible headset to the headset port. The Fanvil X4S supports Electronic Hook Switch (EHS) for Plantronics headsets.
4. Desktop / Wall-Mount Installation
- Desktop: Attach the desk stand to the back of the phone unit. Adjust the stand to your preferred viewing angle.
- Wall-Mount: The phone can also be mounted on a wall. Refer to the separate wall-mount bracket instructions (if included) for proper installation.
Operating Instructions
1. Basic Call Functions
- Making a Call: Lift the handset, press the speakerphone button, or press a line key. Dial the number and press the Dial soft key or wait a few seconds.
- Answering a Call: Lift the handset, press the speakerphone button, or press the Answer soft key.
- Ending a Call: Replace the handset, press the speakerphone button, or press the End Call soft key.
- Redial: Press the Redial button to call the last dialed number.
- Hold: During an active call, press the Hold soft key. Press the Resume soft key to retrieve the call.
2. DSS Keys
The secondary 2.4-inch DSS color screen displays programmable DSS (Direct Station Select) keys. These keys can be configured for various functions such as Speed Dial, Busy Lamp Field (BLF), Intercom, Call Park, and more. The phone supports up to 30 virtualized DSS keys across five pages, which can be navigated using the page navigation buttons.
3. Phonebook
The Fanvil X4S supports a phonebook with the capacity to store up to 500 entries. Access the phonebook via the menu to add, edit, or search for contacts. You can also access call logs to view recent incoming, outgoing, and missed calls.
Maintenance
1. Cleaning
To clean the phone, use a soft, dry cloth. For stubborn marks, a slightly damp cloth with mild, non-abrasive cleaner can be used. Avoid using harsh chemicals, solvents, or abrasive materials, as these can damage the phone's surface and screens.
2. Storage
When not in use for extended periods, store the phone in a cool, dry place away from direct sunlight and extreme temperatures. Disconnect the power adapter and network cable before storage.
Troubleshooting
This section addresses common issues you might encounter with your Fanvil X4S IP Phone.
- No Power:
- Ensure the power adapter is securely connected to both the phone and a working electrical outlet.
- If using PoE, verify that the Ethernet cable is connected to a PoE-enabled port on your network switch and that the switch is powered on.
- No Dial Tone:
- Check the network cable connection to the LAN port.
- Verify that the phone has successfully registered with your VoIP server. Check the phone's display for registration status.
- Ensure the handset cord is properly connected.
- Cannot Make/Receive Calls:
- Confirm network connectivity.
- Check SIP account registration status on the phone's display.
- Contact your VoIP service provider or system administrator for assistance with account configuration.
- Poor Audio Quality:
- Check network connection stability.
- Ensure the handset or headset is properly connected.
- Adjust volume settings on the phone.
For more complex issues, consult your system administrator or Fanvil technical support.
Specifications
| Brand | Fanvil |
| Model | X4S |
| SIP Lines | 4 |
| Main Display | 2.8" Color Screen |
| DSS Display | 2.4" Color Screen (30 virtual DSS keys across 5 pages) |
| Ethernet Ports | 2 x 10/100 Mbps (LAN, PC) |
| HD Voice | Yes |
| PoE Support | Yes |
| Power Source | Power Adapter (included) or PoE |
| Phonebook Capacity | 500 entries |
| EHS Support | For Plantronics headsets |
| Installation | Desktop / Wall-mount |
| Dimensions (L x W x H) | 12 x 12 x 5 inches |
| Caller Identification | Yes |
| Multiline Operation | Yes |
| Compatible Platforms | 3CX, Asterisk, Broadsoft, Elastix, Zycoo, etc. |
Warranty Information
Fanvil products typically come with a standard manufacturer's warranty. For specific warranty terms and conditions, including duration and coverage, please refer to the warranty card included with your product or visit the official Fanvil website. Keep your purchase receipt as proof of purchase for warranty claims.
Support
For technical assistance, product inquiries, or further support, please contact your vendor or visit the official Fanvil support website. Online resources, FAQs, and firmware updates may also be available.
Fanvil Official Website: www.fanvil.com