Introduction
This manual provides detailed instructions for the assembly, operation, and maintenance of your National Geographic 50/600 Telescope and 640x Microscope Kit. This kit is designed to introduce users to the wonders of astronomy and microscopy, offering both celestial and terrestrial observation capabilities.
What's in the Box
Carefully unpack all components and verify that all items listed below are present. If any parts are missing or damaged, please contact customer support.
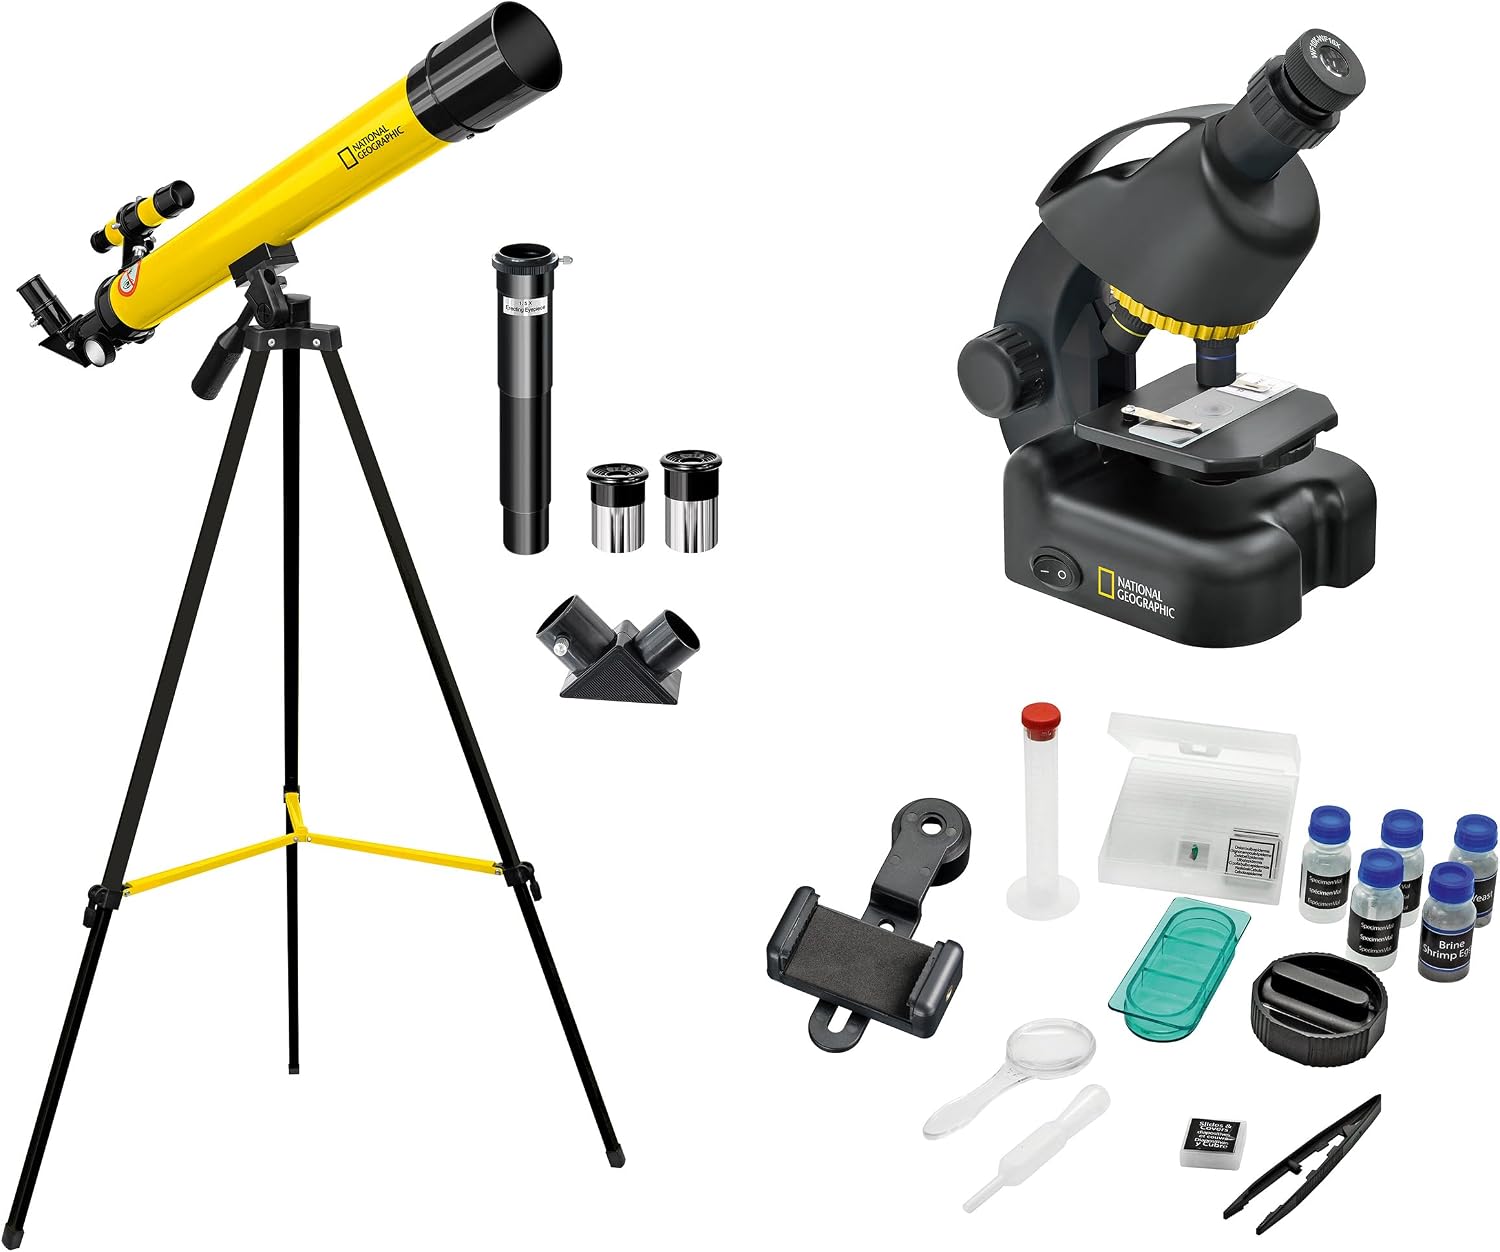
Image: All components of the National Geographic Telescope and Microscope Kit, including the yellow telescope on a tripod, black microscope, and various accessories like eyepieces, slides, and a smartphone adapter.
- 50/600 Refractor Telescope
- Adjustable Aluminum Tripod
- Finder Scope
- Diagonal Mirror (90°)
- 1.5x Reversing Lens
- Eyepieces (e.g., 10mm, 20mm)
- Moon Filter
- 40x-640x Microscope
- Smartphone Holder/Adapter
- Permanent Preparations (pre-made slides)
- Object Slides (blank slides)
- Microscopy Cutlery (tools for slide preparation)
- Specimen Vials (e.g., Brine Shrimp Eggs, Yeast)

Image: A collection of microscope accessories including specimen vials, blank slides, prepared slides, a smartphone adapter, and small tools.
Setup
Telescope Setup

Image: The yellow National Geographic 50/600 Telescope mounted on its black tripod, ready for observation.
- Assemble the Tripod: Extend the legs of the aluminum tripod to a stable height. Secure them using the locking mechanisms.
- Attach the Telescope Tube: Mount the telescope tube onto the tripod head. Ensure it is securely fastened with the provided screws or clamps.
- Install the Finder Scope: Attach the small finder scope to its designated bracket on the main telescope tube. Align it later during operation.
- Insert the Diagonal Mirror: For comfortable viewing, insert the 90° diagonal mirror into the focuser tube. This redirects the light path upwards.
- Insert an Eyepiece: Choose an eyepiece (e.g., 20mm for lower magnification, 10mm for higher) and insert it into the diagonal mirror. Secure it with the small thumbscrew.
- Optional: 1.5x Reversing Lens: For terrestrial viewing, you may insert the 1.5x reversing lens between the diagonal mirror and the eyepiece to correct the image orientation.
- Optional: Moon Filter: For observing the Moon, screw the moon filter onto the bottom of your chosen eyepiece before inserting it.

Image: Close-up of telescope accessories: a 1.5x erecting eyepiece, two standard eyepieces, and a 90-degree diagonal mirror.
Microscope Setup

Image: The black National Geographic 640x Microscope with a slide placed on its stage, showing the objective lenses and eyepiece.
- Power Source: Ensure the microscope has batteries installed (2 AA batteries required) or is connected to a suitable power source if applicable.
- Place on a Stable Surface: Position the microscope on a flat, stable surface.
- Prepare a Slide: Place a prepared slide or create your own specimen using the provided blank slides and microscopy tools.
- Position the Slide: Secure the slide onto the microscope stage using the stage clips.
- Select Objective Lens: Rotate the revolving nosepiece to select the lowest power objective lens (e.g., 4x or 10x) to begin observation.
Smartphone Adapter Setup

Image: A young girl happily observing through the microscope with a smartphone attached to the eyepiece via the adapter, capturing the view.
- Attach to Eyepiece: Secure the smartphone adapter to the eyepiece of either the telescope or microscope. Ensure it is firmly attached without damaging the eyepiece.
- Mount Smartphone: Place your smartphone into the adapter's clamp. Adjust the clamp to securely hold your phone.
- Align Camera: Open your smartphone's camera app. Adjust the adapter and phone position until the camera lens is perfectly aligned with the eyepiece, and the circular view from the instrument is visible on your phone screen.
Operating Instructions
Using the Telescope
- Finder Scope Alignment: Before observing, align the finder scope with the main telescope. Look through the main telescope at a distant object (e.g., a tree top) during the day. Adjust the finder scope until the same object is centered in its crosshairs.
- Locating Objects: Use the finder scope to locate your desired celestial or terrestrial object. Once centered in the finder scope, it should be visible in the main telescope's eyepiece.
- Focusing: Turn the focuser knob slowly until the image appears sharp and clear.
- Changing Magnification: To increase magnification, switch to a lower focal length eyepiece (e.g., from 20mm to 10mm). Refocus after changing eyepieces.
- Observing the Moon: Use the moon filter to reduce glare and enhance contrast when observing the Moon.

Image: Circular views showing the Moon and Jupiter as seen through a telescope, and two different cellular structures as seen through a microscope.
Using the Microscope
- Turn on Illumination: Switch on the built-in LED light source to illuminate your specimen.
- Initial Focus: Using the lowest power objective lens, slowly turn the focus knob to bring the specimen into rough focus.
- Adjusting Magnification: Once focused at low power, rotate the revolving nosepiece to a higher power objective lens (e.g., 40x).
- Fine Focus: At higher magnifications, use the focus knob for fine adjustments to achieve a sharp image.
- Adjusting Light: If available, adjust the diaphragm or light intensity to optimize contrast and brightness for your specimen.

Image: A young boy intently looking through the eyepiece of the National Geographic microscope, with specimen vials visible on the table.
Maintenance
- Cleaning Lenses: Use a soft, lint-free cloth specifically designed for optical lenses to clean eyepieces and objective lenses. Avoid abrasive materials or harsh chemicals.
- Dust Protection: Always replace dust caps on the telescope and microscope when not in use to prevent dust accumulation.
- Storage: Store the kit in a dry, cool place, away from direct sunlight and extreme temperatures.
- Battery Replacement: Replace microscope batteries (AA) as needed to ensure proper illumination.
Troubleshooting
| Problem | Possible Cause | Solution |
|---|---|---|
| Image is blurry in telescope. | Not properly focused; eyepiece not fully inserted. | Adjust the focuser knob slowly. Ensure eyepiece is fully seated and secured. |
| No image visible in telescope. | Dust cap on; finder scope not aligned; wrong eyepiece. | Remove dust cap. Align finder scope. Start with lowest power eyepiece. |
| Microscope light not working. | Batteries dead or incorrectly inserted. | Check battery orientation and replace if necessary (2 AA batteries). |
| Image is dark or unclear in microscope. | Insufficient illumination; objective lens dirty; slide not positioned correctly. | Ensure light is on and bright enough. Clean objective lens. Reposition slide. |
| Smartphone camera not aligning with eyepiece. | Adapter not adjusted correctly. | Loosen adapter clamps slightly and carefully adjust phone position until the camera lens is centered over the eyepiece. |
Specifications
Telescope
- Model: 50/600 Refractor Telescope
- Objective Lens Diameter: 50 mm
- Focal Length: 600 mm
- Eyepiece Lens Description: Achromatic
- Telescope Mount Description: Tripod Mount
- Finderscope: Reflex
- Focus Type: Manual Focus
Microscope
- Magnification: 40x - 640x
- Illumination: Built-in LED light source
- Power Source: 2 AA batteries (not included)
General
- Product Dimensions: 6.77 x 28.35 x 9.45 inches (17.2 x 72 x 24 cm)
- Item Weight: 4.36 pounds (1.98 kg)
- Item Model Number: 9118300
Warranty and Support
This National Geographic product is covered by a 5-Year Warranty when the purchase is registered online. For warranty claims, technical support, or inquiries regarding missing parts, please refer to the contact information provided with your product packaging or visit the official National Geographic product support website.