Introduction
This manual provides detailed instructions for the installation, operation, and maintenance of your Pioneer GM-D9705 GM Series 5-Channel Class D Amplifier. The GM-D9705 is a powerful 2,000-watt amplifier designed for automotive audio systems, featuring a robust design and flexible crossover networks for enhanced sound control. It delivers 75 watts x 4 (RMS) for A/B channels and 500 watts (RMS) for the subwoofer output at 2 ohms. For optimal performance and safety, please read this manual thoroughly before use.
Key Features
- A/B channels: 75W RMS x 4 @ 4Ω
- A/B channels: 100W RMS x 4 @ 2Ω
- SW channels: 350W RMS x 1 @ 4Ω
- SW channels: 600W RMS x 1 @ 2Ω
- A/B channel frequency response: 10Hz–50kHz
- Variable crossover networks for enhanced audio control.
- Wired bass boost knob (0 to 18 dB).
- Block terminals for secure wiring.
Safety Information
Always prioritize safety during installation and operation. Professional installation is highly recommended. Disconnect the vehicle's negative battery terminal before making any electrical connections. Avoid exposing the amplifier to moisture, water, or extreme temperatures. Ensure the amplifier is mounted in a location with adequate ventilation to prevent overheating. Failure to follow these safety guidelines may result in damage to the amplifier, vehicle, or personal injury.
Setup and Installation
Unpacking
Carefully remove all components from the packaging. Verify that all included items are present: amplifier unit, wired bass boost remote, and instruction manual.
Mounting the Amplifier
Select a secure, well-ventilated location for mounting the amplifier, away from direct sunlight, heat sources, and moisture. Ensure adequate airflow around the unit. Use appropriate hardware to secure the amplifier firmly to a stable surface.
Wiring Connections
Before making any connections, disconnect the vehicle's negative battery terminal to prevent electrical shorts. Refer to the wiring diagrams for proper connection of power, ground, remote turn-on, speaker outputs, and RCA inputs. Ensure all connections are secure and insulated.
- Power Connection: Connect the main power cable (minimum 4-gauge recommended) directly to the positive terminal of the vehicle's battery, with an inline fuse installed within 18 inches of the battery.
- Ground Connection: Connect the ground cable (same gauge as power) to a clean, unpainted metal surface of the vehicle chassis, ensuring a solid electrical contact.
- Remote Turn-On: Connect the remote turn-on wire to the remote output of your head unit.
- RCA Input: Connect RCA cables from your head unit's pre-outs to the amplifier's RCA input jacks.
- Speaker Output: Connect your speakers to the amplifier's speaker terminals, observing correct polarity. For subwoofer channels, ensure proper impedance matching (2 ohms or 4 ohms).
Operating Instructions
Initial Power-Up
After all connections are made and verified, reconnect the vehicle's negative battery terminal. Turn on your head unit. The amplifier should power on, indicated by an illuminated power indicator.
Gain Adjustment
Adjust the gain controls on the amplifier to match the output level of your head unit. Start with the gain set to minimum, then slowly increase it until the desired volume is achieved without distortion. Avoid setting the gain too high, as this can lead to clipping and speaker damage.
Crossover Settings
Utilize the variable crossover networks (LPF, HPF) to optimize sound reproduction for your specific speaker setup. High-Pass Filter (HPF) is typically used for full-range speakers, and Low-Pass Filter (LPF) for subwoofers. Adjust the frequency and slope settings as needed.
Bass Boost Control
Use the wired bass boost knob to adjust the low-frequency output (0 to 18 dB) to your preference. Use this feature moderately to avoid distortion.
Maintenance
The Pioneer GM-D9705 amplifier requires minimal maintenance. Keep the unit clean and free from dust and debris. Ensure proper ventilation to prevent overheating. Periodically check all wiring connections for tightness and corrosion.
Cleaning
Use a soft, dry cloth to wipe the amplifier's exterior. Do not use harsh chemicals or abrasive cleaners.
Troubleshooting
No Power
- Check the inline fuse on the power cable.
- Verify power and ground connections are secure.
- Ensure the remote turn-on wire is receiving 12V from the head unit.
No Sound
- Check all RCA and speaker connections.
- Verify head unit output and amplifier input settings.
- Ensure speakers are properly connected and not damaged.
Distorted Sound
- Reduce the amplifier's gain setting.
- Check for proper crossover settings.
- Inspect speaker wiring for shorts or incorrect polarity.
Amplifier Overheats
- Ensure adequate ventilation around the amplifier.
- Check speaker impedance to ensure it matches the amplifier's specifications.
- Reduce gain settings if consistently running at maximum output.
Specifications
| Feature | Value |
|---|---|
| Model | GM-D9705 |
| Brand | PIONEER |
| Dimensions (L x W x H) | 14.9 x 10.7 x 4.4 inches |
| Manufacturer | Pioneer |
| Maximum Supply Voltage | 6.5 Volts |
| Mounting Type | Surface Mount |
| Number of Channels | 5 |
| Maximum Output Power | 2000 Watts |
| RMS Output Power (A/B Channels) | 75W x 4 @ 4Ω / 100W x 4 @ 2Ω |
| RMS Output Power (SW Channel) | 350W x 1 @ 4Ω / 600W x 1 @ 2Ω |
| Item Weight | 10 Pounds |
| Unit Count | 1.0 Count |
Warranty Information
The Pioneer GM-D9705 amplifier comes with a 1-year manufacturer's warranty. For detailed terms and conditions, please refer to the warranty card included with your product or visit the official Pioneer website.
Customer Support
For technical assistance, troubleshooting, or warranty claims, please contact Pioneer customer support. You can find contact information on the official Pioneer website or through your authorized dealer. Visit the official Pioneer Store for more product information.
Product Images

Image showing the Pioneer GM-D9705 5-channel amplifier from the top, alongside its wired remote bass boost knob.

Rear view of the amplifier, detailing the power input, ground, remote turn-on, and speaker output terminals, along with the fuses.
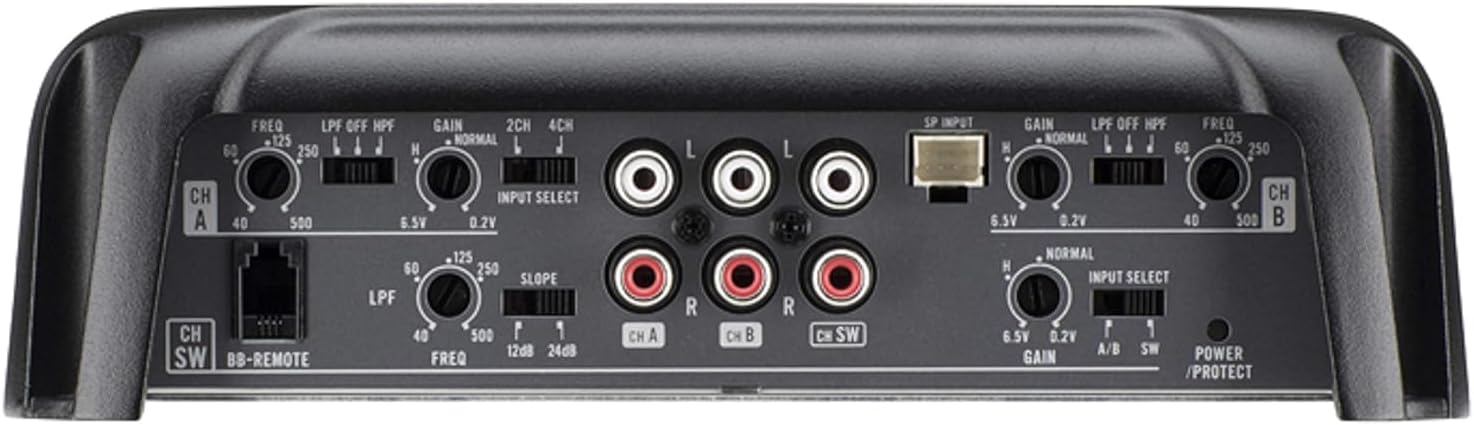
Top view of the amplifier's control panel, displaying the RCA input jacks, gain adjustments, and crossover frequency knobs for channels A, B, and the subwoofer channel.

A close-up image of the wired bass boost remote control, featuring a rotary knob for adjusting bass levels from minimum to maximum.
Product Videos
No official seller-provided product videos are available for embedding in this manual. For additional product demonstrations or user reviews, please refer to the product page or official brand channels.


