
Introduction
This manual provides detailed instructions for the assembly and finishing of the Airfix Hawker Typhoon MK IB Car Door 1:24 scale plastic model kit. This kit allows enthusiasts to recreate a historically significant WWII military aircraft. The model features a 1:24 scale, consisting of 520 pieces, and is rated with a skill level of 4, indicating a challenging build suitable for experienced modelers.

Figure 1: Completed Airfix Hawker Typhoon MK IB Model
Safety Information
Warning: Choking hazard, small parts. Not suitable for children under 8 years old.
Always ensure proper ventilation when using paints and glues. Keep all modeling tools and materials out of reach of small children. Read and follow all safety instructions provided with paints, glues, and other modeling accessories.
What's in the Box
Your Airfix Hawker Typhoon MK IB Car Door model kit includes:
- 1 unassembled military airplane kit (520 pieces)
Please note that paints and glue are not included and must be purchased separately. Refer to the outside of the kit box for a list of recommended Humbrol paints required to complete the various liveries.

Figure 2: Airfix Hawker Typhoon MK IB Kit Box Art
Setup and Assembly
Assembly of this 1:24 scale model requires careful attention to detail and adherence to the provided instructions within the kit. This is a Skill Level 4 kit, designed for experienced modelers.
General Assembly Tips:
- Preparation: Carefully remove all parts from their sprues using a hobby knife or sprue cutters. Clean any flash or mold lines with a sanding stick or fine-grit sandpaper.
- Test Fit: Before applying glue, always test fit parts to ensure proper alignment. Some parts may require minor trimming or sanding for a perfect fit.
- Adhesives: Use plastic model cement sparingly. Apply glue to one surface and press parts together firmly. Allow adequate drying time as specified by the glue manufacturer.
- Painting: It is often easier to paint smaller components or interior sections before final assembly. Refer to the painting guide for specific color schemes.
Key Assembly Areas:
Pay close attention to the cockpit and engine areas, as these often contain intricate details.

Figure 3: Cockpit Detail

Figure 4: Internal Structure Cutaway
The early Typhoon models featured a distinctive 'car door' style cockpit entry with a wind-down window and a hinged transparent roof panel. Ensure these components are assembled according to the kit's specific instructions to accurately represent this feature.

Figure 5: Underside Ordnance Detail
Finishing and Painting (Operating)
Once the model is assembled, the next step is painting and applying the chosen livery. The kit provides options for several historical aircraft.
Livery Options:
- Livery A: R7752 PR-G, flown by Roland Beamont, 609 Squadron, Manston 1943.
- Livery B: RB781 SA-H, 486 Squadron.
- Livery C: EK270 EL-X, 181 Squadron.
- Livery D: JP671 XP-R, 174 Squadron (This livery represents an aircraft captured and operated by 'Zirkus Rosarius' for evaluation, featuring German markings).
Refer to the detailed painting guides provided in the kit for exact color placement and decal application. Humbrol paints are recommended for accurate color matching.
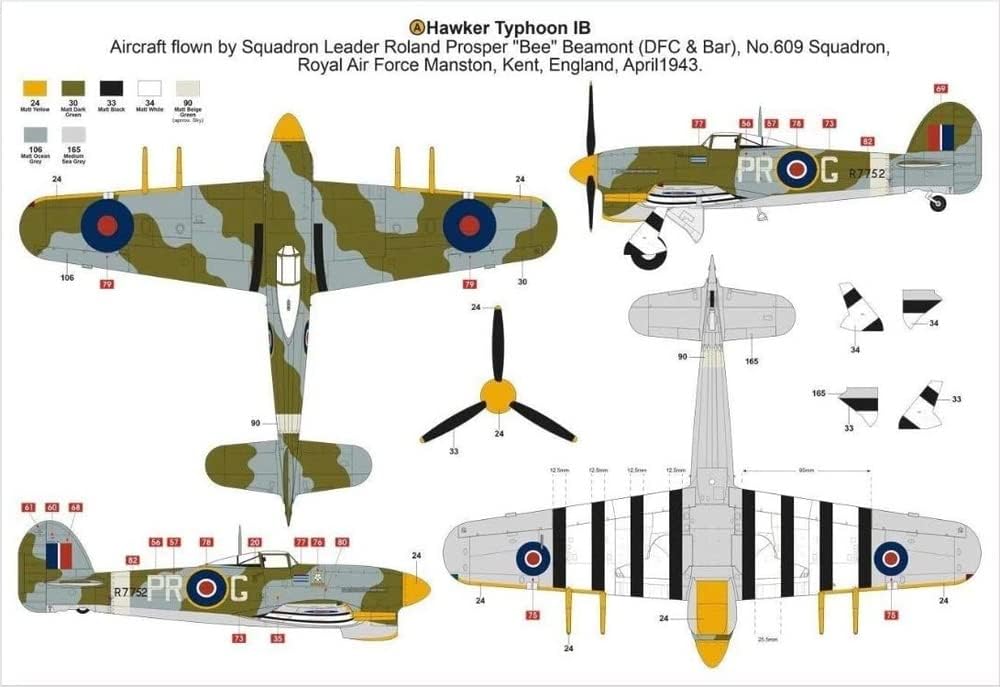
Figure 6: Livery A Guide

Figure 7: Livery B Guide

Figure 8: Livery C Guide

Figure 9: Livery D Guide (Captured Aircraft)
Maintenance and Display
Once your model is complete, proper care will ensure its longevity and appearance.
- Cleaning: Dust your model regularly with a soft, dry brush or a can of compressed air. Avoid using harsh chemicals or wet cloths, which can damage paint or decals.
- Display: Display your model in a stable, dust-free environment away from direct sunlight, extreme temperatures, and high humidity. UV light can cause paint and decals to fade over time.
- Handling: Handle the model by its sturdy parts, such as the fuselage or wings, to avoid damaging delicate components like antennas or landing gear.
Troubleshooting Common Issues
Model building can sometimes present challenges. Here are solutions to common issues:
- Poor Part Fitment: If parts do not fit together perfectly, carefully sand or trim the edges of the mating surfaces. For larger gaps, plastic putty can be used to fill and smooth the area before painting.
- Missing or Damaged Parts: In the event of missing or damaged components, first check all sprues and the box thoroughly. If parts are genuinely missing or unusable, contact Airfix customer support with your kit details.
- Decal Application Issues: Use decal setting solutions to help decals conform to irregular surfaces and eliminate silvering (air trapped under the decal). Ensure the surface is glossy before applying decals for best results.
Specifications
| Feature | Detail |
|---|---|
| Brand | Airfix |
| Model Name | Hawker Typhoon MK IB Car Door |
| Model Number | A19003A |
| Scale | 1:24 |
| Number of Pieces | 520 |
| Skill Level | 4 |
| Material | Plastic |
| Recommended Age | 8 years and up |
| Product Dimensions (L x W x H) | 27 x 14 x 5 inches |
| Item Weight | 2.09 pounds (0.95 Kilograms) |
| Included Components | 1 unassembled military airplane |
Warranty and Support
For specific warranty information, product support, or to inquire about replacement parts, please refer to the official Airfix website or contact their customer service directly. This manual provides general assembly and usage guidelines; detailed warranty terms are typically provided with the product packaging or on the manufacturer's official channels.
You can visit the official Airfix store for more information: Airfix Store