1. Introduction
This manual provides detailed instructions for the safe and effective use of your YUNTENG 690 Multi-Device Tripod. Please read this manual thoroughly before operating the product and retain it for future reference. The YUNTENG 690 tripod is designed to provide stable support for various devices, enhancing your photography and videography experience.
2. Safety Information
- Do not exceed the maximum load capacity of the tripod. Refer to the specifications section for details.
- Ensure all locking mechanisms are securely fastened before mounting any device.
- Avoid placing the tripod on unstable or uneven surfaces.
- Do not leave the tripod unattended with a device mounted, especially in windy conditions.
- Keep the tripod away from extreme temperatures, moisture, and corrosive substances.
- Clean the tripod with a soft, dry cloth. Do not use harsh chemicals.
3. Package Contents
Verify that all items are present in the package:
- YUNTENG 690 Tripod
- Carrying Bag (may vary by region)
- Instruction Manual (this document)
4. Product Overview
Familiarize yourself with the main components of your YUNTENG 690 tripod:
- Tripod Head: The platform where your device attaches, featuring adjustment controls.
- Quick Release Plate: For easy attachment and detachment of your device.
- Horizontal Rotating Locking Knob: Secures the horizontal rotation of the tripod head.
- 360° Shooting Angle Adjusting Handle: Allows for precise control over the pan and tilt movements.
- Lifting Axis: The central column that can be raised or lowered to adjust the tripod's height.
- Leg Locks: Mechanisms on each leg to extend and secure the leg sections.
- Anti-skid Rubber Feet: Provide stability and prevent slipping on various surfaces.
- Gravity Hook: Located at the bottom of the central column, used to hang weights for added stability.
- Hydraulic Damping System: Provides smooth and controlled movements for video recording.

Image 1: The tripod head showing the 360-degree shooting angle adjusting handle and the horizontal rotating locking knob. This allows for flexible adjustment of the shooting angle, including support for vertical shooting.
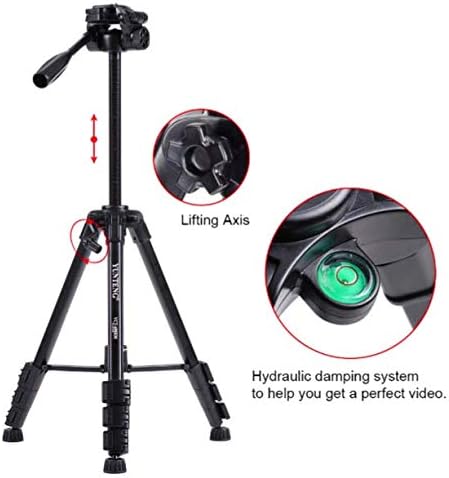
Image 2: Overview of the tripod highlighting the lifting axis for height adjustment and the hydraulic damping system for smooth video movements.
5. Setup
- Unpack the Tripod: Carefully remove the tripod from its packaging and carrying bag.
- Extend the Legs: Release the leg locks on each leg. Extend the leg sections to the desired length. Ensure the legs are fully extended for maximum stability. Securely fasten all leg locks.
- Adjust Leg Angle: Spread the tripod legs to achieve a stable base. The adjustable and non-slip rubber feet can be positioned to adapt to uneven terrain.
- Adjust Height (Lifting Axis): Loosen the central column lock. Raise or lower the lifting axis to the desired height. Tighten the central column lock firmly to secure it.
- Attach Device: Attach your camera or device to the quick release plate. Then, slide the quick release plate with your device onto the tripod head and secure it with the locking mechanism. Ensure it is firmly attached before letting go.
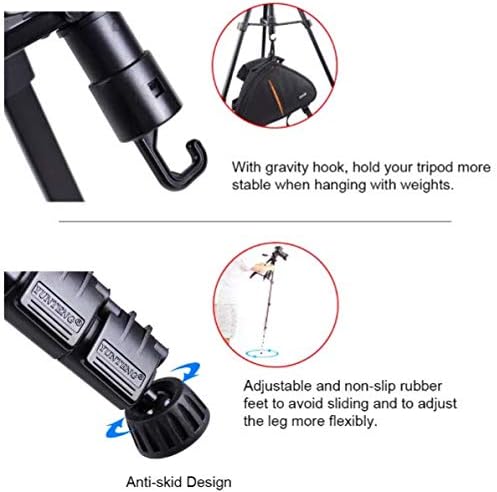
Image 3: Details of the gravity hook for added stability and the adjustable anti-skid rubber feet for flexible leg positioning.
6. Operating Instructions
- Adjusting Shooting Angle: Use the 360° Shooting Angle Adjusting Handle to pan (horizontal movement) and tilt (vertical movement) the tripod head. Loosen the handle to adjust, then tighten to secure the position. The horizontal rotating locking knob provides additional control for horizontal adjustments.
- Vertical Shooting: The tripod head supports vertical shooting. Adjust the tilt mechanism to position your device vertically and secure it.
- Using the Hydraulic Damping System: The integrated hydraulic damping system ensures smooth and fluid movements, particularly beneficial for video recording. Operate the adjusting handle gently to experience the smooth motion.
- Enhancing Stability with Gravity Hook: For increased stability, especially in outdoor or windy conditions, hang a weight (e.g., your camera bag) from the gravity hook located at the bottom of the central column.
7. Maintenance
- Cleaning: Wipe the tripod regularly with a soft, dry cloth to remove dust and dirt. For stubborn grime, a slightly damp cloth can be used, followed by immediate drying.
- Lubrication: Do not apply lubricants to the leg locks or other moving parts unless specifically instructed by the manufacturer. This can attract dirt and impair function.
- Storage: Store the tripod in its carrying bag in a cool, dry place, away from direct sunlight and extreme temperatures.
- Inspection: Periodically check all screws, bolts, and locking mechanisms for tightness. Do not overtighten.
8. Troubleshooting
- Tripod is unstable: Ensure all leg locks are securely fastened and the legs are spread wide enough. Check that the central column lock is tight. Consider using the gravity hook with an added weight.
- Device not attaching securely: Verify that the quick release plate is correctly mounted to your device and then properly inserted and locked into the tripod head.
- Difficulty adjusting head movement: Check if the horizontal rotating locking knob or the adjusting handle is too tight. Loosen slightly for smoother movement.
- Legs not extending/retracting smoothly: Clean the leg sections to remove any dirt or debris. Do not force the legs.
9. Specifications
| Feature | Detail |
|---|---|
| Brand Name | YUNTENG |
| Manufacturer Number | YUNTENG690 |
| Accessory Type | Tripod |
| Compatible Devices | Multi-device |
| ASIN | B07N666LWR |
10. Warranty and Support
For warranty information and customer support, please refer to the documentation provided at the time of purchase or contact your retailer. Keep your proof of purchase for any warranty claims.