1. Product Overview
This manual provides instructions for the weelye RX30 24V Bluetooth Remote Control and Receiver Kit, designed as a replacement part for children's electric ride-on cars. This kit includes a control box and a 2.4G Bluetooth remote control (TX10) with a slow start function, eliminating the need for additional slow starter installations.

Figure 1: weelye RX30 24V Control Box and TX10 Remote Control. This image displays the weelye RX30 24V control box, a black rectangular unit with various ports, positioned above the white weelye TX10 Bluetooth remote control, which features red circular buttons.
2. Compatibility Check
Before installation, it is crucial to verify that this control box and remote control kit is compatible with your child's electric ride-on car. Open your car and visually inspect the existing control box. If its appearance matches the RX30 control box shown in this manual, it should be compatible. Additionally, confirm that the numbers on the side of your original receiver are the same as the RX30.

Figure 2: RX30 Control Box with 7-Pin Blue Single-Sided Socket. A detailed view of the weelye RX30 24V control box, highlighting the blue 7-pin single-sided socket on its right side, crucial for connection.
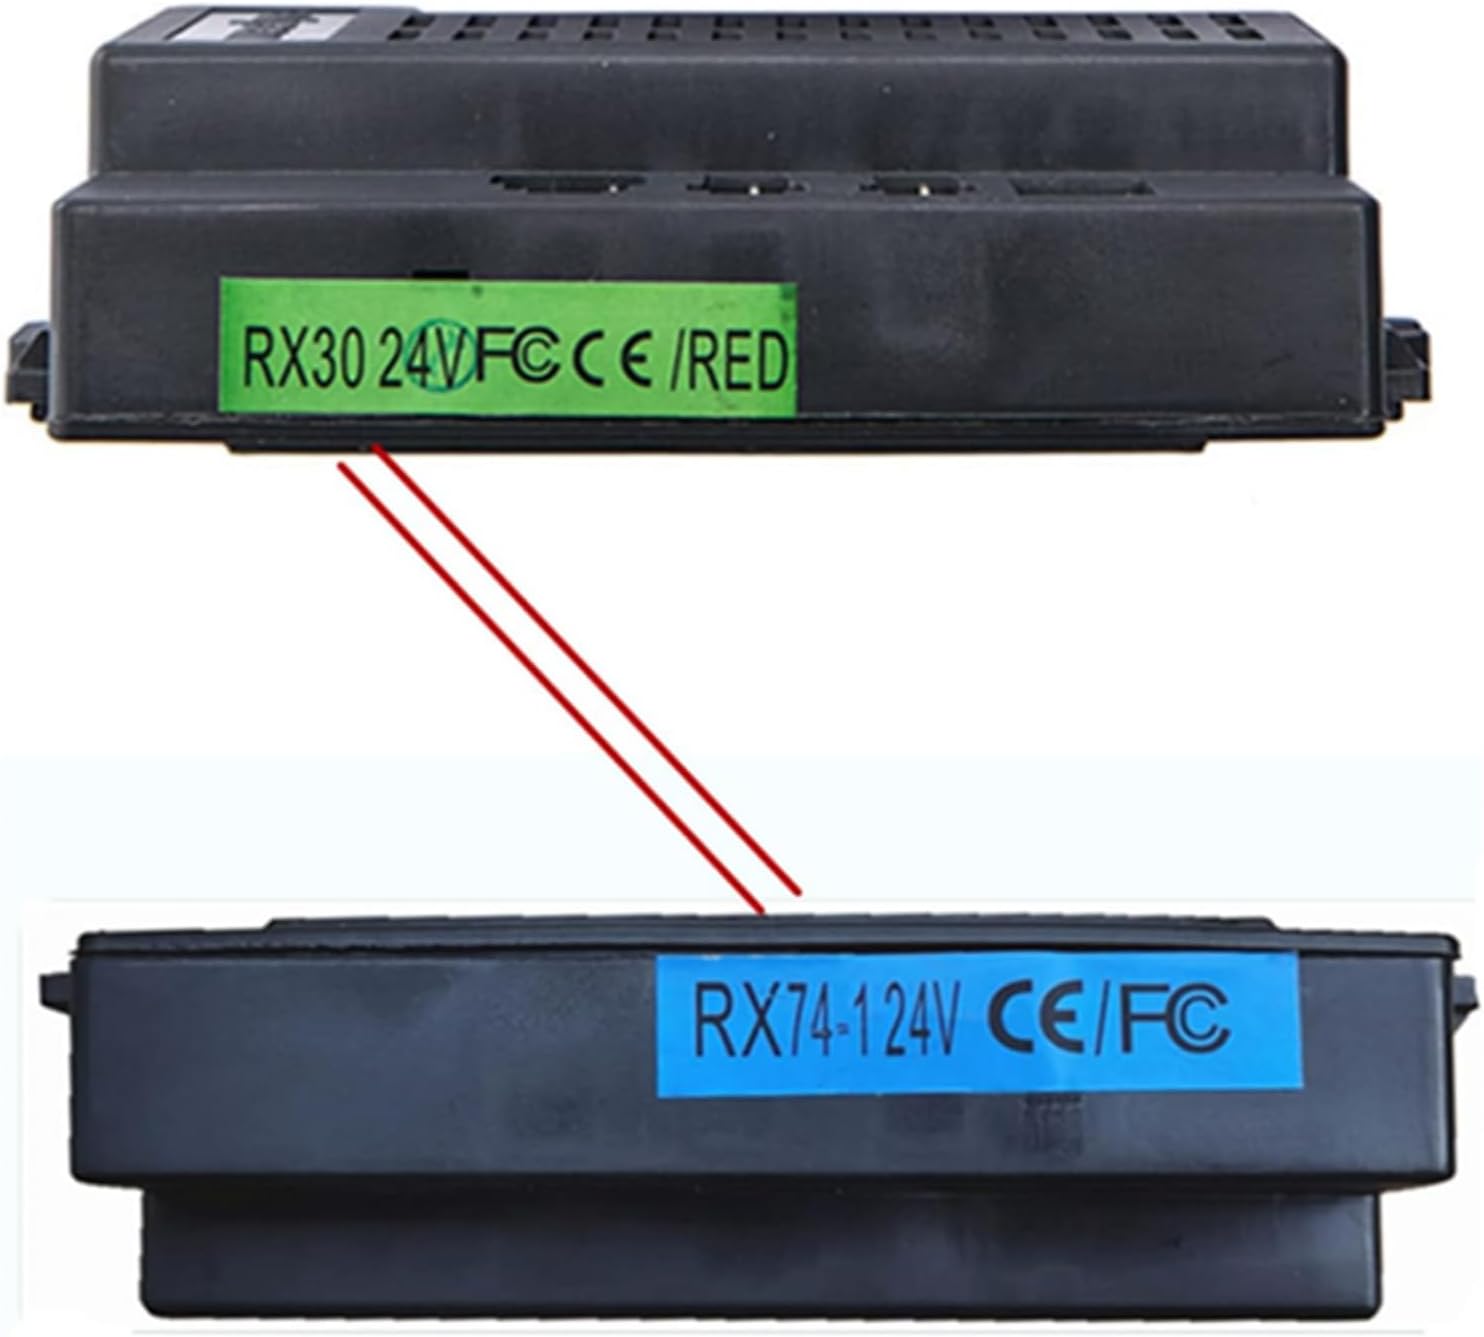
Figure 3: RX30 vs. RX74 Control Box Comparison. This image compares two control boxes: the top one labeled 'RX30 24V FCCE /RED' and the bottom one labeled 'RX74-1 24V CE/FC', indicating different models or versions. Ensure your existing control box matches the RX30.
For remote control compatibility, identify the markings on your receiver. If your receiver has "FCC CE" markings, the TX10 remote control with red buttons is compatible. If it has "12V" markings, a different remote (TX1 with a white button) may be required.

Figure 4: Remote Control Compatibility Guide. This guide illustrates how to select the correct weelye remote control (TX10 with red button or TX1 with white button) based on whether the receiver has 'FCC CE' or '12V' marking.
3. Setup and Installation
3.1 Remote Control Battery Installation
The remote control requires two AAA 1.5V batteries (not included). Follow these steps to install them:
- Open the battery compartment on the back of the remote control.
- Insert two AAA 1.5V batteries, ensuring correct positive (+) and negative (-) polarity as indicated inside the compartment.
- Close the battery cover securely. The indicator light on the remote will flash three times, confirming correct battery installation.
3.2 Frequency Matching (Pairing)
For first-time use or after replacing the remote control batteries, you must pair the remote control with the car's receiver. This process is also known as frequency binding.
- Install batteries into the remote control as described in Section 3.1.
- Press and hold the frequency key (often labeled "car select" or the top white button) on the remote control for approximately 2-5 seconds. The indicator light on the remote will begin to flash.
- While the remote's indicator light is flashing, turn on the power supply of the electric ride-on car.
- The indicator light on the remote control should turn off, indicating successful frequency matching.
- If the matching is unsuccessful (the indicator light continues to flash), turn off the car's power supply and repeat steps 2 and 3.

Figure 5: TX10 Remote Control and Button Functions. The white weelye TX10 Bluetooth remote control with red buttons is shown above a diagram illustrating the functions of its buttons: forward, backward, turn left, turn right, speed, and emergency brake.

Figure 6: Excerpt from Original Operation Manual. A close-up of the operation manual printed on the weelye product packaging, detailing steps for frequency binding, battery installation, and button descriptions for the remote control.
4. Operation
The weelye RX30 control box features a built-in slow start function, ensuring a smooth acceleration for the ride-on car without the need for additional components.
4.1 Remote Control Functions (TX10)
- Arrow Buttons: Control the direction of the car (forward, backward, turn left, turn right).
- S Button (Speed): Adjusts the speed settings of the car.
- P Button (Emergency Brake): Press this button to immediately stop the car's movement. Press it again to release the brake and resume normal operation.
If the remote control is left without operation for 10 seconds, the indication light will turn off to enter power-saving mode.
5. Troubleshooting
If your electric ride-on car is not functioning correctly after installing the new control box and remote, consider the following:
- Frequency Matching: Ensure the remote control is properly paired with the car's receiver by repeating the frequency matching steps in Section 3.2.
- Battery Check: Verify that the remote control batteries are correctly installed and have sufficient charge.
- Car's Internal Components: Check if other functions of your car, such as motors and main battery, are working properly. A malfunction in these components could prevent the car from operating even with a new control kit.
- Wiring: Ensure all connections to the control box are secure and correctly wired according to your car's specific wiring diagram.
6. Specifications
| Feature | Detail |
|---|---|
| Brand | weelye |
| Model Number | RX30 |
| Voltage | 24V |
| Remote Control Type | 2.4G Bluetooth (TX10) |
| Control Box Socket | 7-pin blue single-sided socket |
| Dimensions (Control Box) | 4.7 x 2.9 x 2.3 inches |
| Material | Plastic |
| Assembly Required | No (for the kit itself) |
7. Warranty Information
For specific warranty details regarding your weelye RX30 24V Bluetooth Remote Control and Receiver Kit, please refer to the product packaging or contact weelye customer support directly. Keep your proof of purchase for any warranty claims.
8. Customer Support
If you encounter any issues or have questions not covered in this manual, please contact weelye customer support for assistance. You can typically find contact information on the product packaging or the official weelye website.


