
1. Introduction
This manual provides essential information for the installation, operation, and maintenance of your new C·T·S replacement carburetor. This high-quality replacement part is designed to restore optimal performance to compatible Kawasaki TD40 2-stroke engines found in trimmers, brushcutters, weedeaters, and blowers.
Please read this manual thoroughly before attempting any installation or maintenance to ensure proper function and safety.
2. Compatibility
This C·T·S carburetor is specifically designed to fit:
- Kawasaki TD40 2-Stroke Trimmer, Brushcutter, Weedeater, and Blower engines.
It replaces original part number 15001-2525. It is crucial to verify compatibility with your specific engine model before installation. Refer to the images provided and compare them with your existing carburetor.
3. Product Features
- High-quality replacement carburetor.
- Designed for direct fitment on Kawasaki TD40 engines.
- Aids in restoring proper fuel-air mixture for efficient engine operation.
4. Installation Guide
Safety First: Before beginning any work, ensure the engine is turned off, cool, and the spark plug wire is disconnected to prevent accidental starting.
- Preparation: Gather necessary tools (screwdrivers, wrenches, pliers, fuel line clamps). Work in a well-ventilated area.
- Drain Fuel: If possible, drain the fuel tank to prevent spills.
- Remove Air Filter Assembly: Carefully remove the air filter housing and air filter to access the carburetor.
- Disconnect Fuel Lines: Identify and disconnect the fuel inlet and return lines from the old carburetor. Use clamps to prevent fuel leakage. Note their positions for reinstallation.
- Disconnect Throttle Linkage: Disconnect the throttle cable and any choke linkages from the old carburetor.
- Remove Mounting Bolts: Unscrew the bolts or nuts that secure the carburetor to the engine's intake manifold.
- Remove Old Carburetor: Carefully pull the old carburetor away from the engine. Be mindful of any gaskets that may be present.
- Install New Carburetor: Place new gaskets (if supplied or required) onto the intake manifold. Position the new C·T·S carburetor, ensuring it aligns correctly.
- Secure Mounting Bolts: Reinstall and tighten the mounting bolts evenly. Do not overtighten.
- Reconnect Linkages: Reattach the throttle and choke linkages. Ensure they move freely.
- Reconnect Fuel Lines: Reconnect the fuel inlet and return lines to their correct ports on the new carburetor. Secure with clamps if necessary.
- Reinstall Air Filter Assembly: Reattach the air filter and its housing.
- Refuel and Test: Refill the fuel tank. Reconnect the spark plug wire. Prime the carburetor if your engine has a primer bulb. Start the engine and check for proper operation and any fuel leaks. Adjust idle speed if necessary.
If you are unsure about any step, it is recommended to consult a qualified technician or refer to your engine's specific service manual.
5. Operation
The carburetor's primary function is to mix air and fuel in the correct ratio for combustion. Once installed, the carburetor operates automatically based on engine demand and throttle position.
- Starting: Follow your engine manufacturer's recommended starting procedure, which typically involves using the choke for cold starts.
- Throttle Control: The carburetor responds to throttle input, delivering more fuel and air as the throttle is opened.
- Idle Adjustment: If the engine idles too high or too low after installation, a minor idle speed adjustment screw may be present on the carburetor. Consult your engine manual for specific adjustment procedures.
6. Maintenance
Proper maintenance of your engine and fuel system will prolong the life of your carburetor.
- Fuel Quality: Always use fresh, clean fuel mixed with the correct ratio of 2-stroke oil as specified by your engine manufacturer. Stale or contaminated fuel is a leading cause of carburetor issues.
- Fuel Filter: Regularly inspect and replace the in-tank fuel filter to prevent debris from reaching the carburetor.
- Air Filter: Keep the air filter clean and replace it as recommended. A dirty air filter can restrict airflow and cause the engine to run rich.
- Fuel System Cleaning: If the equipment is stored for extended periods, drain the fuel system or use a fuel stabilizer to prevent gum and varnish buildup inside the carburetor.
7. Troubleshooting
If you experience issues after installing the new carburetor, consider the following common problems:
| Problem | Possible Cause | Solution |
|---|---|---|
| Engine won't start | No fuel, incorrect choke, spark plug issue, fuel lines reversed. | Check fuel level, ensure choke is set correctly, inspect spark plug, verify fuel line connections. |
| Engine runs rough/stalls | Dirty air filter, old/bad fuel, vacuum leak (gasket issue), idle adjustment. | Clean/replace air filter, use fresh fuel, check carburetor mounting and gaskets, adjust idle screw. |
| Fuel leaks | Loose fuel lines, damaged fuel lines, float bowl gasket issue. | Tighten fuel line clamps, replace damaged lines, inspect float bowl gasket. |
For persistent issues, professional assistance may be required.
8. Specifications
- Product Type: Replacement Carburetor
- Compatibility: Kawasaki TD40 2-Stroke Engines
- Replaces Part No.: 15001-2525
- Item Weight: 7.7 ounces (approximate)
- Brand: C·T·S
9. Product Visuals

Figure 1: Front view of the C·T·S replacement carburetor, showing the main body, fuel inlet, and choke lever. This view highlights the overall shape and primary connections.

Figure 2: Top-down view of the carburetor, illustrating the air intake opening and the throttle plate mechanism. This perspective is useful for identifying the air filter mounting surface.
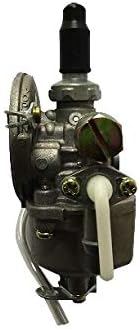
Figure 3: Side view of the carburetor, showing the fuel lines and adjustment screws (if visible). This angle helps in understanding the fuel flow path and potential adjustment points.
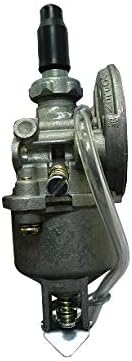
Figure 4: Alternate side view, providing a different angle of the carburetor's components, including the fuel bowl and mounting points. Useful for cross-referencing with the original part.
10. Warranty and Support
Specific warranty information for this C·T·S replacement carburetor is not provided in this manual. Please refer to the product listing or contact the seller directly for details regarding warranty coverage and customer support.
For technical assistance or inquiries, please reach out to the C·T·S customer service via the platform where the product was purchased.


