1. Introduction
Thank you for choosing the DasMikro DSK-130 V1 Sanwa Gyro Micro Receiver. This compact receiver is designed for use with Sanwa compatible transmitters and features an integrated gyroscope for enhanced vehicle stability. This manual provides essential information for the proper setup, operation, and maintenance of your receiver.
2. Safety Precautions
- Always ensure correct polarity when connecting power to the receiver to prevent damage.
- Operate your RC vehicle in a safe environment, away from people, pets, and obstacles.
- Keep the receiver away from moisture, extreme temperatures, and strong electromagnetic fields.
- Do not attempt to modify or disassemble the receiver, as this will void the warranty and may cause malfunction.
- Ensure all connections are secure before operating your RC vehicle.
3. Package Contents
The DasMikro DSK-130 V1 package typically includes:
- 1x DasMikro DSK-130 V1 Sanwa Gyro Micro Receiver
- Connection Wires (various lengths and configurations)

Image: DasMikro DSK-130 V1 receiver shown with typical connection wires.
4. Product Overview
The DSK-130 V1 is a compact receiver board featuring multiple channel outputs and a binding button. Its small size makes it suitable for various micro RC applications.

Image: Top view of the DSK-130 V1 receiver. Note the channel ports (CH1-CH4) and the bind button (SW1).
Key Components:
- CH1-CH4 Ports: These are standard 3-pin servo/ESC connection ports for channels 1 through 4. Typically, CH1 is steering, CH2 is throttle, and CH3/CH4 are auxiliary functions.
- SW1 (Bind Button): Used to initiate the binding process with your Sanwa compatible transmitter.
- Antenna: The red wire extending from the board is the receiver antenna. Ensure it is not cut or damaged and is positioned optimally for signal reception.
- LED Indicators: (Refer to image below) Typically, these indicate power status and binding status.
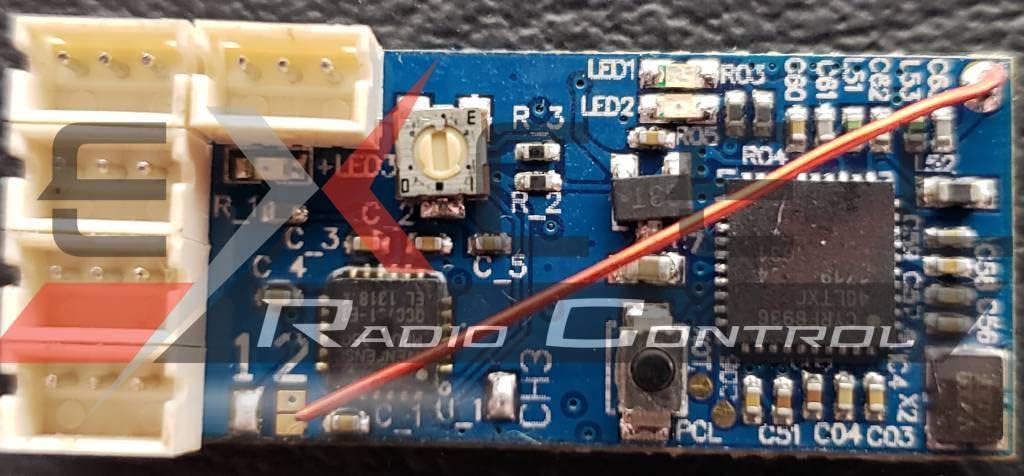
Image: Close-up view of the receiver board, highlighting component details including potential LED indicators (LED1, LED2, LED3).
5. Setup
5.1. Connections
Connect your Electronic Speed Controller (ESC) and servos to the appropriate channels on the receiver. The standard configuration is:
- CH1: Steering Servo
- CH2: ESC (Throttle) - This port typically provides power to the receiver via the BEC (Battery Eliminator Circuit) in the ESC.
- CH3/CH4: Auxiliary functions (e.g., lights, gear shift, additional servos)
Ensure the signal wire (usually white or yellow) is connected to the 'S' pin, the positive wire (red) to the '+' pin, and the negative/ground wire (black or brown) to the '-' pin on each channel port.
5.2. Binding Procedure
To establish communication between your Sanwa compatible transmitter and the DSK-130 V1 receiver, follow these steps:
- Ensure your transmitter is turned off.
- Connect a power source (e.g., ESC with BEC) to the CH2 port of the receiver.
- Press and hold the SW1 (Bind) button on the receiver.
- While holding the bind button, power on the receiver. The LED indicator on the receiver should start flashing rapidly, indicating it is in bind mode.
- Release the bind button.
- Turn on your Sanwa compatible transmitter and activate its binding function (refer to your transmitter's manual for specific instructions).
- Once binding is successful, the LED on the receiver should turn solid, indicating a stable connection.
- Turn off both the receiver and transmitter, then power them on normally (transmitter first, then receiver) to confirm the binding is saved.
5.3. Gyro Setup (if applicable)
The DSK-130 V1 features an integrated gyro. While specific adjustment methods may vary, generally:
- Ensure the receiver is mounted securely and horizontally in your vehicle.
- The gyro typically provides stabilization for steering. Test the steering response and adjust gyro gain if your transmitter supports it, or if there is a physical adjustment on the receiver (not explicitly visible on DSK-130 V1 images).
- Start with a low gyro gain setting and gradually increase it until desired stability is achieved without causing oscillation or twitching.
6. Operating Instructions
After successful binding and installation, operate your RC vehicle as usual. The integrated gyro will automatically assist in maintaining directional stability, especially during turns or on uneven surfaces.
- Always turn on your transmitter first, then power on the receiver/vehicle.
- When finished, power off the receiver/vehicle first, then turn off your transmitter.
- Regularly check all connections for security.
7. Maintenance
- Keep the receiver clean and free from dust, dirt, and debris. Use a soft, dry brush or compressed air for cleaning.
- Avoid exposing the receiver to water or excessive humidity. If it gets wet, disconnect power immediately and allow it to dry completely before reuse.
- Inspect the antenna wire regularly for any cuts or damage. A damaged antenna can significantly reduce range.
- Store the receiver in a dry, cool place when not in use.
8. Troubleshooting
| Problem | Possible Cause | Solution |
|---|---|---|
| Receiver LED not lighting up. | No power or incorrect power connection. | Check power source (ESC BEC) and ensure correct polarity. |
| Receiver LED flashing rapidly, not binding. | Transmitter not in bind mode or incompatible. | Ensure transmitter is in bind mode. Verify transmitter compatibility with Sanwa protocol. Repeat binding steps carefully. |
| No control response after binding. | Incorrect servo/ESC connections, or transmitter settings. | Check all servo/ESC connections for correct channel and polarity. Verify transmitter settings (e.g., channel assignments, trims). |
| Short range or intermittent signal. | Damaged antenna, interference, or poor antenna placement. | Inspect antenna for damage. Reposition antenna away from metal or carbon fiber. Avoid operating near strong interference sources. |
| Vehicle twitching or unstable (gyro related). | Gyro gain too high or improper mounting. | Reduce gyro gain. Ensure receiver is mounted securely and horizontally. |
9. Specifications
- Brand: DasMikro
- Model: DSK-130 V1
- Compatibility: Sanwa compatible transmitters
- Channels: 4 Channels
- Integrated Feature: Gyro Stabilization
- Power Source: Battery Powered (via ESC BEC)
- Operation Mode: Remote Control
- Material: Plastic (housing/connectors), PCB (board)
- Approximate Dimensions: The product is a micro receiver. The listed dimensions of 1 x 4 x 2 inches likely refer to packaging. The receiver board itself is significantly smaller, typically around 20x15mm.
- Manufacturer Part Number: DSK-130
- UPC: 092685803595
10. Warranty and Support
Specific warranty information for the DasMikro DSK-130 V1 receiver is not provided in this manual. For details regarding warranty coverage, technical support, or service, please refer to the retailer where you purchased the product or visit the official DasMikro website.
Always retain your proof of purchase for warranty claims.