1. Product Overview
The YAVIS K7612+10K is a metal, waterproof access control keypad designed for secure door entry systems. It supports both PIN code and RFID card access, making it a versatile solution for various applications including homes, offices, hotels, and factories. This system is capable of managing up to 1000 users.

Figure 1.1: YAVIS K7612+10K Access Control Keypad and included 10 RFID Keyfobs (5 blue, 5 yellow).
This image displays the main components of the product: the robust metal access control keypad and the set of 10 RFID keyfobs, which are essential for card-based access.
1.1 Product Analysis
Understanding the layout of the keypad is crucial for proper installation and operation. The unit features indicator lights, a backlit keypad for visibility, and specific connection points.

Figure 1.2: Detailed view of the keypad components.
This diagram highlights the key components of the YAVIS access control keypad, including the work indicator lights (red/green) for status, the backlight button for visibility in low light conditions, the back outlet for wiring connections, and the fixed screw for secure mounting.
1.2 Key Features
- Updated Design: Features a modern, sensitive, and quickly responsive design.
- Waterproof Construction: Suitable for both outdoor and indoor installations.
- Secure & Reliable: Wiegand access control keypad with full programming capabilities directly from the keypad.
- User Management: Easily add or delete cards and set passwords.
- Integrated Features: Includes a doorbell button and blue backlight for enhanced usability.
- Multiple Access Modes: Supports card-only, password-only, and card + password access.
- High User Capacity: Supports up to 1000 card users.
- Included Accessories: Comes with 10 x 125KHz RFID keyfobs (5 blue + 5 yellow).
- Wide Application: Ideal for homes, hotels, offices, apartments, and factories.
2. Specifications
| Feature | Detail |
|---|---|
| Brand | YAVIS |
| Model Number | K7612+10K |
| Dimensions (L x W x H) | 120 x 77 x 27 mm (4.72 x 3.03 x 1.06 inches) |
| Weight | 550 grams |
| Material | Metal |
| Color | Silvery |
| Power Supply Type | AC adapter (not included) |
| Voltage | 12 Volts |
| Current | <1200 mA |
| Proximity Reader Frequency | 125 KHz |
| Card Reading Distance | 3 to 12 cm |
| Compatible Cards | EM or EM compatible cards |
| User Capacity | 1000 card users |
| Installation Method | Self-installation |
| Control Method | Tactile (Keypad) |
| Alert Type | Audio only, Motion only (referring to system alerts, not product specific) |
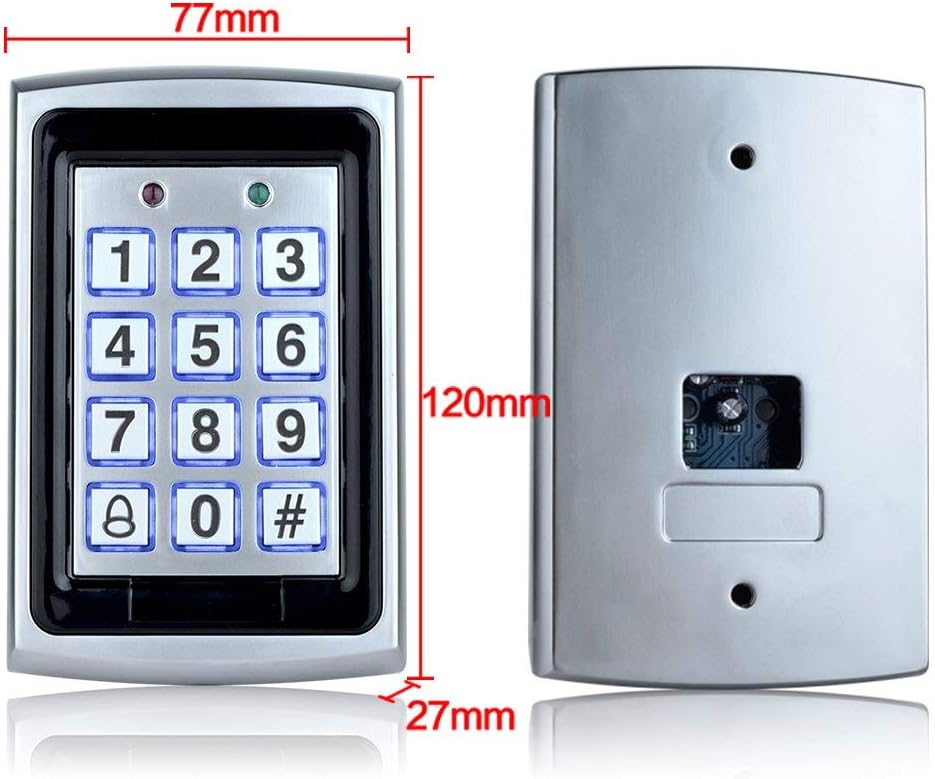
Figure 2.1: Keypad dimensions.
This image provides the precise dimensions of the YAVIS access control keypad, indicating its height (120mm), width (77mm), and depth (27mm), which are important for planning installation space.
3. Setup and Installation
3.1 Package Contents
Before beginning installation, ensure all components are present in the package:
- 1 x RFID Keypad
- 1 x User Manual (this document)
- 1 x Screw Bag (for mounting)
- 10 x RFID Keyfobs (5 blue, 5 yellow)
3.2 Wiring Diagram
Proper wiring is critical for the functionality and safety of your access control system. Refer to the diagram below for connection details. A 12V DC power supply (not included) is required.

Figure 3.1: Wiring connections for the access control system.
This wiring diagram illustrates how to connect the YAVIS access control keypad to various components of a door entry system. It shows connections for the power supply, different types of electric locks (electric mortise lock, electronic lock, magnetic lock), and an exit button. Please note that only the access control unit is included; other components like locks and power supply are sold separately and must be compatible with a 12V system.
Important Notes:
- Ensure power is disconnected before wiring to prevent electrical shock.
- Connect the keypad to a stable 12V DC power source.
- The "Time" connection allows for adjustable door open duration (0-15 seconds).
- The "CONTROL+" and "CONTROL-" terminals are for connecting to the lock mechanism.
- The "PUSH" terminal is typically for the exit button.
3.3 Mounting the Keypad
Choose a suitable location for mounting the keypad, ensuring it is accessible and within reach of the wiring. The keypad is waterproof, allowing for outdoor installation.
- Mark the drilling points on the wall using the keypad's back plate as a template.
- Drill holes and insert wall plugs if necessary.
- Route the necessary wires through the back outlet of the keypad.
- Secure the keypad to the wall using the provided screws.
- Connect the wires according to the wiring diagram (Figure 3.1).

Figure 3.2: Example installation setup.
This image provides a visual example of a typical installation setup for the YAVIS access control system on a door. It depicts the access controller mounted on the wall, connected to an external power supply and an electric drop lock, with an exit button positioned on the inside of the door for convenient egress. Note that the image indicates "Only access control" meaning other components are illustrative.
4. Operating Instructions
The YAVIS access control keypad offers flexible operation modes and easy user management.
4.1 Access Modes
The system supports three primary methods for gaining access:
- Card Only: Present a programmed RFID card to the keypad.
- Password Only: Enter a valid PIN code on the keypad.
- Card + Password: Present a programmed RFID card, then enter the associated PIN code.

Figure 4.1: Accessing with an RFID card.
The YAVIS access control system supports up to 1000 users and offers flexible door opening options: using an RFID card, a password, or a combination of both. This image shows a user presenting an RFID card to the keypad, illustrating one of the primary access methods.
4.2 Programming (Master Code: 123456 - Default)
All programming is done directly on the keypad. The default master code is 123456. It is highly recommended to change this code immediately after installation for security purposes.
4.2.1 Change Master Code
- Press * then enter the current Master Code (default: 123456) then press #. (The indicator light will turn green).
- Press 0 then press #.
- Enter your new 6-digit Master Code then press #.
- Re-enter the new 6-digit Master Code then press # to confirm.
- Press * to exit programming mode.
4.2.2 Add User Cards (RFID Keyfobs)
- Press * then enter the Master Code then press #.
- Press 1 then press #.
- Present the RFID card you wish to add to the keypad. The keypad will beep to confirm.
- Repeat for all cards you wish to add.
- Press * to exit programming mode.
4.2.3 Add User PINs
- Press * then enter the Master Code then press #.
- Press 2 then press #.
- Enter a 4-6 digit PIN code then press #.
- Re-enter the same PIN code then press # to confirm.
- Repeat for all PINs you wish to add.
- Press * to exit programming mode.
4.2.4 Delete User Cards/PINs
- Press * then enter the Master Code then press #.
- Press 3 then press #.
- To delete a card: Present the card to the keypad.
- To delete a PIN: Enter the PIN then press #.
- Press * to exit programming mode.
4.2.5 Reset to Factory Defaults
This action will erase all programmed users and reset the Master Code to 123456. Use with caution.
- Disconnect power from the keypad.
- Press and hold the # button.
- While holding #, reconnect power.
- Release the # button after a few seconds. The keypad will emit a long beep, indicating reset.
5. Maintenance and Care
To ensure the longevity and optimal performance of your YAVIS access control keypad, follow these maintenance guidelines:
- Cleaning: Wipe the keypad surface regularly with a soft, damp cloth. Avoid using abrasive cleaners, solvents, or harsh chemicals, as these can damage the finish and electronic components.
- Environmental Protection: While the keypad is waterproof, prolonged exposure to extreme weather conditions (e.g., direct heavy rain, extreme temperatures, direct sunlight for extended periods) should be minimized if possible to extend its lifespan.
- Connection Check: Periodically inspect the wiring connections at the back of the unit to ensure they remain secure and free from corrosion. Disconnect power before performing any checks.
- Software/Firmware: This device does not typically require user-updatable firmware. If issues persist, refer to the troubleshooting section or contact support.
6. Troubleshooting
If you encounter issues with your YAVIS access control keypad, refer to the table below for common problems and their solutions.
| Problem | Possible Cause | Solution |
|---|---|---|
| No power/lights on keypad | No power supply, incorrect voltage, loose wiring. | Check power supply connection (12V DC), ensure power outlet is active, verify all wiring connections are secure. |
| Keypad unresponsive to button presses | Internal fault, severe power issue. | Disconnect power for 30 seconds, then reconnect. If issue persists, contact support. |
| RFID card not working | Card not programmed, incorrect card frequency, damaged card. | Ensure the card is programmed (Section 4.2.2). Verify it's a 125KHz EM compatible card. Try another card. |
| Cannot open door with PIN | Incorrect PIN, PIN not programmed, wrong access mode. | Double-check the PIN. Ensure the PIN is correctly programmed (Section 4.2.3). Confirm the system is in PIN-only or Card+PIN mode. |
| Door does not unlock after valid entry | Lock mechanism issue, wiring to lock, power supply to lock. | Check the lock's power supply and wiring. Ensure the lock itself is functioning correctly. Verify the door open time setting. |
| Backlight not working | Backlight setting, power issue. | Ensure the backlight feature is enabled (if applicable, check advanced settings in a more detailed manual). Verify stable 12V power supply. |
7. Warranty and Support
YAVIS products are designed for reliability and performance. For specific warranty information, please refer to the warranty card included with your product or contact your point of purchase. Warranty terms typically cover manufacturing defects for a specified period from the date of purchase.
If you require technical assistance, have questions about installation, or need further support, please contact YAVIS customer service or your authorized dealer. Please have your product model number (K7612+10K) and purchase details ready when contacting support.
For the latest information and support resources, you may also visit the official YAVIS website (if available, search online for "YAVIS Official").