1. Introduction
Thank you for choosing the Sharp KD-GHB8S7GW2-DE Heat Pump Dryer. This appliance is designed to provide efficient and gentle drying for your laundry. With an 8 kg capacity, it is suitable for families of up to 4 people. Key features include the BubbleDrum for gentle drying with fewer wrinkles, integrated LED drum lighting, and 15 drying programs, including specialized options like 'Shirts 30'.
To ensure safe and optimal operation, please read this instruction manual thoroughly before using the appliance. Keep this manual for future reference.

Image 1.1: Front-right view of the Sharp KD-GHB8S7GW2-DE Heat Pump Dryer. This image shows the main body of the dryer, the control panel at the top, and the large circular door for loading laundry.
2. Safety Information
Always adhere to the following safety precautions to prevent personal injury or damage to the appliance:
- Electrical Safety: Ensure the dryer is connected to a properly grounded electrical outlet with the correct voltage. Do not use extension cords or adapters.
- Children and Vulnerable Persons: This appliance can be used by children aged 8 years and above and persons with reduced physical, sensory or mental capabilities or lack of experience and knowledge if they have been given supervision or instruction. Children should be supervised to ensure they do not play with the appliance.
- Ventilation: Ensure adequate ventilation around the dryer. Do not block ventilation openings.
- Flammable Materials: Do not dry items that have been soiled with flammable substances (e.g., cooking oil, gasoline, dry-cleaning solvents).
- Installation: The dryer must be installed on a firm, level floor. Do not install the appliance behind a lockable door, a sliding door, or a door with a hinge on the opposite side to that of the tumble dryer, in such a way that a full opening of the tumble dryer door is restricted.
- Maintenance: Disconnect the appliance from the power supply before performing any cleaning or maintenance.
3. Setup
3.1 Unpacking
Carefully remove all packaging materials, including polystyrene blocks, plastic bags, and any tape. Check the appliance for any transport damage. Report any damage immediately to your retailer.
3.2 Placement
- Place the dryer on a solid, level surface to prevent vibrations and noise.
- Ensure there is sufficient space around the appliance for proper air circulation. Do not install in a confined space.
- Avoid placing the dryer near heat sources or in direct sunlight.
- The product dimensions are approximately 63.8 cm (depth) x 59.6 cm (width) x 84.5 cm (height).
3.3 Electrical Connection
Connect the dryer to a dedicated, grounded power outlet. The electrical supply must match the specifications on the rating plate of the appliance. Do not overload the circuit.
3.4 Drainage
The dryer collects condensed water in a removable tank. Ensure the tank is correctly seated. For continuous drainage, an optional drain hose can be connected to a suitable drain point (refer to the detailed installation guide for specific instructions).
3.5 First Use
Before drying laundry for the first time, wipe the inside of the drum with a damp cloth. It is recommended to run an empty drying cycle (e.g., a short program with no laundry) to remove any manufacturing residues.

Image 3.1: Angled view of the Sharp KD-GHB8S7GW2-DE Heat Pump Dryer, highlighting its compact design and the front-loading door.
4. Operating Instructions
4.1 Control Panel Overview
The dryer features an intuitive control panel with a program knob, SoftTouch buttons, and an LED display for easy operation.
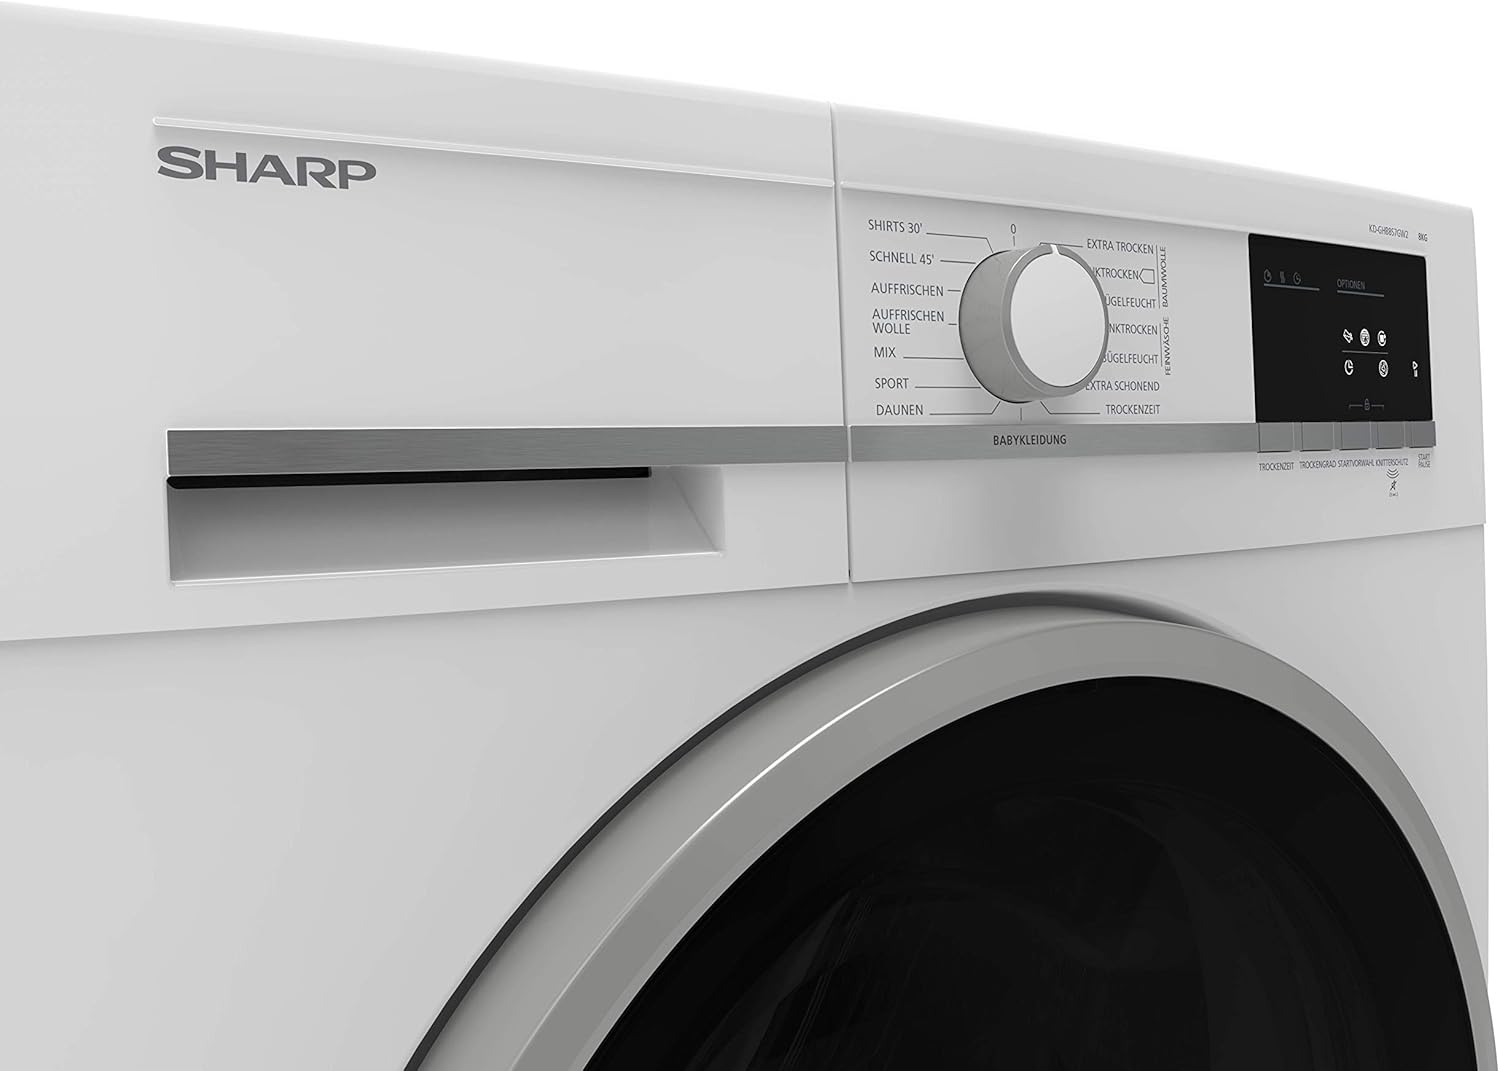
Image 4.1: Close-up view of the control panel, showing the central program selection knob and various program names around it, such as 'Shirts 30', 'Schnell 45' (Quick 45), 'Auffrischen' (Refresh), 'Wolle' (Wool), 'Mix', 'Sport', 'Daunen' (Down), and 'Babykleidung' (Babywear).

Image 4.2: Detailed view of the right side of the control panel, featuring the LED display and SoftTouch buttons for 'Optionen' (Options), 'Trockenzeit' (Drying Time), 'Trockengrad' (Drying Level), 'Startvorwahl' (Delay Start), 'Knitterschutz' (Anti-crease), and 'Start/Pause'.
4.2 Loading Laundry
- Open the dryer door and load laundry loosely into the drum. Do not overload the dryer; respect the maximum 8 kg capacity.
- Ensure no items are caught in the door seal when closing the door.
- Separate laundry by fabric type and desired drying level for best results.
4.3 Selecting a Program
Turn the program knob to select one of the 15 available drying programs. Common programs include:
- Shirts 30: A 30-minute quick-dry program for shirts.
- Mix: For mixed loads of cotton and synthetics.
- Sport: For sportswear.
- Babywear: Gentle drying for baby clothes.
- Wool: Special program for wool items.
- Refresh: To air and refresh clothes without full drying.
Use the SoftTouch buttons to adjust options such as drying time, drying level (e.g., 'Extra Trocken' (Extra Dry), 'Schranktrocken' (Cupboard Dry), 'Bügelfeucht' (Iron Dry)), delay start, or activate the anti-crease function.
4.4 Starting a Cycle
Press the 'Start/Pause' button to begin the selected drying program. The LED display will show the remaining time.
4.5 End of Cycle
The dryer will signal when the cycle is complete. Remove laundry promptly to minimize creasing. The anti-crease function will periodically tumble the load after the cycle ends to prevent wrinkles if laundry is not removed immediately.
5. Maintenance
Regular maintenance ensures the longevity and efficiency of your dryer.
5.1 Cleaning the Lint Filter
Clean the lint filter after every drying cycle. Open the door, pull out the filter, remove accumulated lint, and rinse under running water if necessary. Ensure it is completely dry before reinserting.
5.2 Emptying the Condensate Tank
Empty the condensate tank after every drying cycle. The tank is typically located at the top-left or bottom-right of the appliance. Pull it out, empty the water, and push it back in until it clicks.
5.3 Cleaning the Heat Exchanger/Condenser
The heat exchanger (condenser) should be cleaned periodically, typically every few months, or as indicated by the appliance. Refer to the full user manual for specific instructions on accessing and cleaning the condenser unit for your model.
5.4 Cleaning the Exterior and Drum
Wipe the exterior of the dryer with a soft, damp cloth. Do not use abrasive cleaners. Clean the interior of the drum with a damp cloth as needed. The integrated LED drum lighting assists in visibility.
6. Troubleshooting
If you encounter issues with your dryer, consult the following common troubleshooting steps before contacting service.
- Dryer Not Starting: Check if the power cord is securely plugged in, the door is fully closed, and the 'Start/Pause' button has been pressed. Ensure the child lock is not activated.
- Laundry Not Drying Properly: Ensure the lint filter is clean and the condensate tank is empty. Check if the selected program is appropriate for the load and if the dryer is overloaded. Verify that the heat exchanger is not blocked.
- Unusual Noise: Check for foreign objects in the drum or lint filter. Ensure the dryer is level.
- Error Codes: If an error code appears on the display, refer to the comprehensive user manual for a list of codes and their solutions.
If the problem persists after attempting these solutions, disconnect the dryer from the power supply and contact qualified service personnel.
7. Specifications
| Feature | Specification |
|---|---|
| Brand | Sharp |
| Model Number | KD-GHB8S7GW2-DE |
| Type | Heat Pump Dryer |
| Capacity | 8 kg |
| Energy Efficiency Class | A++ |
| Number of Programs | 15 |
| Dimensions (H x W x D) | 84.5 cm x 59.6 cm x 63.8 cm |
| Weight | 51 kg |
| Noise Level | 65 dB (approximate, based on similar models) |
| Drum Type | BubbleDrum with LED lighting |
| Door Hinge | Right |
8. Warranty and Support
This Sharp appliance comes with a manufacturer's warranty. Please refer to the warranty card included with your product for detailed terms and conditions, including the warranty period and coverage.
For technical support, service requests, or to order spare parts, please contact Sharp customer service. Contact information can typically be found in the warranty documentation or on the official Sharp website for your region. When contacting support, please have your model number (KD-GHB8S7GW2-DE) and serial number ready.