1. Introduction
This user manual provides detailed instructions for the Estink Battery Capacity Voltage Meter, a universal LCD display gauge designed to monitor the capacity and voltage of various battery types. It features a green backlit screen for clear visibility and is compatible with 12V, 24V, 36V, and 48V battery systems, primarily for lithium batteries and specific lead-acid types.
The meter is designed for easy installation and provides accurate readings to help users keep track of their battery status.
2. Key Features
- Durable Design: Safeguarded by a PVC film, ensuring a long-lasting life and comfortable handling.
- High-Performance Monitoring: Accurately measures both battery voltage and capacity, displaying readings in percentages.
- Clear LCD Display: Features a high-quality LCD screen with a green backlight for enhanced visibility from any angle.
- Wide Compatibility: Supports batteries ranging from 12V to 48V, including 12V P01- batteries and P04- batteries. Note: 6V batteries are not supported.
- Portable & Easy Assembly: Compact and lightweight design with an innovative buckle for quick, screw-free installation and disassembly.
3. Product Specifications
| Brand | Estink |
| Model (ASIN) | B07MV8DKWT |
| Color | Black |
| Power Source | Battery Powered |
| Item Weight | 18 Grams (0.63 ounces) |
| Package Dimensions | 3.74 x 2.56 x 0.67 inches |
| Upper Temperature Rating | 50 Degrees Celsius |
| Country of Origin | China |
4. Battery Compatibility
The Estink Battery Capacity Voltage Meter is designed to support a wide range of battery types and voltages. It is compatible with battery systems ranging from 12V to 48V. This includes:
- 12V P01-type lead-acid batteries
- P04-type lead-acid batteries
- Various lithium battery configurations within the 12V-48V range.
Important Note:
- This device DOES NOT support 6V lead-acid batteries.

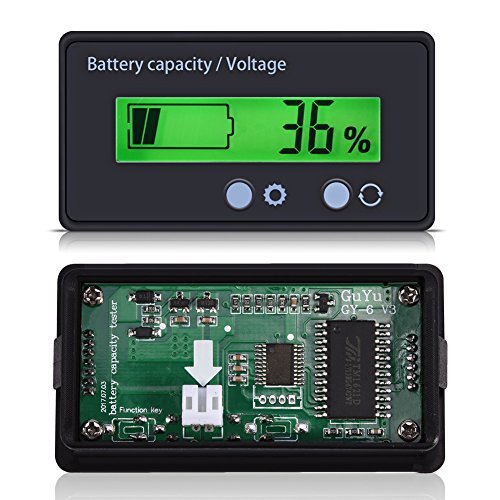
This image illustrates the meter's display and its compatibility with 12-48V batteries, emphasizing that 6V batteries are not supported. It also points out the LCD screen with green backlight, durable button, and battery status indicator.

This image displays the versatility of the battery meter, showing its use in various applications such as electric scooters, large battery packs, industrial cleaning machines, and other electronic devices.
5. Setup and Installation
The Estink Battery Capacity Voltage Meter is designed for quick and easy installation, featuring a buckle design that eliminates the need for screws.
5.1 Package Contents
Before installation, ensure all components are present:
- 1 x Estink Battery Capacity Voltage Meter
- 1 x 30cm Connecting Wire (Red and Black)

This image illustrates what is included in the package: the battery capacity meter and a 30cm connecting wire.
5.2 Physical Dimensions
Refer to the dimensions below for proper mounting: This image provides detailed measurements of the battery meter, including its length (61.3mm / 2.3in), width (33.3mm / 1.4in), and depth (13.5mm / 0.59in), along with drilling hole sizes for installation.
5.3 Wiring Instructions
- Identify the positive (+) and negative (-) terminals of your battery system.
- Connect the RED wire from the meter to the POSITIVE (+) terminal of your battery.
- Connect the BLACK wire from the meter to the NEGATIVE (-) terminal of your battery.
- Ensure all connections are secure to prevent loose contacts.

This image shows the battery meter with its red and black connecting wires, illustrating the simple wiring required for operation.
This image provides a view of the back of the meter, revealing the internal circuit board and connection points, which are protected by the device's casing.
6. Operating Instructions
Once properly connected, the meter will power on and display the battery status on its LCD screen.
6.1 Display Modes
The meter can display both battery capacity and voltage. Use the buttons on the front panel to switch between display modes:
- Battery Capacity: Displays the remaining battery charge as a percentage (e.g., "36%").
- Battery Voltage: Displays the current battery voltage (e.g., "12.0V").

This image demonstrates the two primary display modes of the meter: showing the battery's remaining capacity in percentage and its current voltage in volts.

This image provides a comprehensive look at the battery meter from different angles and in various sizes, highlighting its compact design and clear display.
7. Maintenance
To ensure the longevity and accurate performance of your Estink Battery Capacity Voltage Meter, follow these simple maintenance guidelines:
- Cleaning: Wipe the display and casing with a soft, dry cloth. Avoid using abrasive cleaners or solvents.
- Protection: The meter's surface is equipped with a PVC film for water resistance. However, avoid submerging the device in water or exposing it to excessive moisture.
- Storage: When not in use for extended periods, store the meter in a cool, dry place away from direct sunlight and extreme temperatures.
- Connections: Periodically check the wiring connections to ensure they remain secure and free from corrosion.

This image highlights the meter's waterproof PVC film, showing water droplets on its surface, which helps protect the device from splashes and moisture.
8. Troubleshooting
If you encounter issues with your battery capacity voltage meter, refer to the following common problems and solutions:
| Problem | Possible Cause | Solution |
|---|---|---|
| No display / Meter not turning on |
|
|
| Inaccurate readings |
|
|
| Display flickering or dim |
|
|
9. Warranty and Support
Specific warranty details for the Estink Battery Capacity Voltage Meter are typically provided at the point of purchase or within the product packaging. Please refer to your purchase documentation for warranty terms and conditions.
For technical support, troubleshooting assistance beyond this manual, or warranty claims, please contact Estink customer service through the retailer where the product was purchased (e.g., Amazon.com). You can also visit the official Estink store on Amazon for more information: