1. Introduction
This manual provides detailed instructions for the G-MARK PTM-4 Analog 4-Channel Audio Mixer. It covers product features, setup procedures, operational guidelines, and troubleshooting tips to ensure optimal performance and longevity of your device. Please read this manual thoroughly before operating the mixer.

Image 1.1: G-MARK PTM-4 Mini Audio Mixer overview.
2. Safety Information
- Ensure the power supply voltage matches the requirements specified for the device.
- Do not expose the mixer to water, moisture, or extreme temperatures.
- Avoid placing the mixer near heat sources or in direct sunlight.
- Do not open the casing; refer all servicing to qualified personnel.
- Disconnect power during thunderstorms or when unused for extended periods.
- Use only manufacturer-specified attachments/accessories.
3. Package Contents
Upon opening the package, verify that all items are present and in good condition:
- G-MARK PTM-4 Analog 4-Channel Audio Mixer
- USB Power Cable (5V)
- Instruction Manual (this document)
- (Additional accessories may vary by region or package)
4. Product Overview
The G-MARK PTM-4 is a compact 4-channel analog audio mixer designed for various applications including live performance, studio recording, karaoke, and home use. It features Bluetooth connectivity, a USB audio interface, 48V phantom power, and a 3-band EQ on all channels.
4.1. Mixer Layout and Dimensions

Image 4.1: Front view of the G-MARK PTM-4 mixer, showing all controls and inputs/outputs.

Image 4.2: Side view of the G-MARK PTM-4 mixer with approximate dimensions: 7.28 inches (depth) x 6.1 inches (width) x 2.36 inches (height).
4.2. Control Panel Functions

Image 4.3: Detailed diagram of the G-MARK PTM-4 mixer's control panel, indicating the function of each knob, button, and port.
- MIC/LINE 1 & 2 Inputs: Combo XLR/6.35mm (1/4 inch) jacks for microphones or line-level instruments.
- INST-HIZ Switch: For Channel 2, activates high-impedance input for direct connection of instruments like guitars.
- +48V Phantom Power Switch: Activates 48V phantom power for condenser microphones on MIC/LINE 1 & 2.
- REC OUT (Lotus Interface): RCA outputs for recording.
- MAIN OUT: Left and Right 6.35mm (1/4 inch) outputs for connecting to main speakers or amplifiers.
- L/M CH3-4 IN: 6.35mm (1/4 inch) stereo input for channels 3-4.
- Gain Knob: Adjusts the input sensitivity for each channel.
- HF (High Frequency) Knob: Adjusts the treble frequencies for each channel.
- LF (Low Frequency) Knob: Adjusts the bass frequencies for each channel.
- FX Knob: Adjusts the amount of effect sent from each channel.
- PKI (Peak Indicator): Lights up when the input signal is too high, indicating potential clipping.
- VOL (Volume) Knob: Adjusts the output volume for each channel.
- MP3 ROUTE / CH3-4 MP3 Switch: Routes the MP3/Bluetooth signal to channels 3-4.
- Bluetooth & MP3 Player Section:
- Display Screen: Shows current mode and track information.
- USB Port: For connecting USB drives for MP3 playback or connecting to a computer as an audio interface.
- Control Buttons: Play/Pause, Previous/Next Track, Mode/Record.
- DEL (Delay) Knob: Adjusts the delay time for the built-in effect.
- REP (Repeat) Knob: Adjusts the number of repeats for the built-in effect.
- MAIN OUT Volume Knob: Controls the overall output volume of the mixer.
- PHONES (Headphones) Output: 6.35mm (1/4 inch) jack for connecting headphones.
- HEADPHONES Volume Knob: Adjusts the volume for the headphone output.
- Power Indicator: Lights up when the mixer is powered on.
5. Setup
5.1. Power Connection
The PTM-4 mixer is powered via a 5V USB connection. Connect the provided USB cable to the mixer's power input and then to a compatible USB power source (e.g., a computer USB port, a USB wall adapter, or a portable power bank).
5.2. Connecting Audio Devices
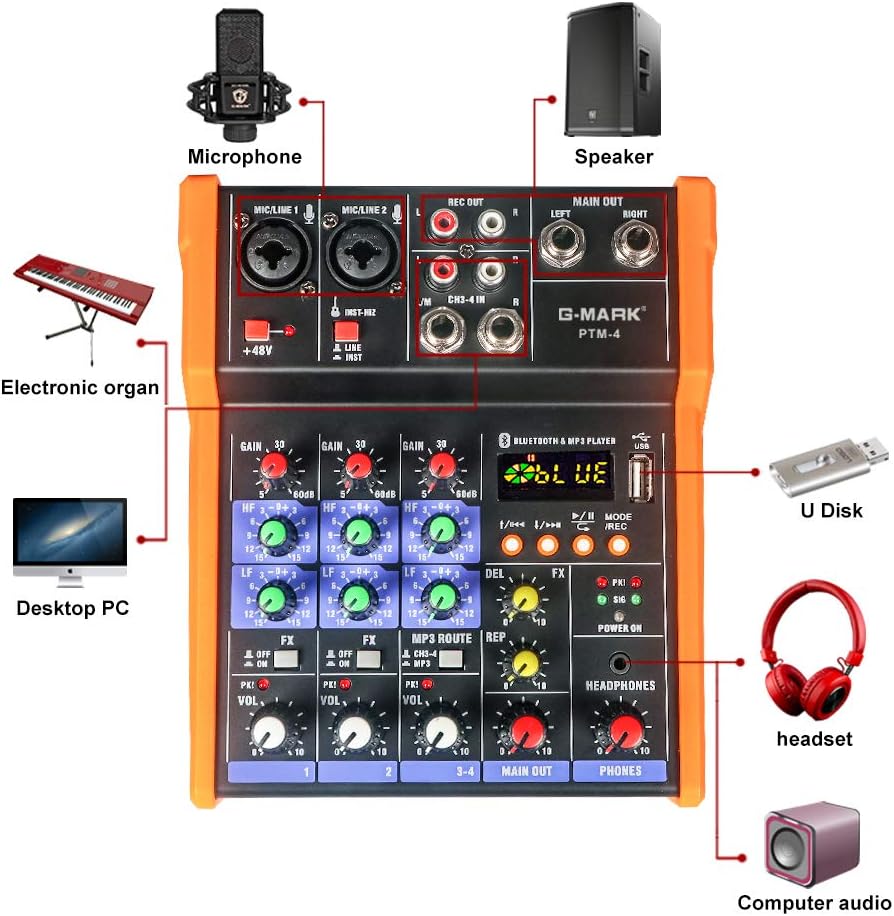
Image 5.1: Diagram illustrating various connection possibilities for the G-MARK PTM-4 mixer, including microphones, speakers, computers, and headphones.
- Microphones: Connect XLR or 6.35mm (1/4 inch) microphones to the MIC/LINE 1 or MIC/LINE 2 inputs. If using a condenser microphone, activate the +48V Phantom Power switch.
- Instruments: Connect instruments (e.g., guitar, keyboard) to the MIC/LINE inputs. For high-impedance instruments, ensure the INST-HIZ switch on Channel 2 is engaged.
- External Audio Sources (Channels 3-4): Connect devices like CD players, media players, or other line-level sources to the L/M CH3-4 IN 6.35mm (1/4 inch) stereo input.
- Main Output: Connect the MAIN OUT (Left and Right 6.35mm jacks) to your powered speakers, amplifier, or recording device.
- Headphones: Connect headphones to the PHONES 6.35mm (1/4 inch) output.
- Recording Output: Use the REC OUT RCA jacks to connect to a dedicated recording device.
6. Operating Instructions
6.1. Basic Operation
- Power On: Connect the USB power cable. The Power Indicator light will illuminate.
- Adjust Input Gain: For each connected input, slowly turn the Gain Knob clockwise until the PKI (Peak Indicator) light flashes only occasionally during the loudest parts of the signal. Avoid constant illumination of the PKI light to prevent distortion.
- Set Channel Volume: Adjust the VOL Knob for each channel to achieve the desired balance between inputs.
- Adjust Main Output: Slowly increase the MAIN OUT Volume Knob to the desired listening level.
- Headphone Monitoring: Adjust the HEADPHONES Volume Knob for comfortable monitoring.
6.2. Equalization (EQ)
Each channel features a 3-band EQ (High, Mid, Low). Use the HF and LF knobs to shape the tone of each input. Turning a knob clockwise boosts the frequency, while turning it counter-clockwise cuts the frequency. The center position (12 o'clock) is flat (no boost or cut).
6.3. 48V Phantom Power

Image 6.1: Close-up of the 48V Phantom Power switch, indicating its function for condenser microphones.
The +48V Phantom Power switch provides power to condenser microphones. Ensure this switch is OFF before connecting or disconnecting any microphone to prevent damage. Only activate it when a condenser microphone is properly connected and requires phantom power.
6.4. Built-in Effects (FX)
The mixer includes built-in delay effects. Use the FX Knob on each channel to send a portion of that channel's signal to the effects processor. Adjust the overall effect parameters using the DEL (Delay) and REP (Repeat) knobs in the master section.
6.5. Bluetooth Connectivity

Image 6.2: Illustration of connecting a mobile phone via Bluetooth to the G-MARK PTM-4 mixer.
- Press the MODE button in the Bluetooth & MP3 Player section until "BLUE" appears on the display.
- On your mobile device, search for Bluetooth devices and select "G-MARK PTM-4" (or similar name).
- Once paired, audio from your device will play through the mixer.
- Use the MP3 ROUTE / CH3-4 MP3 switch to route the Bluetooth audio to channels 3-4 for mixing.
6.6. USB Playback and Recording
- USB Playback: Insert a USB flash drive containing MP3 files into the USB port. The mixer will automatically switch to MP3 mode and begin playback. Use the control buttons (Previous/Next, Play/Pause) to navigate tracks.
- USB Audio Interface: Connect the mixer to a computer via the USB port. The mixer will function as an audio interface, allowing you to record the mixed output or play audio from your computer through the mixer. No special drivers are typically required for Windows or macOS.
- Recording to USB: In MP3 mode, press the MODE/REC button to initiate recording to the inserted USB drive. Press again to stop recording.
7. Maintenance
- Clean the mixer's exterior with a soft, dry cloth. Do not use liquid cleaners or solvents.
- Keep the mixer free from dust and debris.
- Store the mixer in a cool, dry place when not in use.
- Avoid excessive force when operating knobs and switches.
8. Troubleshooting
| Problem | Possible Cause | Solution |
|---|---|---|
| No sound output. |
|
|
| Distorted sound. |
|
|
| Condenser microphone not working. |
|
|
| Bluetooth not connecting. |
|
|
9. Specifications
| Feature | Detail |
|---|---|
| Model | PTM-4 |
| Number of Channels | 4 |
| Connectivity Technology | USB, Bluetooth, Analog Interface |
| Power Source | Corded Electric (5V USB) |
| Voltage | 5 Volts |
| Item Weight | 2.13 pounds (0.97 Kilograms) |
| Product Dimensions (D x W x H) | 7.28" x 6.1" x 2.36" |
| Phantom Power | +48V (for condenser microphones) |
| Equalization | 3-Band EQ (High, Low) on all channels |
| Audio Interface | USB Soundcard for MAC/PC |
10. Warranty and Support
G-MARK products are designed for reliability and performance. For warranty information, please refer to the warranty card included with your product or visit the official G-MARK website. For technical support or service inquiries, please contact G-MARK customer service through their official channels.