
1. Introduction
Thank you for choosing the BACOENG R134a AUTO AC U-Charge Hose with Gauge and Can Tap. This manual provides essential information for the safe and effective use of your new AC refrigerant charging tool. Please read these instructions carefully before operation and retain them for future reference.
2. Safety Information
- Always wear appropriate personal protective equipment, including safety glasses and gloves, when handling refrigerants.
- Refrigerants can cause frostbite upon contact with skin or eyes. In case of contact, flush with water and seek medical attention immediately.
- Ensure proper ventilation when working with refrigerants.
- Never overcharge an AC system. Refer to your vehicle's service manual for correct refrigerant capacity.
- Keep out of reach of children.
- Do not expose the refrigerant can or hose to open flames or high temperatures.
3. Package Contents
Verify that all components are present in your package:
- R134a U-Charge Hose
- Pressure Gauge (0-100 PSI scale)
- Refrigerant Can Tap (1/2" ACME fitting)
- Low Side Quick Coupler
4. Product Overview
Familiarize yourself with the main components of the BACOENG R134a U-Charge Hose kit.
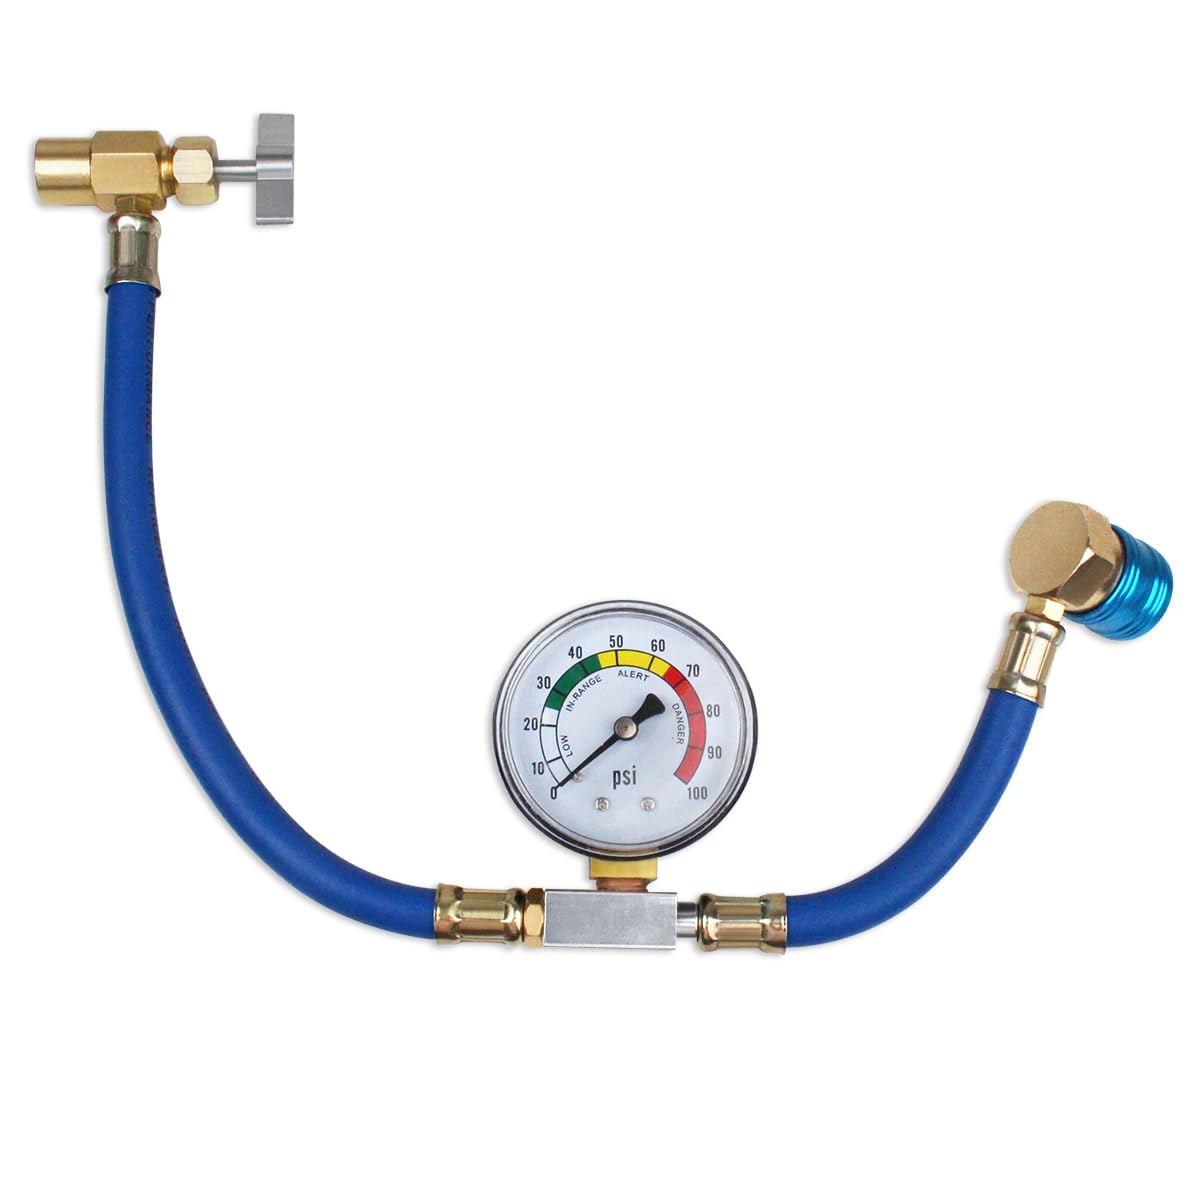
Figure 1: Pressure Gauge. This gauge displays the low-side pressure of your vehicle's AC system, with a scale from 0 to 100 PSI. It features color-coded zones for 'LOW', 'IN-RANGE', 'ALERT', and 'DANGER' to assist in proper charging.

Figure 2: Refrigerant Can Tap. This component connects to the R134a refrigerant can. It features a 1/2" ACME fitting and a piercing needle mechanism to open the can and allow refrigerant flow into the hose.

Figure 3: Low Side Quick Coupler. This coupler connects the charging hose to the vehicle's low-pressure AC service port. It is designed for R134a systems and ensures a secure, leak-free connection.
5. Setup
- Prepare the Refrigerant Can: Ensure the refrigerant can is R134a compatible.
- Attach Can Tap: Screw the refrigerant can tap onto the top of the R134a refrigerant can. Turn the handle clockwise until the needle pierces the can. Then, turn the handle counter-clockwise to retract the needle, opening the can for refrigerant flow.
- Connect Hose to Can Tap: Ensure the hose is securely connected to the can tap.
- Locate Vehicle's Low-Side Port: Identify the low-pressure service port on your vehicle's AC system. This port is typically located on the larger diameter line and is often marked with an 'L' or a blue cap.
- Connect Low Side Quick Coupler: Pull back the blue collar on the low side quick coupler, then push it firmly onto the vehicle's low-pressure service port until it snaps into place. Release the collar to secure the connection. Ensure it is snug to prevent leaks.
6. Operating Instructions
Once the setup is complete, follow these steps to charge your vehicle's AC system:
- Start Vehicle and AC: Start your vehicle's engine and turn the AC system to its maximum cooling setting with the fan on high.
- Monitor Pressure Gauge: Observe the pressure reading on the gauge. A low reading (in the 'LOW' or 'ALERT' zone) indicates a need for refrigerant.
- Begin Charging: With the can tap handle retracted (can open), invert the refrigerant can (if recommended by the refrigerant manufacturer) and gently shake it while allowing refrigerant to flow into the system.
- Check Pressure Periodically: Periodically stop charging and check the pressure gauge. Continue adding refrigerant in short bursts until the gauge reads within the 'IN-RANGE' zone. Avoid overcharging.
- Disconnect: Once the desired pressure is reached, turn the can tap handle clockwise to close the can. Disconnect the low side quick coupler from the vehicle's service port by pulling back the blue collar.
- Store Equipment: Properly store the hose, gauge, and can tap in a clean, dry place.
7. Maintenance
- After each use, wipe down the hose and fittings with a clean cloth to remove any refrigerant residue or dirt.
- Inspect the hose for any signs of cracks, wear, or damage before each use. Replace if necessary.
- Ensure all connections are clean and free of debris to maintain a proper seal.
- Store the tool in a cool, dry environment away from direct sunlight and extreme temperatures.
8. Troubleshooting
- Gauge reads zero or very low after connecting: Ensure the low side quick coupler is fully seated and locked onto the vehicle's service port. The blue collar must be pulled back, pushed onto the port, and then released to snap into place. Also, verify the can tap is properly piercing the refrigerant can and open.
- Refrigerant not flowing: Check that the can tap handle is fully retracted (counter-clockwise) to allow refrigerant to flow. Ensure the refrigerant can is not empty.
- Leaks at connections: Tighten all threaded connections. Ensure the quick coupler is properly seated on the vehicle's port. Inspect O-rings for damage.
- Low side quick coupler does not fit: The R134a low side quick coupler has a maximum diameter of 13mm. Ensure you are attempting to connect to the correct low-pressure service port on your vehicle. Some users report needing to pull the blue collar back firmly before pushing onto the port for a secure fit.
9. Specifications
| Brand | BACOENG |
| Model Number | 749789929194 |
| Material | Metal |
| Total Length | 30 cm (11.8 inches) |
| Refrigerant Can Tap Fitting | 1/2" ACME |
| Pressure Gauge Scale | 0 - 100 PSI |
| Thread Type | 1/2" (maximum diameter 12mm) |
| R134a Low Side Diameter | Maximum 13mm (when connecting to AC) |
| Item Weight | 0.1 kg |
10. Warranty and Support
For warranty information and customer support, please refer to the documentation provided with your purchase or contact the seller directly. Keep your proof of purchase for any warranty claims.