1. Introduction
The Cangaroo 3-in-1 device is a versatile instrument designed to monitor indoor temperature and humidity, while also functioning as a digital clock with an alarm feature. This manual provides detailed instructions for its setup, operation, and maintenance, ensuring you get the most accurate readings and functionality from your device.
2. Product Features
- Temperature and Humidity Measurement: Accurately measures ambient temperature and relative humidity.
- Digital Clock with Alarm Function: Displays time and includes a programmable alarm.
- Large Display: Clear and easy-to-read digital screen.
- Wide Measurement Range: Temperature from -50°C to 70°C; Humidity from 10% to 99%.
- High Accuracy: Temperature accuracy of +/- 1°C; Humidity accuracy of +/- 5%.
- Battery-Operated: Requires one AA 1.5V battery (not included) for portable use.
- Modern Design: Compact and aesthetically pleasing for various environments.
3. Package Contents
Please check the package for the following items:
- 1 x Cangaroo 3-in-1 Thermometer, Hygrometer, Digital Clock with Alarm (Model 103548)
Note: AA 1.5V battery is not included and must be purchased separately.
4. Setup
4.1 Battery Installation
- Locate the battery compartment on the back of the device.
- Open the battery compartment cover.
- Insert one AA 1.5V battery, ensuring the correct polarity (+ and -).
- Close the battery compartment cover securely.
Upon successful battery installation, the display will power on and show current temperature, humidity, and time.

Image: Rear view of the device, highlighting the battery compartment and control buttons (ADJ, MODE, °C/°F).
4.2 Initial Placement
Place the device on a flat, stable surface or mount it on a wall using the integrated hanging hole. For accurate readings, avoid placing the device near heat sources, direct sunlight, or areas with extreme drafts.
5. Operating Instructions
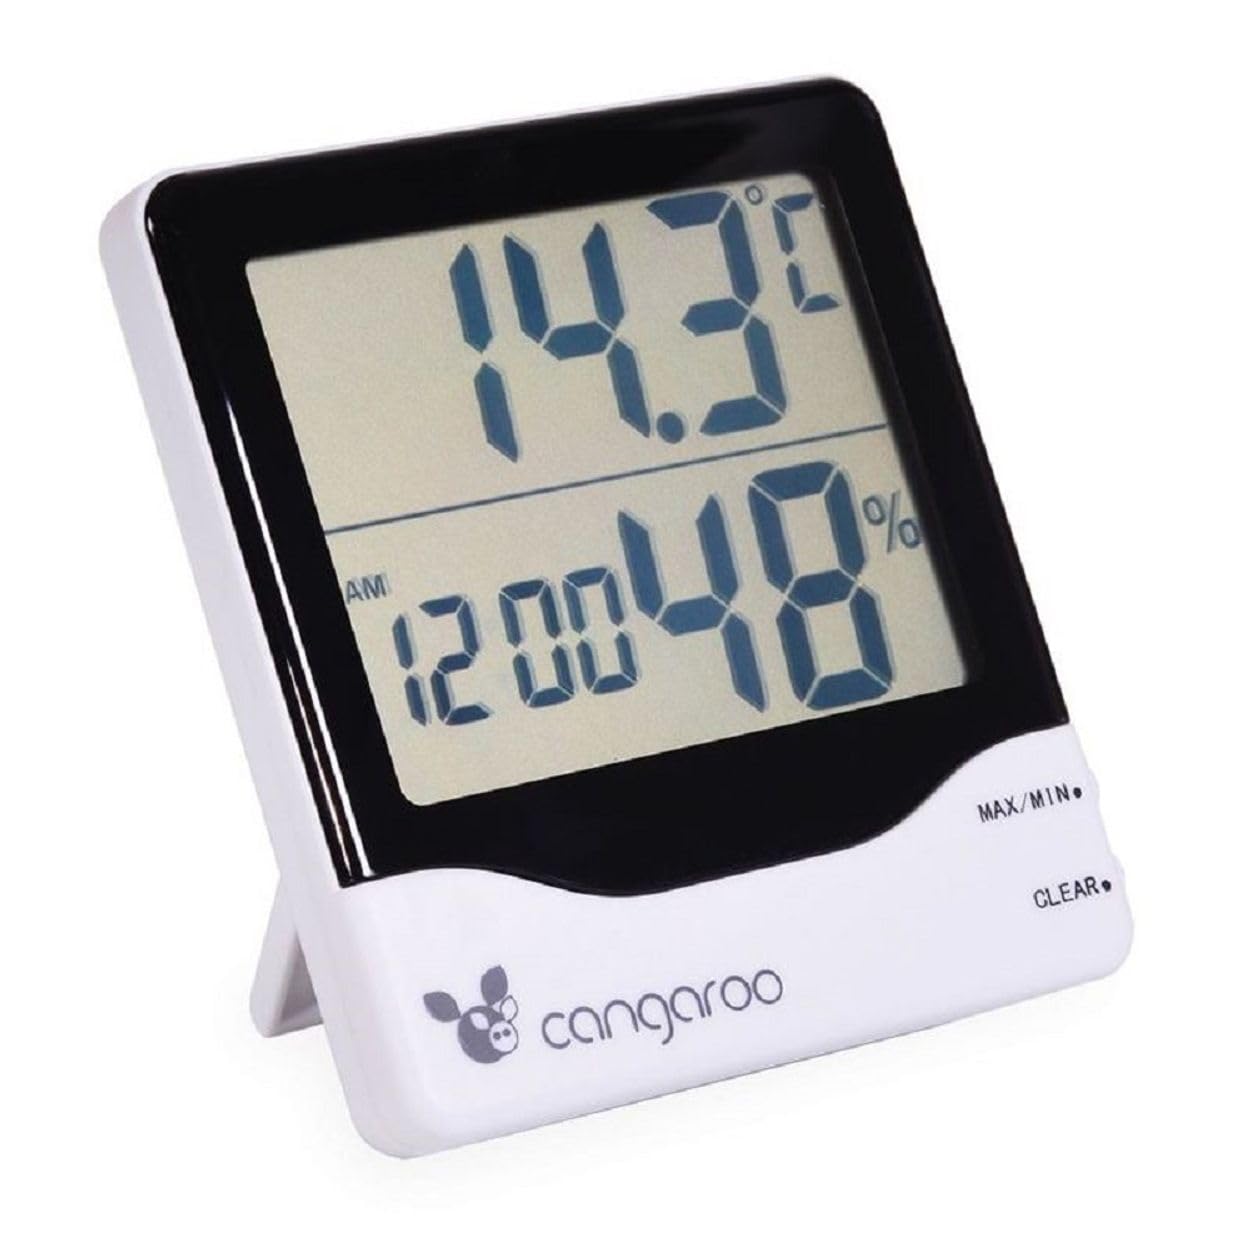
Image: Front view of the Cangaroo 3-in-1 device, showing the main display with temperature, time, and humidity readings.
5.1 Display Overview
The large LCD screen displays the following information:
- Upper Display: Current temperature in °C or °F.
- Lower Display: Current time (AM/PM indicator) and relative humidity in %.
5.2 Setting Time and Date
- Press the MODE button on the back of the device to cycle through display modes until the time setting is active (usually indicated by flashing digits).
- While in time setting mode, press the ADJ (Adjust) button to change the flashing digit (hours, minutes).
- Continue pressing MODE to move to the next setting (e.g., minutes, 12/24 hour format, date if available).
- Use the ADJ button to set the desired value for each.
- Once all settings are complete, press MODE again to exit the setting mode.
5.3 Setting the Alarm
- Press the MODE button until the alarm time is displayed (often indicated by an alarm icon or 'AL').
- Press and hold the MODE button for a few seconds until the alarm hours start flashing.
- Use the ADJ button to set the desired alarm hour.
- Press MODE to move to alarm minutes, then use ADJ to set.
- Press MODE again to confirm and exit alarm setting.
- To activate/deactivate the alarm, press the ADJ button while in alarm display mode (not setting mode). An alarm icon will appear/disappear on the display.
5.4 Switching Temperature Units (°C/°F)
Press the °C/°F button on the back of the device to toggle between Celsius and Fahrenheit temperature display.
5.5 MAX/MIN Temperature and Humidity Readings
The device records the maximum and minimum temperature and humidity values since the last reset.
- Press the MAX/MIN button (located on the front right side) once to display the maximum recorded temperature and humidity.
- Press MAX/MIN again to display the minimum recorded temperature and humidity.
- Press MAX/MIN a third time to return to current readings.
- To clear the MAX/MIN records, press the CLEAR button (located on the front right side, below MAX/MIN) while MAX or MIN values are displayed.
6. Maintenance
6.1 Cleaning
Wipe the device with a soft, dry cloth. Do not use abrasive cleaners or immerse the device in water. Avoid spraying liquids directly onto the display or buttons.
6.2 Battery Replacement
When the display becomes dim or the device stops functioning, it is time to replace the battery. Follow the steps in Section 4.1 Battery Installation to replace the AA 1.5V battery.
6.3 Storage
If the device will not be used for an extended period, remove the battery to prevent leakage and damage. Store the device in a cool, dry place away from direct sunlight.
7. Troubleshooting
- No Display: Check if the battery is inserted correctly with the right polarity. Replace the battery if it is depleted.
- Inaccurate Readings: Ensure the device is not placed near heat sources, direct sunlight, or in areas with extreme drafts. Allow the device to stabilize for 15-30 minutes after initial setup or relocation.
- Alarm Not Sounding: Verify that the alarm function is activated (check for the alarm icon on the display). Ensure the alarm time is set correctly.
8. Specifications
| Model Number | 103548 |
| Color | White and Black |
| Temperature Range | -50°C to 70°C (-58°F to 158°F) |
| Temperature Accuracy | +/- 1°C |
| Humidity Range | 10% to 99% RH |
| Humidity Accuracy | +/- 5% RH |
| Power Source | 1 x AA 1.5V Battery (not included) |
| Dimensions (L x W x H) | 11 x 10 x 2.5 cm (approximately) |
| Weight | 120 Grams (approximately) |
9. Warranty and Support
This product is covered by a standard manufacturer's warranty. For specific warranty details, please refer to the documentation provided with your purchase or contact Cangaroo customer support. If you encounter any issues or require assistance, please reach out to the retailer or manufacturer's support channels.
10. Disposal Information
Please dispose of the device and its batteries responsibly according to local environmental regulations. Do not dispose of electronic devices or batteries with household waste. Contact your local authorities for information on recycling programs.