SolarEpic Tracer2206AN
EPEVER MPPT Solar Charge Controller Tracer2206AN User Manual
Model: Tracer2206AN | Brand: SolarEpic
1. Product Overview
The EPEVER MPPT Solar Charge Controller Tracer2206AN is an advanced Maximum Power Point Tracking (MPPT) charge controller designed for off-grid solar systems. It efficiently manages power flow from solar panels to batteries, ensuring optimal charging and extending battery life. Featuring a negative grounding design and high charging efficiency, this controller is compatible with 12V and 24V battery systems, including AGM, Sealed Gel, Flooded, and LiFePO4 batteries. It supports a maximum PV input voltage of 60V and includes an RS485 interface for communication with remote meters, PC software, and mobile applications.
2. Package Contents
Upon unboxing, please verify that all the following components are included:
- EPEVER MPPT Solar Charge Controller (Tracer2206AN)
- SolarEpic MT50 Remote Meter with 2-meter cable
- PC Software Communication Cable (USB to RJ45)
- Battery Temperature Sensor
- User Manual (this document)

Image: Main components of the Tracer2206AN package, including the solar charge controller, MT50 remote meter, PC communication cable, and battery temperature sensor.
3. Setup and Installation
Proper installation is crucial for the safe and efficient operation of your solar charge controller. Please follow these steps carefully.
3.1 Mounting the Controller
Mount the controller vertically on a flat, non-flammable surface in a well-ventilated area, away from direct sunlight, high temperatures, and moisture. Ensure there is sufficient space around the controller for heat dissipation. The controller features mounting holes for secure attachment.
3.2 Wiring Connections
Connect the components in the following order to prevent damage:
- Battery Connection: Connect the battery to the controller's battery terminals first. Ensure correct polarity (positive to positive, negative to negative). The controller will automatically detect 12V or 24V system voltage.
- Solar Panel Connection: Connect the solar panels to the controller's PV terminals. Observe correct polarity. Ensure the open circuit voltage of your solar array does not exceed the controller's maximum PV input voltage (60V).
- Load Connection (Optional): If using the load output, connect your DC load to the controller's load terminals. Ensure the load current does not exceed the controller's rated discharge current.
- Temperature Sensor Connection: Connect the battery temperature sensor to the designated RTS interface. This allows the controller to compensate for battery charging voltage based on temperature, optimizing battery life.
- Remote Meter/Communication Connection: Connect the MT50 remote meter or PC communication cable to the RS485 communication interface (COM port) for monitoring and parameter adjustment.
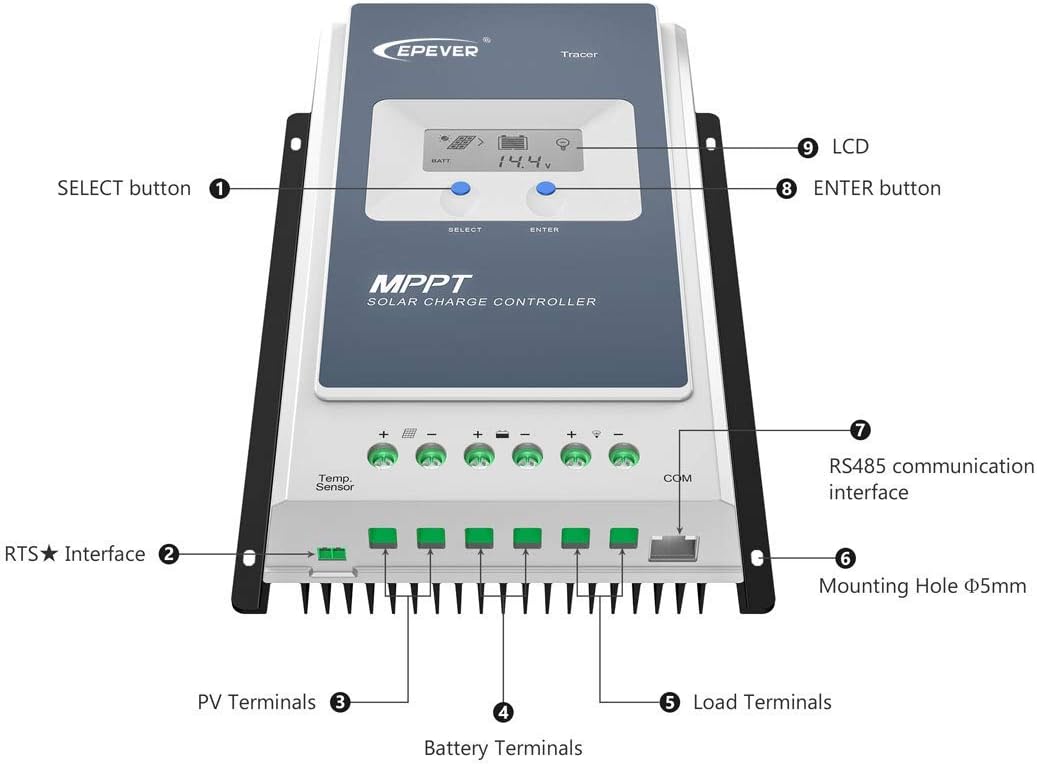
Image: Detailed view of the controller's terminals and buttons, including PV, battery, load, temperature sensor (RTS), and RS485 communication ports.
Important: Always disconnect connections in the reverse order of installation (load, then solar, then battery) when performing maintenance or disassembly.
4. Operating Instructions
Once properly installed, the controller will begin operating automatically. The integrated LCD provides real-time system information.
4.1 LCD Display and Buttons
The controller features an LCD screen and two buttons: SELECT and ENTER. The SELECT button cycles through various display screens, while the ENTER button confirms selections or enters settings menus (when applicable, especially with the MT50 remote meter).

Image: Examples of information displayed on the controller's LCD, including solar input, battery status, and load output.
The LCD can display various parameters, including:
- PV Voltage and Current
- PV Input Power
- Battery Voltage and Current
- Load Voltage and Current
- Battery Temperature
- System Status and Error Codes
4.2 Battery Type Selection
The controller supports various battery types. For optimal charging, ensure the correct battery type is selected. While some types are auto-detected, for LiFePO4 and other specific chemistries, it is recommended to use the MT50 remote meter or PC software for precise parameter configuration. The controller's advanced MPPT algorithm ensures efficient power conversion regardless of battery type.
4.3 Remote Monitoring and Control
The RS485 communication interface allows for advanced monitoring and control:
- MT50 Remote Meter: Provides a comprehensive display of system data and allows for detailed parameter settings.
- PC Software: Connect the controller to a computer using the provided communication cable for in-depth monitoring, data logging, and parameter configuration.
- Mobile APP: With an optional eBox adapter, you can monitor and control the system via a mobile application on your smartphone.
5. Maintenance
Regular maintenance ensures the longevity and optimal performance of your solar charge controller.
- Cleaning: Periodically clean the controller's exterior with a dry cloth to remove dust and debris. Ensure ventilation openings are clear.
- Connection Check: Annually inspect all wiring connections for tightness and corrosion. Loose connections can lead to power loss or overheating.
- Environmental Conditions: Ensure the controller remains within its specified operating temperature range (-20°C to +70°C). Avoid exposing it to excessive moisture or direct sunlight.
- Firmware Updates: Check the manufacturer's website for any available firmware updates that may improve performance or add new features.
6. Troubleshooting
If you encounter issues with your solar charge controller, refer to the following common problems and solutions.
- No Display/No Power:
- Check battery connections and ensure they are secure and correctly polarized.
- Verify battery voltage is within the controller's operating range (8-32V).
- No Charging from Solar Panels:
- Check solar panel connections and polarity.
- Ensure sufficient sunlight is reaching the panels.
- Verify PV open circuit voltage is within the controller's limits (Max 60V).
- Confirm the solar panels are producing power using a multimeter.
- Load Not Working:
- Check load connections and ensure correct polarity.
- Verify the load current does not exceed the controller's rated discharge current (20A).
- Check if the battery voltage is too low, causing the load output to be disconnected by the controller's low voltage disconnect (LVD) function.
- Inaccurate Readings/Unexpected Behavior with LiFePO4 Batteries:
- While the controller supports LiFePO4, optimal performance requires precise parameter settings. Ensure the battery type is correctly configured via the MT50 or PC software.
- Verify that the charging parameters (e.g., boost, float, low voltage disconnect) are set according to your specific LiFePO4 battery manufacturer's recommendations.
For persistent issues or error codes displayed on the LCD, consult the detailed troubleshooting section in the full product manual available from the manufacturer or contact SolarEpic customer support.
7. Specifications
Below are the technical specifications for the EPEVER MPPT Solar Charge Controller Tracer2206AN:

Image: Technical specifications table for the Tracer AN series, including the Tracer2206AN model.
| Parameter | Value (Tracer2206AN) |
|---|---|
| Nominal System Voltage | 12/24VDC Auto Work |
| Rated Charge Current | 20A |
| Rated Discharge Current | 20A |
| Battery Input Voltage Range | 8-32V |
| Max. PV Open Circuit Voltage | 60V (at min. operating temp), 46V (at 25℃) |
| MPP Voltage Range | V(BAT)+2V~72V |
| Max. PV Input Power | 260W (12V Battery), 520W (24V Battery) |
| Battery Type Compatibility | Sealed, Gel, Flooded, LiFePO4, Li(NiCoMn)O2 (User defined) |
| Self-consumption | ≤14mA (12V), ≤15mA (24V) |
| Discharge Circuit Voltage Drop | ≤0.23V |
| Temperature Compensate Coefficient | 3mV/℃/2V (default) |
| Grounding | Common Negative |
| RS485 Interface | 5VDC/100mA |
| Ambient Temperature Range | -20°C to +70°C (-4°F to 158°F) |
| Enclosure | IP30 |
| Dimensions (Package) | 16.42 x 8.98 x 3.94 inches |
| Item Weight | 4.03 pounds |
| Color | Blue-Grey |
| Material | Plastic |
8. Warranty and Support
For information regarding the product warranty, please refer to the warranty card included with your purchase or visit the official SolarEpic website. Warranty terms and conditions may vary.
For technical support, troubleshooting assistance, or inquiries about replacement parts, please contact SolarEpic customer service. Contact details can typically be found on the manufacturer's website or on your purchase documentation.
Related Documents - Tracer2206AN
 |
EPEVER Tracer AN Series MPPT Solar Charge Controller User Manual User manual for EPEVER Tracer AN series MPPT solar charge controllers, covering safety instructions, installation, operation, troubleshooting, and technical specifications for models Tracer1206AN, Tracer2206AN, Tracer1210AN, Tracer2210AN, Tracer3210AN, and Tracer4210AN. |
 |
EPEVER Tracer-AN G3 Series MPPT Solar Charge Controller User Manual Comprehensive user manual for the EPEVER Tracer-AN G3 series MPPT solar charge controllers, covering installation, operation, features, technical specifications, and troubleshooting for models like Tracer1206AN G3, Tracer1210AN G3, Tracer2206AN G3, Tracer2210AN G3, Tracer3210AN G3, and Tracer4210AN G3. |
 |
EPEVER Tracer-AN Series MPPT Solar Charge Controller User Manual Detailed user manual for the EPEVER Tracer-AN Series MPPT solar charge controllers, covering safety, installation, operation, troubleshooting, and technical specifications. Learn about MPPT technology, battery charging stages, and system configuration. |
 |
EPEVER Tracer-AN G3 Series MPPT Solar Charge Controller User Manual Comprehensive user manual for the EPEVER Tracer-AN G3 series MPPT solar charge controllers, detailing installation, operation, safety, key features like advanced MPPT and multi-stage charging, remote monitoring capabilities, and essential technical specifications for efficient solar energy management in RVs, household systems, and field applications. |
 |
EPEVER Tracer AN Series MPPT Solar Charge Controller User Manual Comprehensive user manual for the EPEVER Tracer AN series MPPT solar charge controllers, covering installation, operation, specifications, safety instructions, and troubleshooting for models including Tracer1206AN, Tracer2206AN, Tracer1210AN, Tracer2210AN, Tracer3210AN, and Tracer4210AN. |
 |
EPEVER Tracer-AN G3 Series MPPT Solar Charge Controller User Manual Comprehensive user manual for EPEVER Tracer-AN G3 and G3 BLE series MPPT solar charge controllers. Covers installation, safety, features, specifications, troubleshooting, and maintenance for efficient solar energy management. |
Ask a question about this manual
Ask about setup, troubleshooting, compatibility, parts, safety, or missing instructions. Manuals+ will review the question and use this page’s manual context to help answer it.