1. Introduction
This manual provides detailed instructions for the safe and proper installation, operation, and maintenance of your Mount Plus OB-600 Outdoor Weatherproof Tilt TV Wall Mount. Please read this manual thoroughly before installation and retain it for future reference.
The Mount Plus OB-600 is designed to securely mount most 37-inch to 86-inch televisions in outdoor environments. Its robust construction and weatherproof features ensure durability and reliable performance.
2. Safety Information
WARNING: Failure to read and follow these instructions may result in serious personal injury, property damage, or voiding of your warranty.
- Ensure the mounting surface can safely support the combined weight of the mount and the television.
- Do not exceed the maximum weight capacity of 176 lbs (80 kg).
- Always use appropriate safety equipment, including eye protection, during installation.
- If you are unsure about any part of the installation process, consult a qualified professional.
- Keep children and pets away from the work area during installation.
- Check all connections and fasteners regularly to ensure they remain secure.
3. Package Contents
Verify that all components are present and undamaged before beginning installation. If any parts are missing or damaged, contact Mount Plus customer support.
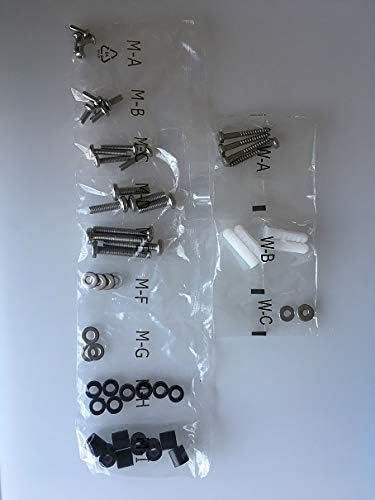
Figure 3.1: Assorted hardware for the Mount Plus OB-600, including various screws, washers, and wall anchors, organized in labeled bags.
- Wall Plate Assembly
- TV Bracket Arms (2x)
- Mounting Hardware Kit (screws, washers, spacers, anchors)
- Instruction Manual
4. Specifications
| Feature | Detail |
|---|---|
| Model Number | OB-600 |
| Brand | Mount Plus |
| TV Size Compatibility | Most 37" - 86" TVs |
| Maximum Weight Capacity | 176 lbs (80 kg) |
| VESA Compatibility | 75x75, 100x100, 100x150, 150x100, 150x150, 200x100, 200x200, 300x200, 300x300, 400x200, 400x300, 400x400, 600x400 mm |
| Tilt Range | +5° to -10° |
| Profile (Distance from Wall) | 54mm (2.1") |
| Material | Stainless Steel, Powder-Coated Galvanized Steel |
| Item Weight | 8.98 pounds |
| UPC | 638845988612 |
5. Setup and Installation
Before you begin, ensure you have the necessary tools: drill, stud finder (for wood studs), level, measuring tape, pencil, and a screwdriver.
5.1. Determine Mounting Location
Choose a suitable outdoor wall location. The mount is designed for patios, decks, and balconies. Ensure the wall structure can support the combined weight of the mount and your TV.

Figure 5.1: Example of the Mount Plus OB-600 installed on an outdoor brick wall, demonstrating its intended use in an outdoor living space.
5.2. Attach TV Brackets to Television
- Carefully place your TV face down on a soft, clean surface.
- Identify the VESA mounting holes on the back of your TV.
- Select the appropriate screws and spacers from the hardware kit that fit your TV's VESA pattern.
- Attach the two TV bracket arms to the back of your TV, ensuring they are centered and securely fastened. The arrows on the brackets should point upwards.
5.3. Install Wall Plate to Wall
- Hold the wall plate against the wall at your desired height and use a level to ensure it is perfectly horizontal. Mark the drilling locations with a pencil.
- Drill pilot holes at the marked locations. For wood studs, use a smaller drill bit. For concrete or brick, use a masonry drill bit and insert wall anchors.
- Secure the wall plate to the wall using the provided lag bolts and washers. Tighten all bolts firmly, but do not overtighten.
5.4. Mount Television to Wall Plate
- With assistance, carefully lift the TV with the attached brackets and hook the brackets onto the top edge of the wall plate.
- Allow the TV to hang freely, ensuring the brackets are properly seated on the wall plate.
- Secure the TV to the wall plate using the safety screws or locking mechanism at the bottom of the TV bracket arms. This prevents accidental dislodgement.

Figure 5.2: A close-up view of the Mount Plus OB-600's anti-theft design, showing a padlock securing the TV bracket to the wall plate, preventing unauthorized removal.
6. Operating Instructions
6.1. Adjusting Tilt Angle
The Mount Plus OB-600 features a free-tilting design, allowing you to adjust the TV's vertical viewing angle. Loosen the tilt adjustment knobs on the sides of the TV bracket arms, adjust the TV to the desired angle (+5° to -10°), and then tighten the knobs to secure the position.
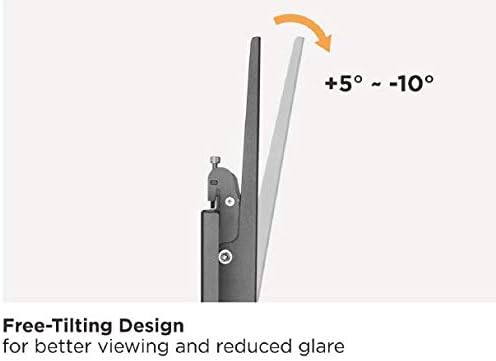
Figure 6.1: Visual representation of the Mount Plus OB-600's tilt functionality, demonstrating the ability to adjust the screen angle from 5 degrees upward to 10 degrees downward for optimal viewing and glare reduction.
6.2. Level Adjustment
After installation, if minor leveling adjustments are needed, the mount allows for a built-in level adjustment of ±5mm (±0.19"). This feature helps ensure your TV is perfectly horizontal.
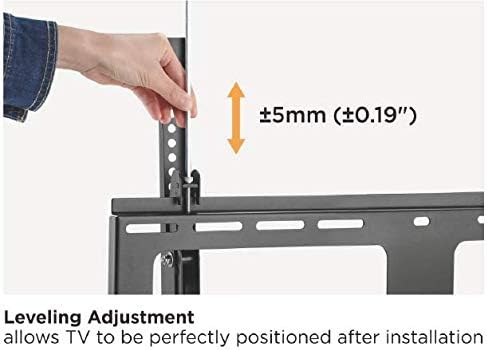
Figure 6.2: A hand demonstrating the leveling adjustment feature of the Mount Plus OB-600, which allows for fine-tuning the TV's horizontal position by up to ±5mm after initial installation.
6.3. Anti-Theft Feature
The mount includes an anti-theft design. Once the TV is mounted, a padlock (not included) can be inserted through the designated hole on the bottom of the TV bracket arms to deter unauthorized removal of the television.
7. Maintenance
To ensure the longevity and safe operation of your Mount Plus OB-600, regular maintenance is recommended, especially in outdoor environments.
- Cleaning: Wipe the mount with a soft, damp cloth to remove dust and debris. Avoid abrasive cleaners or solvents that could damage the powder-coated finish.
- Inspection: Periodically check all bolts, screws, and connections to ensure they are tight and secure. Re-tighten if necessary.
- Corrosion Check: Although designed for outdoor use with a powder-coated finish and stainless steel screws, regularly inspect for any signs of rust or corrosion, especially in coastal or harsh weather conditions. Address any issues promptly.
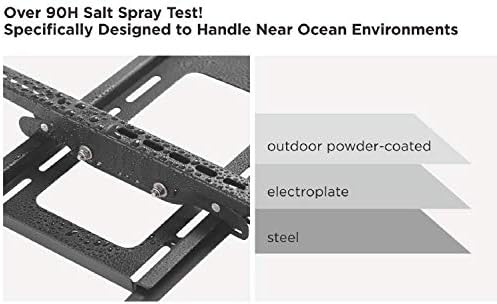
Figure 7.1: Illustration of the Mount Plus OB-600's multi-layer construction, highlighting the outdoor powder-coated finish, electroplate, and steel base designed for enhanced weather resistance and durability.

Figure 7.2: A close-up image of a stainless steel screw, emphasizing its role in providing additional protection against salt air and corrosion in outdoor environments.
8. Troubleshooting
| Problem | Possible Cause | Solution |
|---|---|---|
| TV appears crooked after installation. | Wall plate not level, or TV not level on brackets. | Use the built-in level adjustment feature (±5mm) to fine-tune the TV's horizontal position. If the wall plate is significantly off, you may need to re-install it. |
| TV is difficult to tilt or does not stay in position. | Tilt adjustment knobs are too tight or too loose. | Loosen the tilt adjustment knobs to adjust the angle, then tighten them firmly to secure the TV in the desired position. |
| Mount feels unstable. | Loose fasteners, incorrect installation, or unsuitable wall material. | Immediately remove the TV. Check all wall plate and TV bracket fasteners for tightness. Ensure the wall material is appropriate and anchors are correctly installed. Consult a professional if unsure. |
| Missing parts from package. | Packaging error. | Contact Mount Plus customer support for replacement parts. |
9. Warranty Information
Mount Plus products are designed for durability and performance. For specific warranty details, please refer to the warranty card included with your product or visit the official Mount Plus website. Keep your purchase receipt as proof of purchase for any warranty claims.
10. Customer Support
If you have any questions, require assistance with installation, or need to report missing/damaged parts, please contact Mount Plus customer support:
- Website: Visit the Mount Plus Store on Amazon (for general product information)
- Refer to your product packaging or included documentation for direct contact information (phone/email).