1. Product Overview
This manual provides detailed instructions for the installation, maintenance, and troubleshooting of the Kizut 130BT Carburetor Kit. This kit is designed as a replacement part for specific Husqvarna and RedMax backpack leaf blower models, aiming to restore optimal engine performance.
1.1 Kit Components
The Kizut Carburetor Kit includes the following parts:
- 1 x Carburetor (Replacement for Husqvarna 504116101, Walbro WYA-73A)
- 1 x Gasket
- 1 x Fuel Filter
- 1 x Spark Plug
- 1 x Primer Bulb
- 2 x Fuel Lines
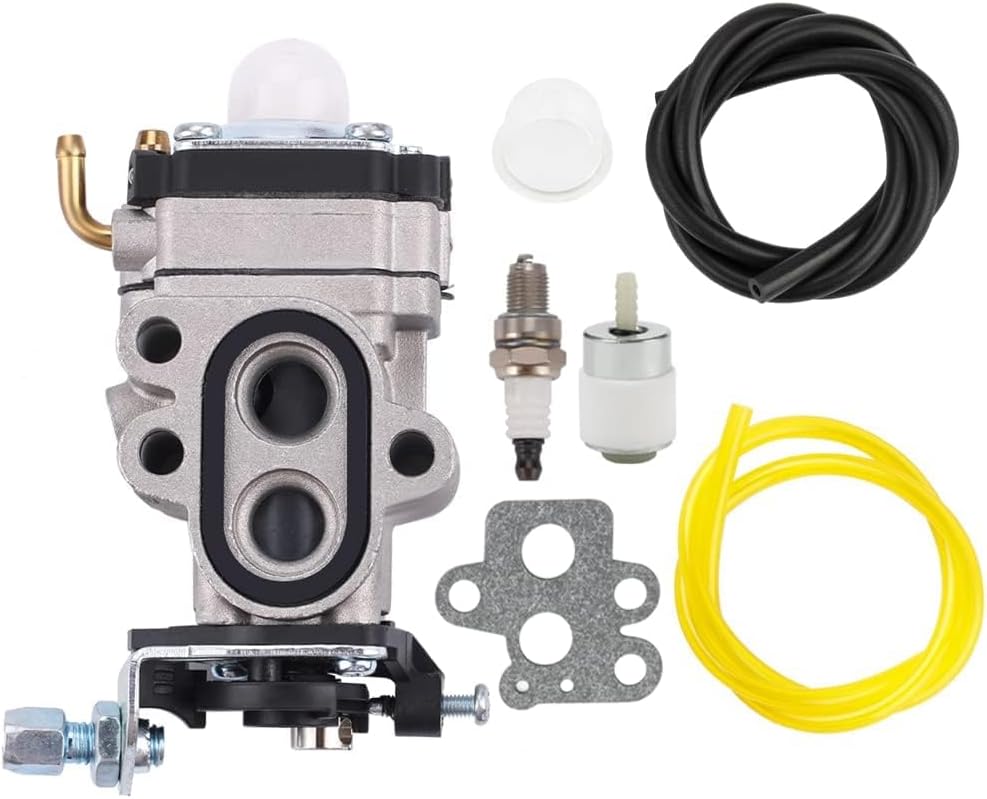
Image 1.1: Complete Kizut Carburetor Kit showing all included components: carburetor, gasket, fuel filter, spark plug, primer bulb, and fuel lines.
1.2 Compatibility
This carburetor kit is compatible with the following models:
- Husqvarna 130BT (2007-01) 965102204 Backpack Blower
- Husqvarna 130BT (2008-10) Backpack Blower
- Husqvarna 530BT (2012-10) Lightweight Backpack Blower
- RedMax EBZ3050RH Backpack Blower
- RedMax EBZ3000RHCA Backpack Blower

Image 1.2: Visual representation of the compatible Husqvarna and RedMax leaf blower models for this carburetor kit.
2. Safety Information
Always prioritize safety when working with fuel-powered equipment. Failure to follow safety precautions can result in serious injury or property damage.
- Disconnect Spark Plug: Before performing any maintenance or installation, always disconnect the spark plug wire to prevent accidental starting.
- Fuel Handling: Work in a well-ventilated area. Avoid open flames, sparks, or smoking near fuel. Use an approved fuel container.
- Eye Protection: Wear safety glasses or goggles to protect your eyes from debris and fuel splashes.
- Gloves: Wear appropriate gloves to protect your hands from fuel, oil, and sharp edges.
- Engine Cool Down: Allow the engine to cool completely before working on it to prevent burns.
- Proper Tools: Use the correct tools for each step to avoid damaging components.
3. Installation
This section outlines the general procedure for replacing the carburetor and associated components. Specific steps may vary slightly depending on your exact leaf blower model. Refer to your blower's original service manual for detailed disassembly/assembly instructions if needed.
3.1 Preparation
- Ensure the leaf blower engine is cool and the fuel tank is empty or nearly empty.
- Disconnect the spark plug wire from the spark plug.
- Place the blower on a stable, clean surface.
3.2 Carburetor Replacement
- Access the Carburetor: Remove any air filter covers, air filters, and housing components that obstruct access to the carburetor. Note the routing of fuel lines and throttle linkage.
- Disconnect Fuel Lines: Carefully disconnect the fuel lines from the old carburetor. Be prepared for minor fuel spills.
- Disconnect Throttle Linkage: Detach the throttle cable and any choke linkages from the old carburetor.
- Remove Old Carburetor: Unscrew the mounting bolts that secure the carburetor to the engine manifold. Remove the old carburetor and gasket.
- Install New Gasket: Place the new gasket included in the kit onto the engine manifold, ensuring proper alignment.
- Mount New Carburetor: Position the new carburetor (Image 3.1) onto the gasket and secure it with the mounting bolts. Do not overtighten.
- Reconnect Linkages: Reattach the throttle cable and choke linkages to the new carburetor. Ensure smooth operation.
- Reconnect Fuel Lines: Connect the new fuel lines (if replacing) or the existing fuel lines to the appropriate ports on the new carburetor. Ensure connections are secure to prevent leaks.

Image 3.1: Front view of the replacement carburetor, showing the main body and mounting points.
3.3 Fuel Filter and Fuel Line Replacement
- Drain Fuel Tank: If not already done, drain any remaining fuel from the tank into an approved container.
- Remove Old Fuel Filter: Locate the fuel filter inside the fuel tank (it's usually at the end of a fuel line). Use a hook or pliers to carefully pull it out.
- Replace Fuel Lines: If the old fuel lines are cracked, brittle, or damaged, replace them with the new fuel lines provided in the kit. Note the original routing for correct installation.
- Install New Fuel Filter: Attach the new fuel filter (Image 3.2) to the end of the appropriate fuel line and carefully place it back into the fuel tank.

Image 3.2: The fuel filter and primer bulb components from the kit, ready for installation.
3.4 Spark Plug Replacement
- Remove Old Spark Plug: Use a spark plug wrench to carefully remove the old spark plug.
- Install New Spark Plug: Thread the new spark plug (Image 3.3) into the cylinder head by hand to avoid cross-threading. Once finger-tight, use the wrench to tighten it an additional 1/4 to 1/2 turn. Do not overtighten.
- Reconnect Spark Plug Wire: Reconnect the spark plug wire firmly to the new spark plug.

Image 3.3: The new spark plug provided in the kit, essential for proper engine ignition.
3.5 Primer Bulb Replacement (If Applicable)
If your existing primer bulb is cracked or not functioning, replace it with the new one provided.
- Carefully pry off the old primer bulb.
- Press the new primer bulb (Image 3.2) firmly into place until it seats securely.
4. Initial Use and Adjustment
After installation, perform these steps before operating the leaf blower.
- Refuel: Fill the fuel tank with the correct fuel mixture as specified by your blower's manufacturer.
- Prime the Carburetor: Press the primer bulb several times until fuel is visible in the bulb and it feels firm. This ensures fuel is drawn into the carburetor.
- Start the Engine: Follow your leaf blower's standard starting procedure (e.g., choke setting, pull cord).
- Idle Adjustment: Once the engine starts and warms up, it should idle smoothly. If the idle is too high or too low, locate the idle adjustment screw on the carburetor (Image 4.1) and turn it clockwise to increase RPM or counter-clockwise to decrease RPM until a stable idle is achieved.
- High/Low Mixture Adjustment (Advanced): Some carburetors have high and low-speed mixture screws. Adjusting these requires specialized knowledge and tools (like a tachometer) to ensure optimal performance and prevent engine damage. If the engine runs poorly at high throttle or under load after idle adjustment, it is recommended to consult a qualified service technician or refer to your blower's service manual for specific adjustment procedures.

Image 4.1: Side view of the carburetor, highlighting potential locations for idle and mixture adjustment screws.
5. Maintenance
Regular maintenance helps ensure the longevity and proper function of your carburetor and leaf blower.
- Fuel Quality: Always use fresh, clean fuel mixed with the correct ratio of 2-stroke oil (if applicable to your blower). Stale fuel or incorrect oil mixtures can clog the carburetor.
- Fuel Filter: Inspect and replace the fuel filter annually or more frequently if operating in dusty conditions or if fuel flow issues occur.
- Air Filter: Clean or replace the air filter regularly as per your blower's manual. A dirty air filter can cause the engine to run rich and affect carburetor performance.
- Spark Plug: Inspect the spark plug annually. Replace it if electrodes are worn, fouled, or if the engine misfires.
- Storage: Before long-term storage, drain the fuel tank and run the engine until it stops to clear the carburetor of fuel. Alternatively, use a fuel stabilizer.
6. Troubleshooting
This section addresses common issues that may arise after carburetor replacement.
| Problem | Possible Cause | Solution |
|---|---|---|
| Engine won't start | No fuel to carburetor, clogged fuel filter, faulty spark plug, incorrect choke setting, loose spark plug wire. | Ensure fuel tank has fuel. Prime carburetor. Check fuel filter. Inspect/replace spark plug. Reconnect spark plug wire. Adjust choke. |
| Engine starts but dies quickly | Improper idle adjustment, fuel starvation, air leak, clogged fuel filter. | Adjust idle screw. Check fuel lines for kinks or blockages. Ensure carburetor is securely mounted. Replace fuel filter. |
| Engine runs rough or lacks power | Dirty air filter, incorrect fuel mixture, clogged carburetor passages, improper high/low mixture adjustment. | Clean/replace air filter. Use fresh, correct fuel mixture. If issues persist, professional carburetor adjustment or cleaning may be required. |
| Fuel leak | Loose fuel line connections, damaged fuel lines, improperly seated gasket. | Check all fuel line connections for tightness. Replace damaged fuel lines. Ensure gasket is properly installed and carburetor bolts are snug. |
7. Specifications
| Attribute | Value |
|---|---|
| Manufacturer | Kizut |
| Part Number (Replaces) | Husqvarna 504116101, Walbro WYA-73A |
| Item Model Number | 130BT 530BT EBZ3050RH EBZ3000RHCA |
| Item Weight | 0.035 ounces |
| Package Dimensions | 3.7 x 3.31 x 2.05 inches |
| UPC | 656721539239 |
8. Warranty and Support
Specific warranty details for this product are not provided within this manual. For information regarding warranty coverage, returns, or technical support, please contact the manufacturer, Kizut, or the retailer from whom the product was purchased.
It is recommended to retain your purchase receipt as proof of purchase for any warranty claims.