Introduction
This manual provides detailed instructions for the installation, operation, and maintenance of your TORCHSTAR LED Emergency Exit Sign. Designed for safety and reliability, this double-faced exit sign features a durable construction, battery backup for power outages, and versatile mounting options. Please read this manual thoroughly before installation and use to ensure proper function and safety.

Image: TORCHSTAR LED Emergency Exit Sign, showcasing its sleek design and red 'EXIT' lettering.
Safety Information
- UL 924 Certified: This exit sign is UL 924 certified, ensuring compliance with safety standards for emergency lighting and exit signs.
- Fireproof Material: Constructed from fireproof ABS plastic for enhanced safety and durability.
- Damp Location Rated: Suitable for installation in damp environments.
- Electrical Safety: Installation should be performed by a qualified electrician in accordance with national and local electrical codes. Ensure power is disconnected before installation or servicing.
- Battery Safety: The unit contains a rechargeable battery. Do not expose to fire or extreme temperatures.
Package Contents
Verify that all components are present before beginning installation:
- LED Emergency Exit Sign Unit (2 units per pack)
- Mounting Bracket
- Plastic Pop-out Arrows (for directional customization)
- Wire Nuts
- Mounting Screws
- Built-in 1.2V 900mAh Rechargeable Battery
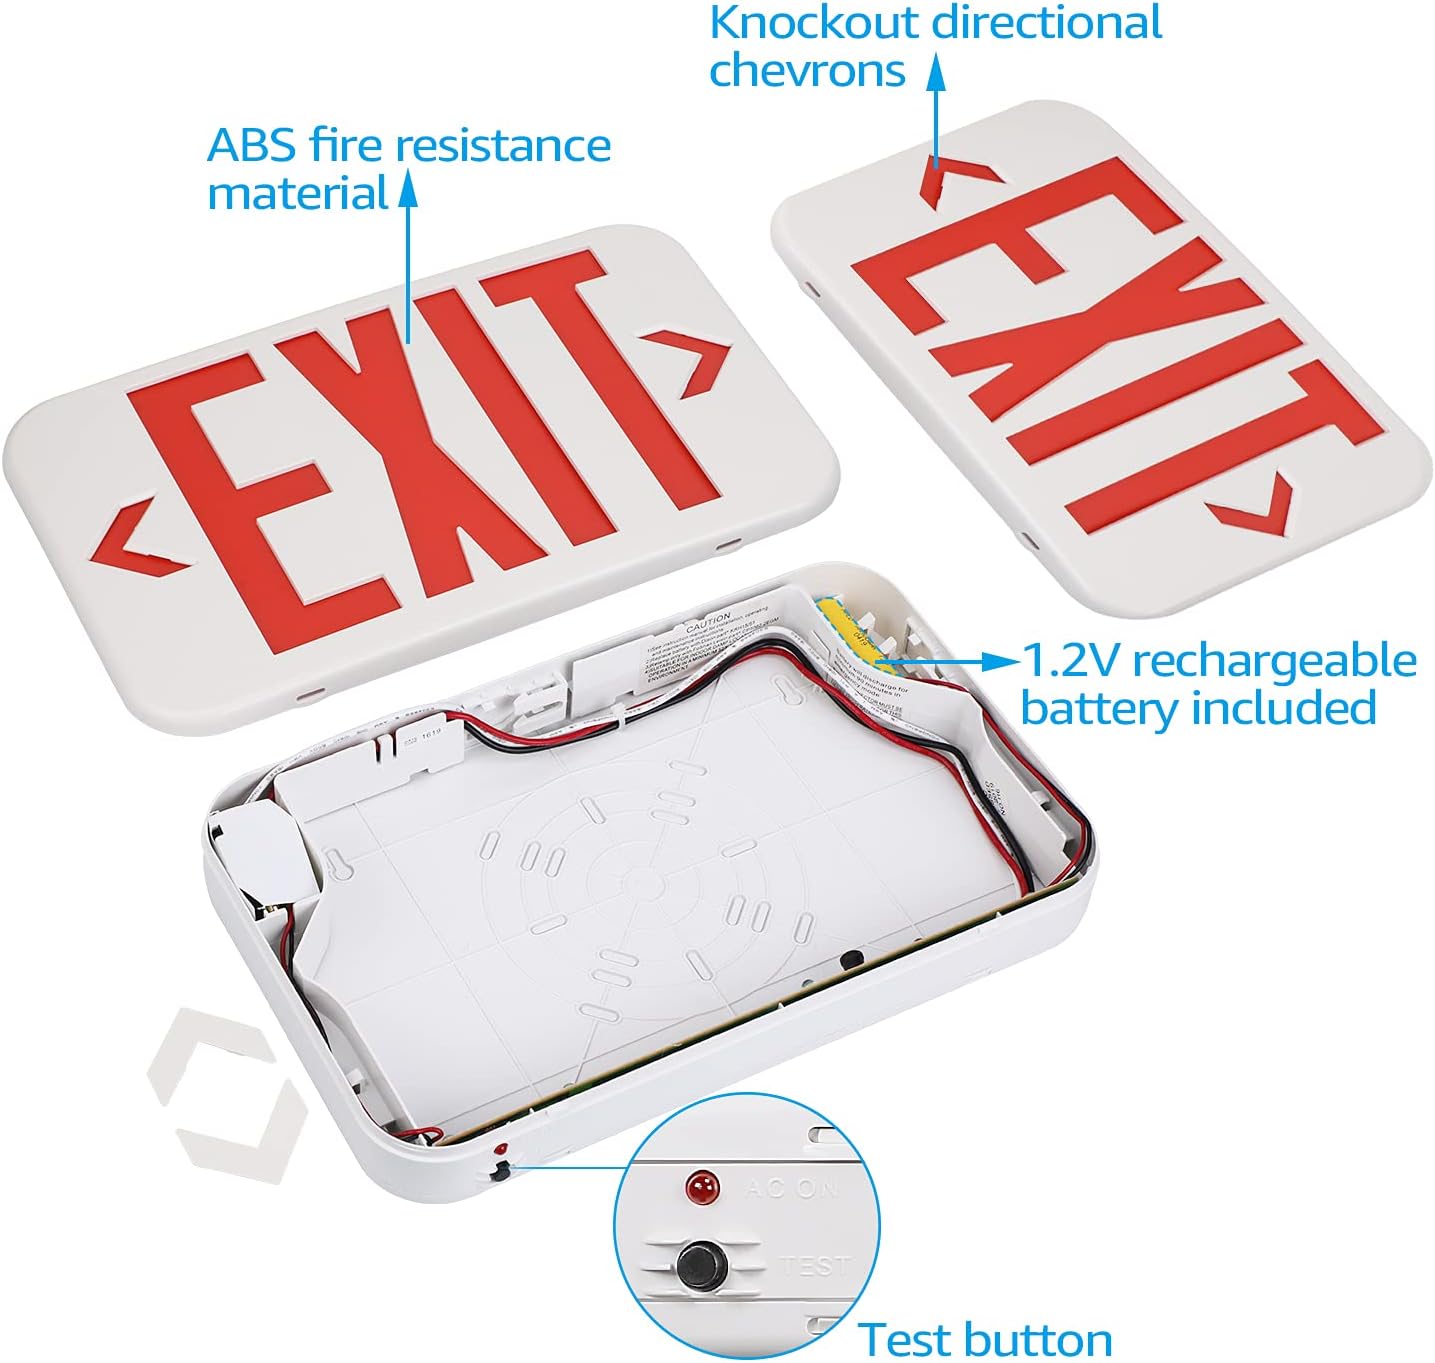
Image: View of the internal components, including the 1.2V rechargeable battery, wiring, and test button.
Setup & Installation
The TORCHSTAR LED Emergency Exit Sign offers versatile mounting options. Ensure power is turned off at the circuit breaker before proceeding.
1. Choose Mounting Method:
This unit supports three mounting types: Top-mount (ceiling), Side-mount (wall), and Back-mount (wall).

Image: Illustration of the three available mounting options: Wall Mounting, Side Mounting, and Ceiling Mounting.
2. Prepare the Unit:
- Open the unit by gently prying open the clips on the sides.
- Customize Arrows: If directional arrows are needed, carefully pop out the desired chevron cutouts on the sign face(s). If no arrows are needed, leave them in place.
- Connect Battery: Locate the 1.2V rechargeable battery and plug its connector into the designated port on the circuit board inside the unit.
3. Wiring:
Connect the unit's wires to the building's electrical supply. The unit supports both 120V and 277V AC circuits.
- Connect the white wire from the exit sign to the building's neutral wire.
- For 120V AC operation, connect the black wire from the exit sign to the building's 120V live wire. Cap off the red wire with a wire nut.
- For 277V AC operation, connect the red wire from the exit sign to the building's 277V live wire. Cap off the black wire with a wire nut.
- Secure all connections with wire nuts.
Video: Official TORCHSTAR video demonstrating the LED Exit Sign and its features, including wiring and mounting options.
4. Mount the Unit:
- Attach the mounting bracket to the desired surface (ceiling or wall) using the provided screws.
- Secure the exit sign unit to the mounting bracket, ensuring all wires are tucked safely inside the electrical box and the unit is flush against the surface.
- Close the unit securely, ensuring all clips are engaged.
Video: A brief overview of the LED Exit Sign, highlighting its design and ease of installation.
Operating Instructions
- Normal Operation: Once properly installed and connected to power, the LED exit sign will illuminate continuously. The indicator light (AC ON) will be lit, showing that the unit is receiving AC power and the battery is charging.
- Battery Backup: In the event of a power outage, the built-in 1.2V 900mAh rechargeable battery will automatically activate, providing illumination for up to 90 minutes.
- Test Button: Press the 'TEST' button located on the unit to simulate a power outage. The sign should illuminate using battery power. Release the button to return to normal operation. This test should be performed monthly to ensure battery functionality.
Maintenance
- Cleaning: Clean the sign's surface with a soft, damp cloth. Do not use abrasive cleaners or solvents.
- Monthly Test: Perform a monthly test using the 'TEST' button to ensure the battery backup system is functioning correctly. The sign should remain illuminated for at least 30 seconds during the test.
- Annual Full Discharge Test: Annually, disconnect AC power to the unit for 90 minutes to ensure the battery provides full backup duration. Reconnect AC power after the test.
- Battery Replacement: The rechargeable battery has a limited lifespan. If the unit fails to provide adequate illumination during a test, the battery may need replacement. Contact customer support for replacement options.
Troubleshooting
| Problem | Possible Cause | Solution |
|---|---|---|
| Sign does not illuminate (AC power) | No AC power, incorrect wiring, faulty LED. | Check circuit breaker. Verify wiring connections. Contact customer support if LEDs are faulty. |
| Sign does not illuminate during test (battery backup) | Battery not connected, battery not charged, faulty battery. | Ensure battery is properly plugged in. Allow 24 hours for initial charge. Replace battery if necessary. |
| Indicator light (AC ON) is off | No AC power, faulty indicator light. | Check AC power supply. If power is present, contact customer support. |
Specifications
| Feature | Detail |
|---|---|
| Model Number | ZF3EL-04V2-2P |
| Input Voltage | AC 120V/277V |
| Battery Type | 1.2V 900mAh Rechargeable (included) |
| Emergency Operation Time | 90 minutes (minimum) |
| Light Type | LED |
| Letter Color | Red |
| Material | Fireproof ABS Plastic |
| Product Dimensions | 11.61"L x 4.31"W x 1.77"D (approximate, without mounting canopy) |
| Item Weight | 1.82 pounds |
| Mounting Type | Ceiling, Side, Back (Universal) |
| Operating Temperature | 32°F-104°F |
| Certifications | UL 924 Listed, Damp Location |
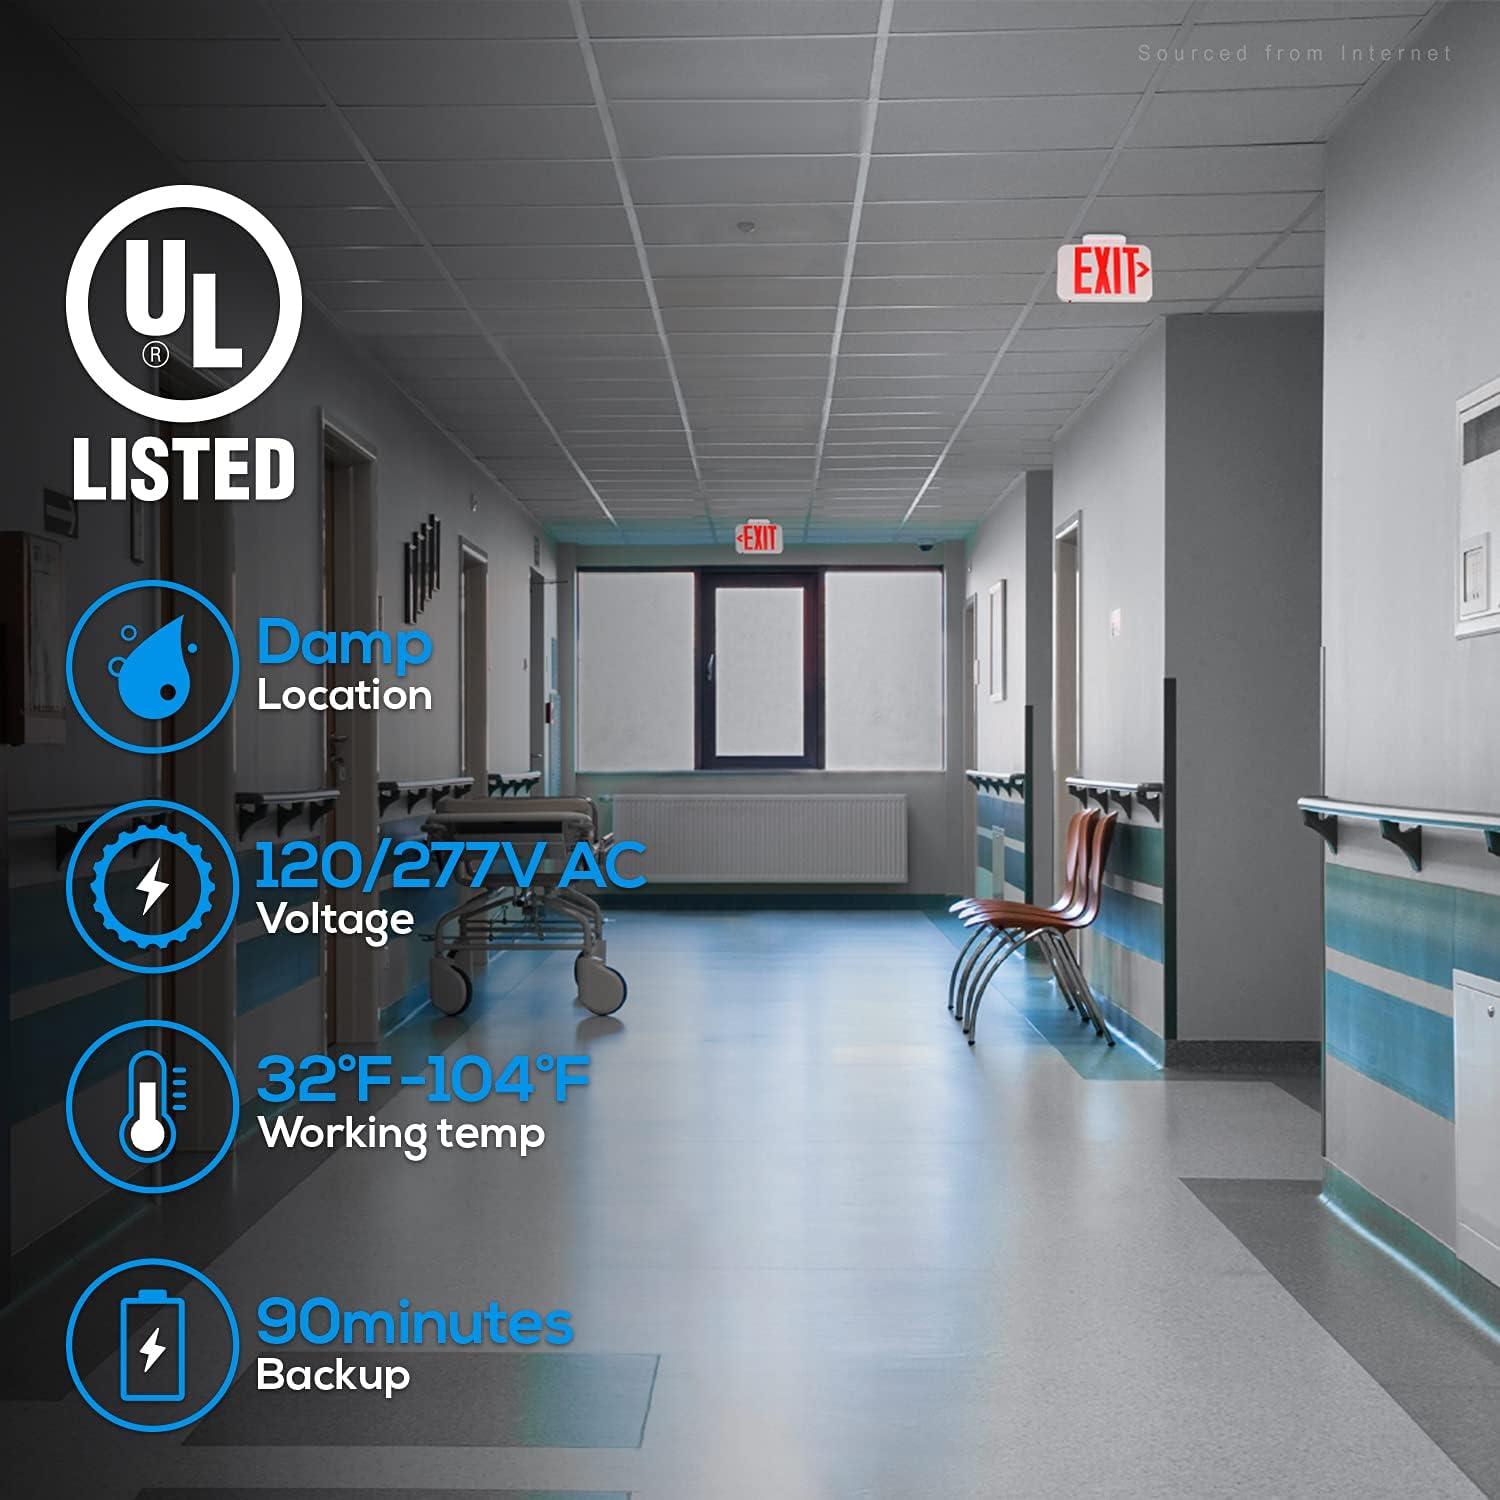
Image: Visual summary of key features: UL Listed, Damp Location suitability, 120/277V AC Voltage, 32°F-104°F Working Temperature, and 90 minutes Battery Backup.

Image: Detailed dimensions of the exit sign, showing length, width, and depth in both inches and millimeters.
Warranty and Support
For warranty information, technical support, or replacement parts, please contact TORCHSTAR customer service. Keep your purchase receipt for warranty claims.