1. Introduction
This manual provides detailed instructions for the installation, maintenance, and troubleshooting of your Speakman SA-2707 Vector 24-Inch Polished Chrome Towel Bar. Please read these instructions carefully before beginning installation to ensure proper function and longevity of the product.
2. Product Overview
The Speakman Vector SA-2707 Towel Bar is a durable and stylish accessory designed for bathroom use. It features a 24-inch frame constructed entirely of brass, ensuring robust support for towels. The design incorporates clean, circular elements with subtle details, complementing various bathroom aesthetics. This towel bar is part of the Speakman Vector collection, known for its commercial-grade quality, similar to those found in hotels.
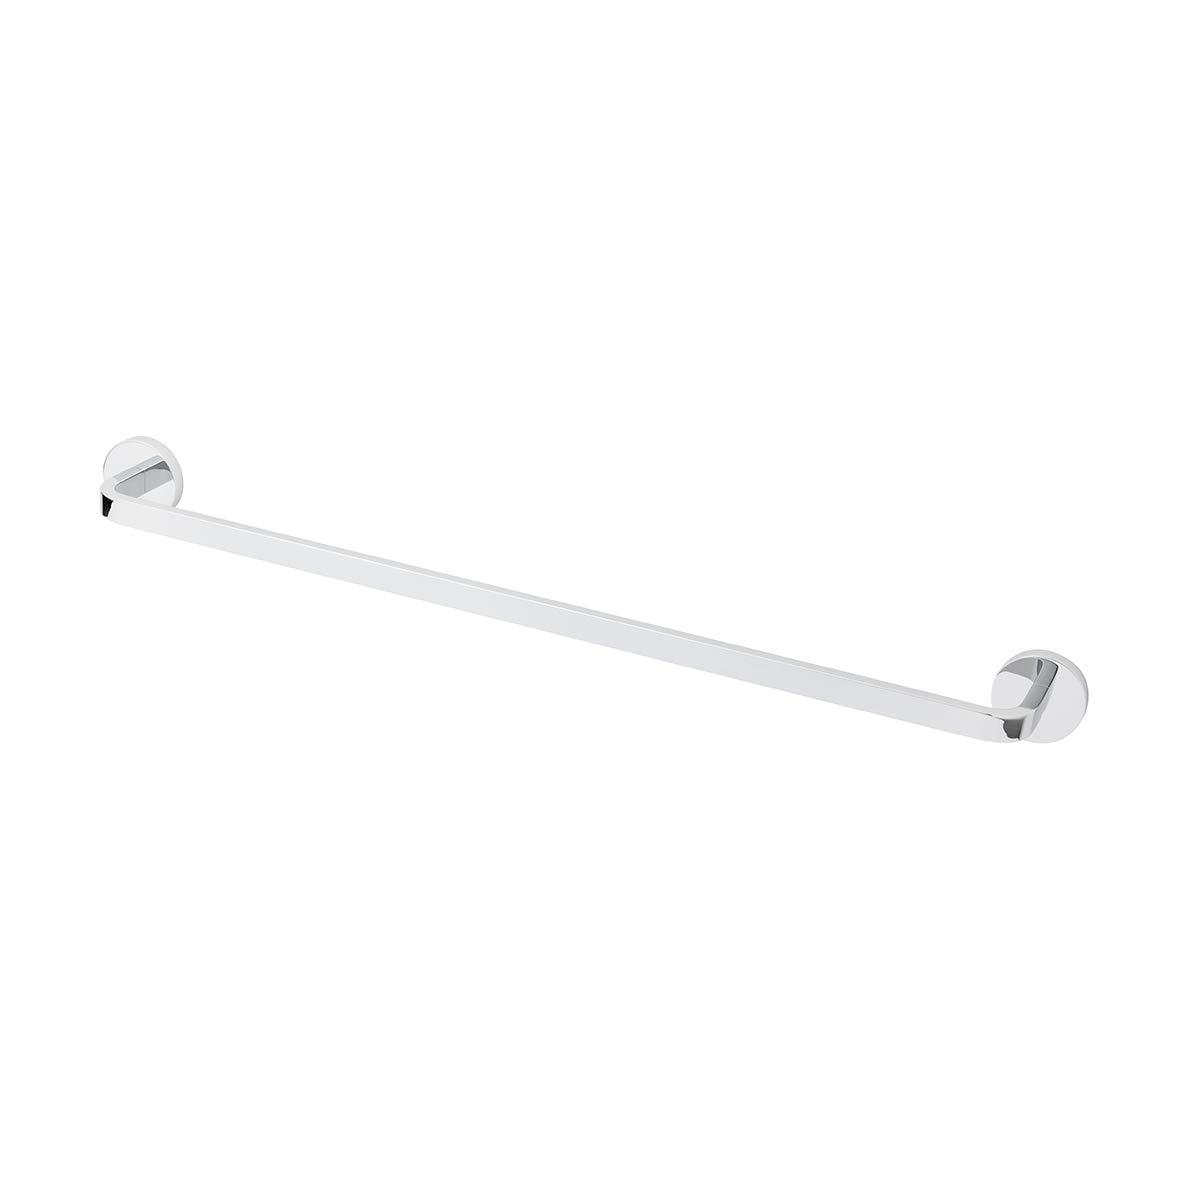
Figure 2.1: The Speakman SA-2707 Vector 24-Inch Polished Chrome Towel Bar. This image shows the complete towel bar in its polished chrome finish, ready for installation.
Key Features:
- Durable Brass Construction: Ensures long-lasting performance and resistance to corrosion.
- 24-Inch Length: Provides ample space for hanging towels.
- Polished Chrome Finish: Offers a sleek, reflective surface that is easy to clean and complements modern bathroom decor.
- Easy Installation: Designed for straightforward setup with included mounting hardware.
- Commercial Grade: Built to the same high standards as products used in hotels.
3. Package Contents
Before beginning installation, please verify that all components are present and undamaged. If any parts are missing or damaged, do not proceed with installation and contact Speakman customer support.
- Speakman SA-2707 Vector 24-Inch Towel Bar (1)
- Mounting Hardware (Screws, Wall Anchors, Mounting Brackets) (1 set)
4. Safety Information
Please observe the following safety precautions during installation and use:
- Always wear appropriate safety gear, such as safety glasses, when drilling.
- Ensure the installation surface is structurally sound and can support the weight of the towel bar and any towels placed on it.
- Use a stud finder to locate wall studs if possible, for more secure mounting. If mounting into drywall without a stud, use appropriate wall anchors.
- Keep small parts and tools out of reach of children.
- Do not overtighten screws, as this may damage the product or the mounting surface.
5. Installation Instructions
Follow these steps for proper installation of your Speakman SA-2707 Vector 24-Inch Towel Bar.
Tools Required (Not Included):
- Pencil
- Measuring Tape
- Drill
- Drill Bit (appropriate size for wall anchors)
- Phillips Head Screwdriver
- Level
Installation Steps:
- Choose Location: Select a suitable location on your wall for the towel bar. Ensure it is at a convenient height and clear of any electrical wiring or plumbing.
- Mark Mounting Points: Hold one of the mounting brackets against the wall at your desired height. Use a level to ensure it is straight. Mark the screw holes with a pencil. Repeat for the second mounting bracket, ensuring the distance between the two brackets matches the towel bar's length (approximately 24 inches center-to-center, with an overall length of 26 1/4 inches).
- Drill Pilot Holes: Using an appropriate drill bit for your wall anchors (if not drilling into a stud), drill pilot holes at the marked locations.
- Insert Wall Anchors (if needed): If drilling into drywall without a stud, gently tap the wall anchors into the pilot holes until they are flush with the wall surface.
- Attach Mounting Brackets: Align the mounting brackets with the drilled holes/anchors. Secure them to the wall using the provided screws and a Phillips head screwdriver. Ensure they are firmly attached and level.
- Install Towel Bar: Slide the towel bar onto the attached mounting brackets. The design allows for a secure fit. Some models may have small set screws on the underside of the mounting posts to further secure the bar; tighten these if present.
- Test Stability: Gently pull on the towel bar to ensure it is securely mounted and does not wobble.
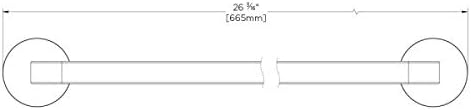
Figure 5.1: Dimensional drawing of the Speakman SA-2707 Towel Bar, indicating an overall length of 26 1/4 inches (665mm).

Figure 5.2: The Speakman SA-2707 Towel Bar shown installed on a bathroom wall, holding a towel. This illustrates the final appearance after successful installation.
6. Maintenance
To maintain the polished chrome finish and ensure the longevity of your Speakman SA-2707 Towel Bar, follow these cleaning guidelines:
- Clean regularly with a soft, damp cloth.
- For stubborn spots, use a mild soap solution and rinse thoroughly with water.
- DO NOT use abrasive cleaners, harsh chemicals, or scouring pads, as these can damage the finish.
- Dry the towel bar immediately after cleaning to prevent water spots.
7. Troubleshooting
| Problem | Possible Cause | Solution |
|---|---|---|
| Towel bar feels loose or wobbly. | Mounting screws are not tight enough, or wall anchors are not properly seated. | Tighten mounting screws. If the issue persists, remove the bar, inspect wall anchors, and replace if damaged. Ensure anchors are appropriate for your wall type. |
| Finish appears dull or stained. | Residue from cleaning products or hard water spots. | Clean with a soft, damp cloth and mild soap. Rinse thoroughly and dry immediately. Avoid abrasive cleaners. |
8. Specifications
- Model Number: SA-2707
- Brand: Speakman
- Product Type: Towel Bar
- Length: 24-Inch (nominal) / 26 1/4-Inch (overall)
- Color: Polished Chrome
- Material: Brass
- Finish Type: Polished
- Installation Type: Screw-In
- Included Components: Mounting hardware
- UPC: 671252143045
9. Warranty and Support
The Speakman SA-2707 Vector 24-Inch Polished Chrome Towel Bar is backed by a Limited Lifetime Warranty. This warranty covers defects in material and workmanship under normal use and service. For specific terms and conditions, please refer to the official Speakman warranty documentation or contact customer support.
For technical assistance, replacement parts, or warranty claims, please contact Speakman Customer Support:
- Website: Visit the Speakman Store on Amazon
- Manufacturer: Speakman
- Model Number: SA-2707