1. Introduction
This manual provides detailed instructions for the assembly, operation, and maintenance of your SOLOMARK 60AZ Refractor Telescope. Designed for both terrestrial and astronomical observation, this telescope features a 60mm aperture and 700mm focal length, offering clear views of celestial objects and distant landscapes.

Image 1.1: The SOLOMARK 60AZ Refractor Telescope, fully assembled, ready for observation.
2. Package Contents
Verify that all components are present before beginning assembly:
- Telescope Optical Tube (60mm aperture, 700mm focal length)
- Adjustable Aluminum Alloy Tripod
- Altazimuth Mount with Slow Motion Control
- K20mm Eyepiece (35X magnification)
- K9mm Eyepiece (78X magnification)
- 3X Barlow Lens
- Finderscope
- 1.25 inch 10mm Smartphone Eyepiece Adapter
- Accessory Tray
3. Setup and Assembly
Follow these steps to assemble your telescope:
Set up the Tripod: Extend the legs of the aluminum alloy tripod to the desired height. Secure the legs using the locking clamps. Attach the accessory tray to the center brace of the tripod.
Attach the Mount: Secure the altazimuth mount to the top of the tripod. Ensure it is firmly tightened to provide a stable base for the telescope.

Image 3.1: The altazimuth mount, providing stability and movement control.
Mount the Optical Tube: Place the telescope optical tube into the cradle of the altazimuth mount. Secure it with the provided screws or clamps. Ensure the tube is balanced.
Install the Finderscope: Locate the finderscope bracket on the telescope tube. Slide the finderscope into the bracket and tighten the retaining screws. The finderscope aids in locating objects before viewing them through the main eyepiece.

Image 3.2: The finderscope, essential for initial object targeting.
Insert the Eyepiece: Choose an eyepiece (K20mm for lower magnification, K9mm for higher magnification) and insert it into the diagonal or directly into the focuser. Secure it with the thumbscrew. For higher magnification, you can also insert the 3X Barlow lens before the eyepiece.
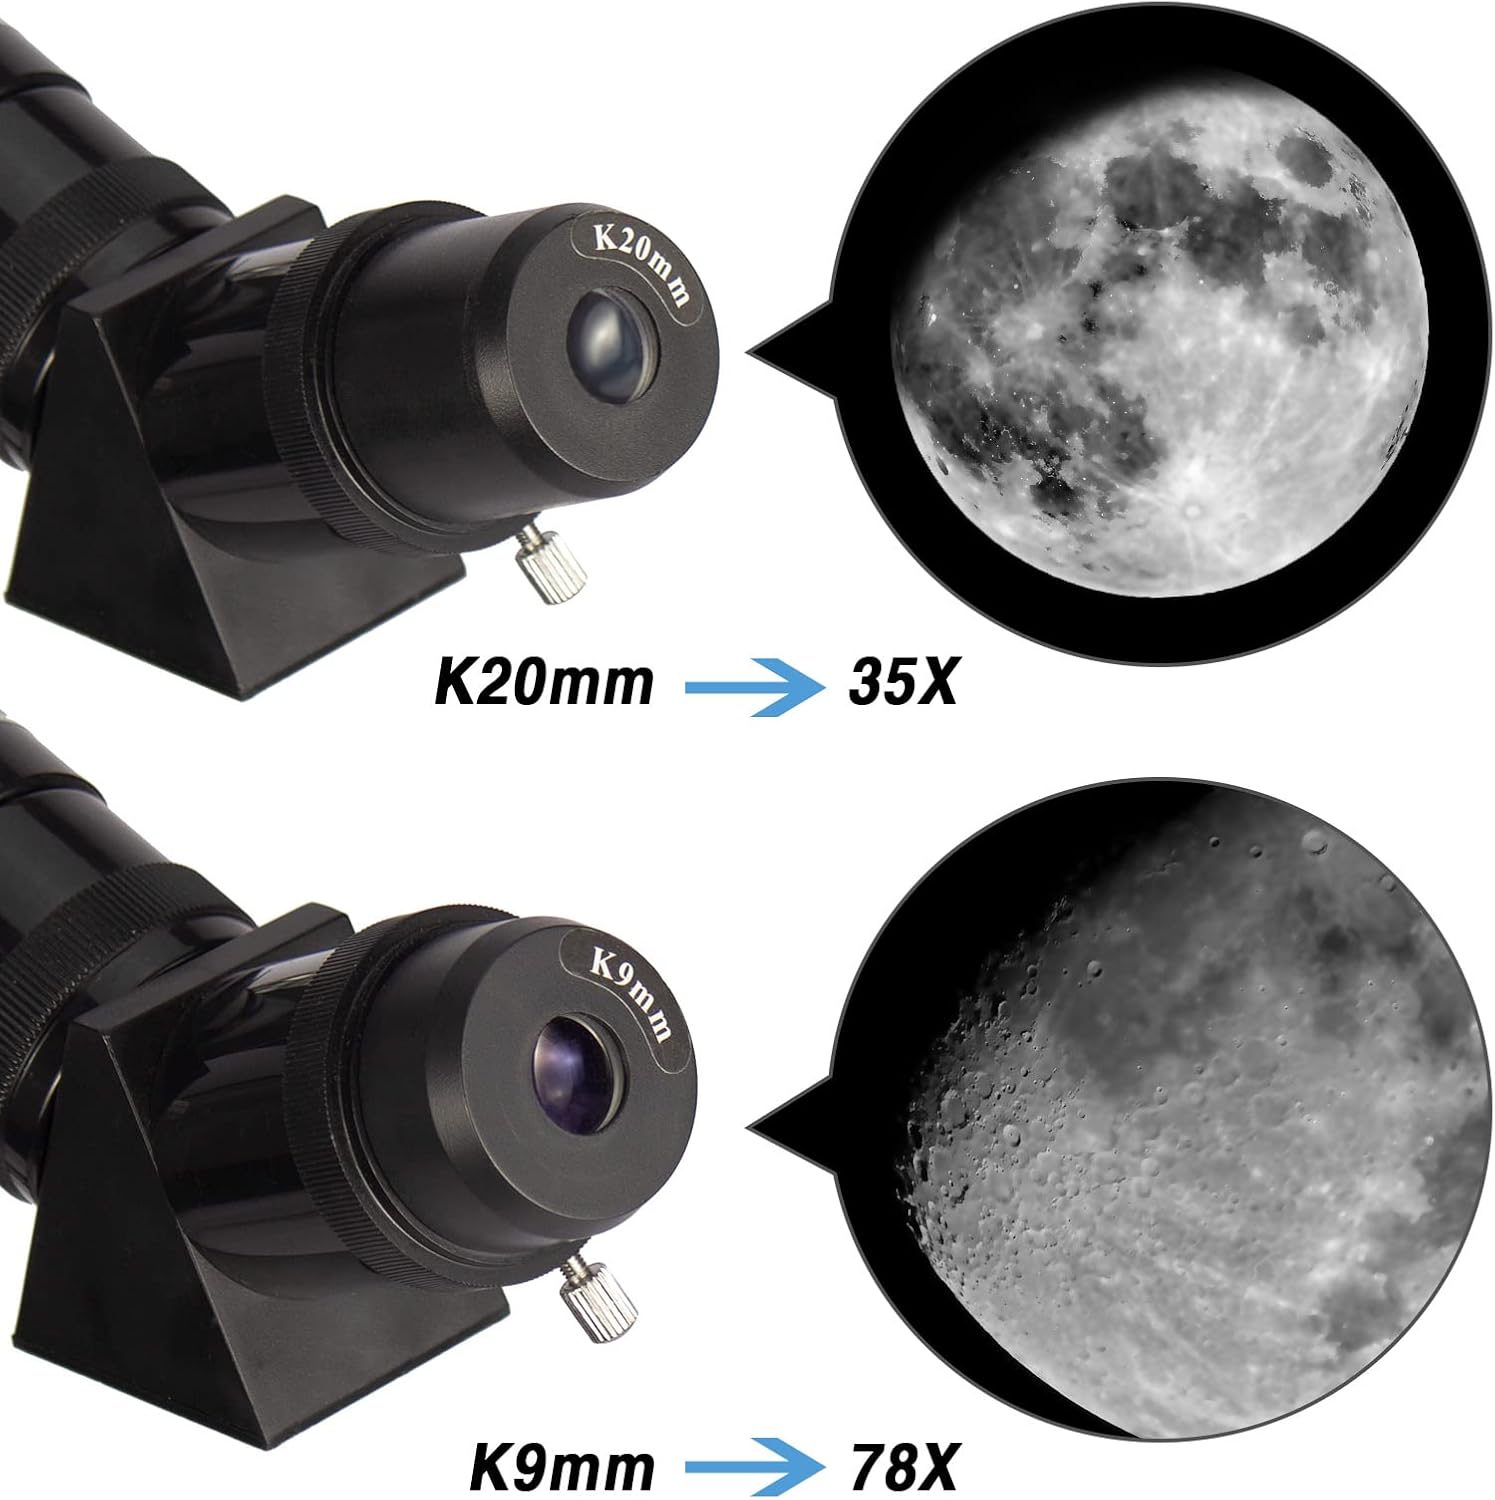
Image 3.3: Eyepiece options and their respective magnifications.

Image 3.4: The 3X Barlow lens for enhanced magnification.
Attach the Smartphone Adapter: If using, attach the smartphone eyepiece adapter to an eyepiece. Secure your smartphone to the adapter to capture images or videos.

Image 3.5: Smartphone adapter for photography and video recording.
4. Operating Instructions
Aligning the Finderscope: Before observing, align the finderscope with the main telescope. Point the main telescope at a distant, stationary object (e.g., a distant tree or building). Look through the finderscope and adjust its alignment screws until the object is centered in its crosshairs. Then, check the main telescope to ensure the object is also centered in the eyepiece view.
Locating Objects: Use the finderscope to locate the desired object. Once the object is centered in the finderscope, it should be visible in the main telescope's eyepiece.
Focusing: Turn the focuser knob slowly until the image appears sharp and clear. Different eyepieces and objects may require refocusing.
Changing Magnification: Start with the lowest magnification eyepiece (K20mm) for a wider field of view. Once centered, you can switch to a higher magnification eyepiece (K9mm) or add the 3X Barlow lens for more detailed views.
Tracking Objects: The altazimuth mount allows for movement along horizontal (azimuth) and vertical (altitude) axes. Use the slow-motion control rod for fine adjustments to track moving celestial objects.

Image 4.1: Slow-motion control rod for precise object tracking.
Terrestrial Observation: The telescope can be used for viewing distant land objects. Ensure the object is far enough away for the telescope to focus properly.

Image 4.2: Example of terrestrial observation, focusing on a bird.
5. Maintenance
Cleaning Lenses: Use a soft, lint-free cloth specifically designed for optical lenses. Gently wipe the objective lens and eyepieces. Avoid touching the optical surfaces with your fingers. For stubborn smudges, use a specialized optical cleaning solution sparingly.
Storage: When not in use, store the telescope in a dry, dust-free environment. Keep all caps on the optical tube and eyepieces to prevent dust accumulation. Store the telescope in its original packaging or a protective case.
Handling: Always handle the telescope with care. Avoid sudden impacts or dropping the instrument, as this can affect its optical alignment and mechanical components.
Environmental Protection: Do not expose the telescope to extreme temperatures or humidity. Avoid leaving it in direct sunlight for extended periods, especially without lens caps, as this can damage internal components.
6. Troubleshooting
Image is blurry:
- Adjust the focuser knob slowly until the image is sharp.
- Ensure the eyepiece is fully inserted and secured.
- Check for condensation on the lenses; allow the telescope to acclimate to the ambient temperature.
Cannot find objects:
- Verify that the finderscope is properly aligned with the main telescope.
- Start with the lowest magnification eyepiece (K20mm) for a wider field of view.
- Ensure the object is above the horizon and not obstructed by buildings or trees.
Image is dim or dark:
- Ensure all lens caps are removed from both the objective lens and the eyepiece.
- Observe from a location with minimal light pollution for astronomical viewing.
- Higher magnification eyepieces naturally result in dimmer images; try a lower magnification.
Telescope is unstable:
- Ensure all tripod leg clamps are tightened.
- Verify that the altazimuth mount is securely attached to the tripod.
- Place the telescope on a firm, level surface.
7. Specifications
| Feature | Specification |
|---|---|
| Model Number | 60AZ |
| Optical Design | Refractor |
| Aperture | 60mm |
| Focal Length | 700mm |
| Focal Ratio | f/11.6 |
| Eyepieces Included | K20mm, K9mm |
| Barlow Lens | 3X |
| Finderscope | Reflex |
| Mount Type | Altazimuth Mount with Slow Motion Control |
| Tripod | Adjustable Aluminum Alloy (26 to 43 inches) |
| Optical Coating | Multi-Layer Green Film |
| Product Dimensions | 28.8 x 10.6 x 6.7 inches |
| Item Weight | 12 pounds |
| Compatible Devices | Smartphone (with adapter) |

Image 7.1: The 60mm objective lens, responsible for light gathering.
8. Warranty and Support
For warranty information or technical support, please refer to the contact details provided with your purchase documentation or visit the official SOLOMARK website. Keep your purchase receipt as proof of purchase.
For additional resources and product information, you may visit the SOLOMARK Store.