Introduction
This manual provides essential instructions for the safe installation, operation, and maintenance of your Aexit 20W COB LED Recessed Downlight. Please read this document thoroughly before attempting any installation or use to ensure proper function and safety.
Safety Information
Always adhere to the following safety precautions to prevent injury or damage to the product:
- Disconnect Power: Always ensure the main power supply is turned off at the circuit breaker before attempting any installation, maintenance, or cleaning.
- Professional Installation: If you are not familiar with electrical wiring, it is highly recommended to have the downlight installed by a qualified electrician.
- Voltage Compatibility: Verify that your electrical supply voltage (AC 85V-265V) matches the requirements of this downlight.
- Do Not Disassemble: Do not attempt to open or modify the downlight or its driver. There are no user-serviceable parts inside.
- Avoid Direct Eye Exposure: Do not stare directly into the light source when it is illuminated, as it can cause eye strain.
- Proper Ventilation: Ensure adequate air circulation around the downlight to prevent overheating.
Package Contents
The package should contain the following item:
- 1 x Aexit 20W COB LED Recessed Downlight with integrated LED driver
Specifications
| Product Name | LED Downlight |
| Input Voltage | AC 85V-265V 50-60Hz |
| Output Voltage | 40-85V |
| Current | 280mA |
| Power | 20W |
| Color Temperature | Pure White (6000-6500K) |
| LED Type | COB |
| Beam Angle | 120 Degrees |
| Lumens | 1550lm +/-5% |
| Material | Aluminum, Plastic |
| Shell Color | White |
| Driver | Constant current driver |
| Dimension | 190mm x 50mm |
| Cut-out Size | 170mm |
| Weight | 481g |
| Lifespan | 50,000 Hours |
Setup and Installation
Follow these steps carefully for safe and proper installation:
- Step 1: Preparation
Before starting, ensure the power supply to the installation area is completely disconnected at the main circuit breaker. Identify the desired location for the downlight, ensuring there is sufficient clearance above the ceiling for the fixture and its driver.
- Step 2: Cut Hole
Using a suitable hole saw, cut a circular opening in the ceiling. The recommended cut-out diameter is 170mm. Ensure the hole is clean and free of debris.
- Step 3: Wiring
Connect the AC input wires from your electrical supply to the LED driver's input terminals (typically marked 'L' for Live and 'N' for Neutral). Ensure all connections are secure and insulated. The driver's output wires are pre-connected to the downlight fixture.
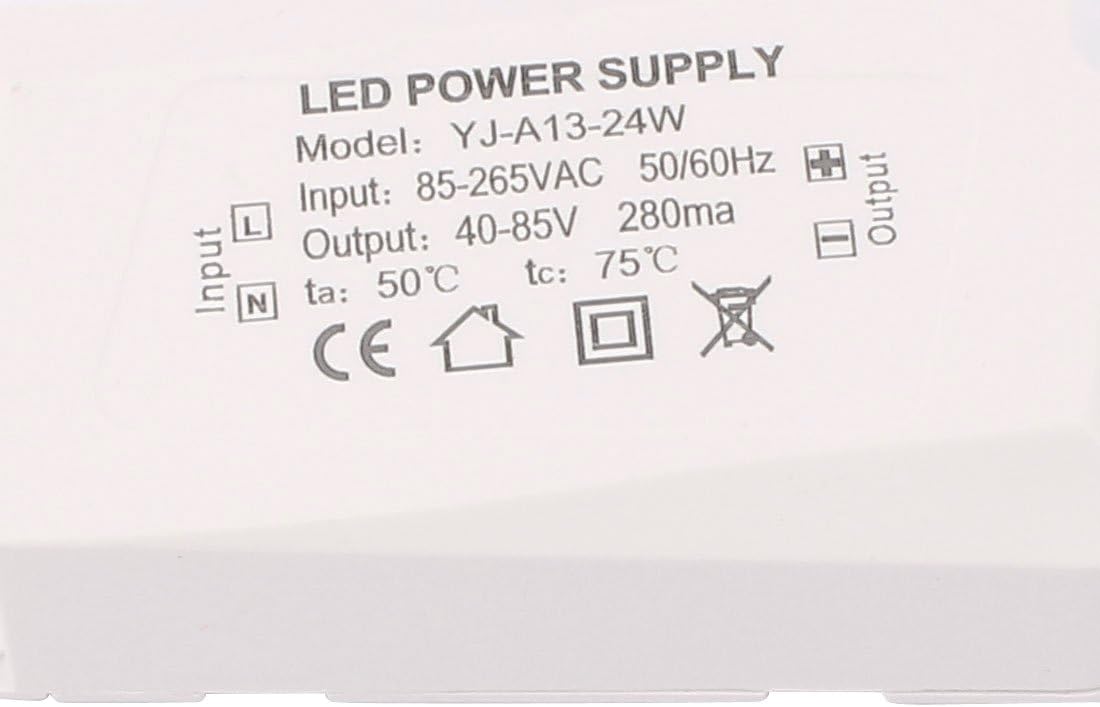
Image: Close-up view of the LED power supply driver, showing input (85-265VAC) and output (40-85V) specifications, along with 'L' and 'N' input terminals. This illustrates where the main power supply connects.
- Step 4: Mount Downlight
Carefully push the spring clips on the sides of the downlight upwards and insert the fixture into the cut-out hole. The clips will spring back down, securing the downlight firmly against the ceiling. Ensure the LED driver is placed safely above the ceiling, away from any heat sources.

Image: Rear view of the Aexit 20W COB LED Recessed Downlight, highlighting the black finned heat sink for thermal management and the spring-loaded clips used for securing the light into the ceiling opening. The attached LED driver is also visible.
- Step 5: Test
Once the downlight is securely installed and all wiring connections are verified, restore power at the circuit breaker and test the light's functionality using the wall switch.
Operating Instructions
The Aexit 20W COB LED Recessed Downlight operates simply via a standard wall switch connected to its power supply. Once installed and powered, use the wall switch to turn the light on or off.
Maintenance
To ensure the longevity and optimal performance of your downlight, follow these maintenance guidelines:
- Cleaning: Always disconnect power before cleaning. Use a soft, dry, or slightly damp cloth to wipe the surface of the downlight. Do not use abrasive cleaners, solvents, or harsh chemicals, as these can damage the finish or electrical components.
- No User-Serviceable Parts: The LED downlight contains no user-serviceable parts. Do not attempt to open or repair the unit yourself.
- Regular Inspection: Periodically check for any visible damage or loose connections. If any issues are found, disconnect power immediately and consult a qualified electrician.
Troubleshooting
If you encounter issues with your downlight, refer to the following common problems and solutions:
- Light Does Not Turn On:
- Check if the main power supply is connected and turned on.
- Ensure the wall switch is in the 'ON' position.
- Verify all wiring connections to the LED driver are secure.
- Check the circuit breaker for any tripped circuits.
- Light is Flickering:
- Ensure all electrical connections are tight and secure.
- Verify that the input voltage is stable and within the specified range (AC 85V-265V).
- If connected to a dimmer switch, ensure it is compatible with LED lighting. This downlight is not explicitly stated as dimmable.
- Light is Dim or Not Bright Enough:
- Confirm the input voltage is correct.
- Ensure there are no obstructions blocking the light output.
- The light output is 1550 lumens; if it appears significantly lower, there might be an issue with the power supply or the LED driver.
If these steps do not resolve the issue, please contact customer support or a qualified electrician.
Warranty and Support
For information regarding warranty coverage, technical support, or replacement parts, please contact your original retailer or the manufacturer directly. Keep your purchase receipt as proof of purchase.