1. Introduction
The Graigar ZBL-C310A Rebar Corrosion Detector is a specialized apparatus designed for examining the corrosion potential and locating active corrosion in rebar within concrete structures. It utilizes electrochemical testing methods, specifically the natural potential method, to assess rebar corrosion levels. This device is crucial for non-destructive evaluation in construction and infrastructure maintenance, helping to foresee and prevent structural issues caused by rebar corrosion.
The C310A tests the potential of concrete surfaces using a Cu/CuSO4 reference electrode. It supports both natural potential and potential gradient methods to detect the corrosion range and distribution of rebar. The system includes automatic data storage, USB data transfer, and user-friendly software for generating rebar corrosion potential contour graphs and final analysis reports, compatible with Windows-based computers.
2. Product Components Overview
The ZBL-C310A Rebar Corrosion Detector kit comes with several essential components for comprehensive rebar corrosion assessment. Familiarize yourself with each part before operation.

Figure 2.1: Complete ZBL-C310A kit in its protective carrying case, showing the main unit, probes, cables, and accessories neatly organized.

Figure 2.2: The ZBL-C310A main unit and the dual-probe handle, illustrating their primary forms for connection and use.
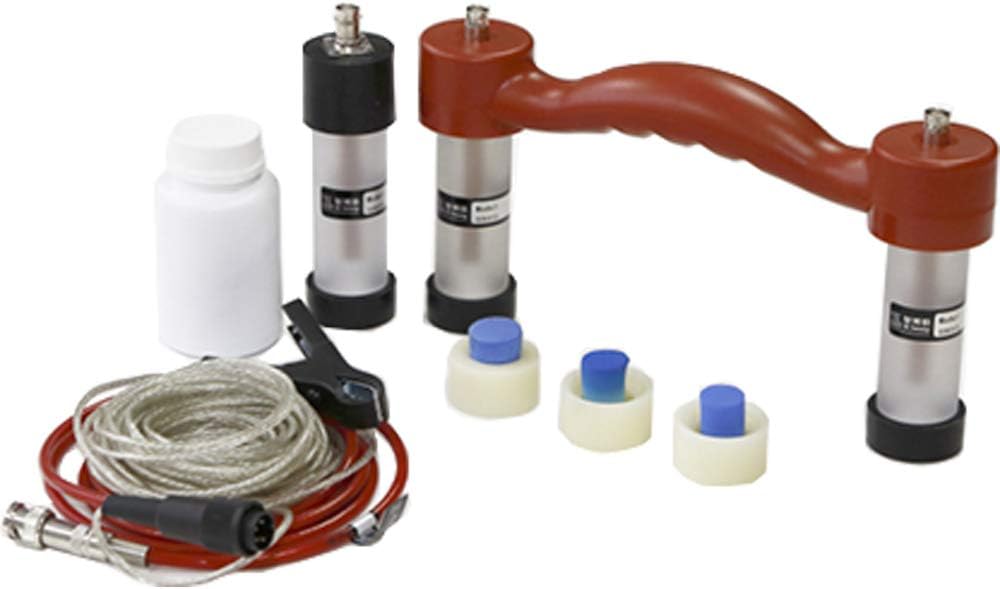
Figure 2.3: All components of the ZBL-C310A kit laid out, showing the main unit, various probes, connection cables, power adapter, and solution bottle, providing a full view of the included items.
Key Components:
- Main Unit (ZBL-C310A): The central processing and display unit for measurements.
- Dual-Probe Handle: Ergonomically designed handle with two probe connections for efficient scanning.
- Single Probes: Individual probes for specific measurement requirements.
- Connection Cables: Cables to connect probes to the main unit.
- Power Adapter: For charging the internal battery.
- Solution Bottle: Contains the necessary solution for the Cu/CuSO4 reference electrodes.
- Warranty Card & Documentation: Important information regarding product warranty and usage.
3. Setup and Initial Operation
Follow these steps to set up your ZBL-C310A Rebar Corrosion Detector for first use.
Video 3.1: This video demonstrates the unboxing process and provides an overview of the components included with the ZBL-C310A Rebar Corrosion Detector, showing how to access and identify each part.
- Unpack the Kit: Carefully open the protective carrying case and remove all components. Ensure all items listed in the packing list are present.
- Charge the Main Unit: Connect the provided power adapter to the main unit and a power outlet. Allow the unit to fully charge before initial use. The battery indicator on the screen will show charging status.
- Prepare the Probes: The Cu/CuSO4 reference electrodes require a specific solution. Fill the solution bottle with the appropriate liquid as per the detailed instructions in the full manual. Ensure the probes are properly saturated.
- Connect Probes: Attach the desired probes (single or dual-probe handle) to the main unit using the provided connection cables. Ensure connections are secure to prevent signal loss.
- Power On: Press and hold the power button on the main unit until the screen illuminates. The device will display a startup screen with version information and then the main menu.
- Initial Settings: Navigate through the 'Sys Setup' menu to configure language, date, time, and other relevant parameters as needed for your testing environment.
4. Operating Instructions
The ZBL-C310A offers intuitive operation for rebar corrosion detection. Below are the general steps for conducting a test.

Figure 4.1: A close-up view of the ZBL-C310A main unit's display and control panel, showing the menu options and button layout for operation.
- Select Test Mode: From the main menu, select 'Rusty Test' to begin a corrosion potential measurement.
- Prepare Test Area: Ensure the concrete surface is clean and free from debris. For optimal contact, a thin layer of conductive gel or water may be applied to the probe tips or the concrete surface.
- Perform Measurement: Place the probes firmly on the concrete surface at the desired measurement points. The device will automatically record the potential readings. For grid-based measurements, follow a predefined grid pattern to cover the entire area of interest.
- Data Storage: The instrument features automatic storage. Measurements are saved internally.
- Data Output: To transfer data, select 'Data Output' from the main menu. Connect the device to a computer via USB. The stored data can then be transferred to a USB-thumb drive or directly to the computer.
- Data Analysis: Utilize the provided user-friendly software on a Windows-based computer to process the collected data. The software can generate rebar corrosion potential contour graphs and comprehensive analysis reports, aiding in the interpretation of corrosion levels and distribution.
5. Maintenance
Proper maintenance ensures the longevity and accuracy of your ZBL-C310A detector.
- Cleaning: After each use, wipe the main unit and probes with a soft, dry cloth. If necessary, use a slightly damp cloth with mild soap, then dry thoroughly. Do not use abrasive cleaners or solvents.
- Probe Care: Regularly inspect the probe tips for wear or damage. Ensure the Cu/CuSO4 solution in the electrodes is maintained at the correct level and replaced as per the manufacturer's recommendations to ensure accurate readings.
- Battery Care: Recharge the battery regularly, even if the device is not in frequent use, to maintain battery health. Avoid fully discharging the battery for extended periods.
- Storage: Store the device and all accessories in its original protective case in a cool, dry place, away from direct sunlight and extreme temperatures.
- Calibration: Periodically check the calibration of the device as per the instructions in the detailed user manual. If significant deviations are observed, contact customer support for recalibration services.
6. Troubleshooting
This section addresses common issues you might encounter with the ZBL-C310A.
| Problem | Possible Cause | Solution |
|---|---|---|
| Device does not power on. | Low or depleted battery. | Connect the power adapter and charge the unit. Ensure the adapter is properly connected to a working power outlet. |
| Inaccurate or inconsistent readings. | Probes not properly prepared (e.g., insufficient solution), poor contact with concrete, or damaged probes. | Ensure probes are adequately saturated with solution. Apply conductive gel/water to the surface. Check probe tips for damage and replace if necessary. Consider recalibration. |
| Data transfer issues. | Incorrect USB connection, driver issues, or software not recognizing the device. | Verify USB cable connection. Restart the device and computer. Reinstall the data processing software and any necessary drivers. |
| Screen is unresponsive or frozen. | Software glitch or temporary system error. | Perform a soft reset by pressing and holding the power button until the device shuts down, then restart. If the issue persists, contact technical support. |
7. Specifications
Key technical specifications for the ZBL-C310A Rebar Corrosion Detector:
- Model: ZBL-C310A
- Manufacturer: Graigar
- Part Number: ZBL-C310A
- Color: Red & Black
- Material: Plastic
- Batteries: 1 Lithium Ion battery (included)
- Batteries Included?: Yes
- Batteries Required?: Yes
- Battery Cell Type: Lithium Ion
- Item Package Quantity: 1
- First Available Date: December 15, 2018
8. Warranty and Support
The ZBL-C310A Rebar Corrosion Detector comes with a manufacturer's warranty. Please refer to the included Warranty Card for specific terms, conditions, and duration of coverage.
For technical assistance, troubleshooting beyond this manual, or warranty claims, please contact Graigar customer support. Keep your purchase receipt and product serial number readily available when contacting support.
Contact Information: Refer to the official Graigar website or the product packaging for the most up-to-date contact details for support and service.