1. Introduction
The nJoy Aten Pro 1000VA is an advanced Uninterruptible Power Supply (UPS) designed to provide reliable power protection for sensitive electronic equipment. This online double-conversion UPS ensures a continuous, clean power supply, safeguarding your devices against power outages, voltage fluctuations, and surges. It features a pure sine wave output, an LCD display for real-time status, and communication ports for comprehensive management.
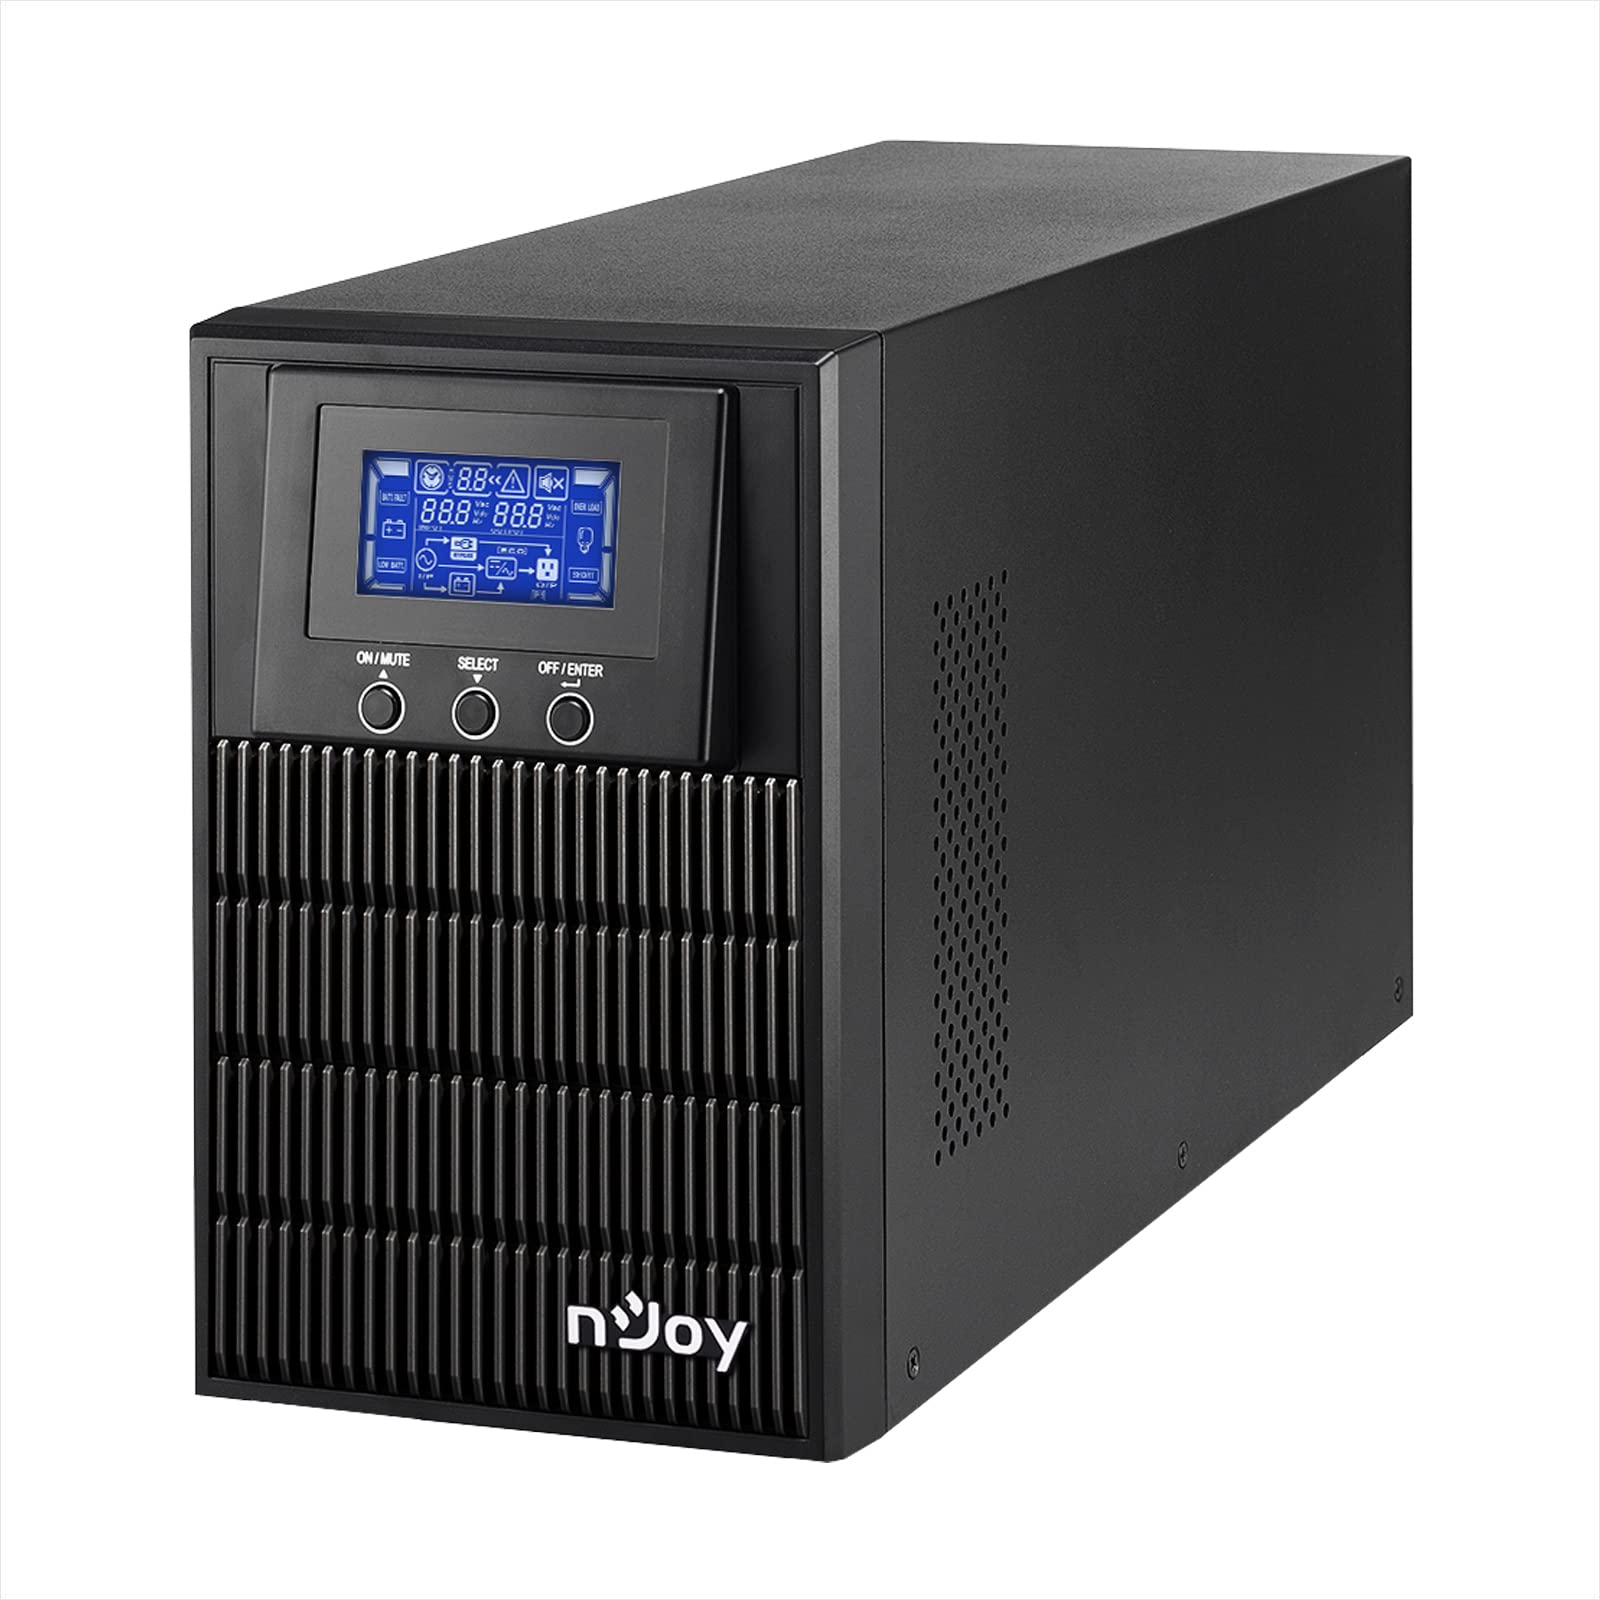
Figure 1: nJoy Aten Pro 1000VA UPS Front View
This image shows the front of the nJoy Aten Pro 1000VA UPS, highlighting its compact tower design and the integrated LCD display panel with control buttons.

Figure 2: Key Features Overview
This image visually summarizes the main features of the nJoy Aten Pro 1000VA UPS, including its online double-conversion technology, 1000VA/900W capacity, dual 12V@9.0Ah batteries, USB interface, LCD display, pure sine wave output, and SNMP capability.
2. Safety Information
Please read and follow all safety instructions carefully before installing, operating, or maintaining the UPS.
- This UPS is designed for indoor use only.
- Do not open the UPS casing. There are no user-serviceable parts inside. Refer all servicing to qualified service personnel.
- Ensure the UPS is connected to a properly grounded AC power outlet.
- Do not block ventilation openings. Maintain adequate airflow around the UPS.
- Avoid placing the UPS in direct sunlight, near heat sources, or in environments with excessive dust, humidity, or corrosive substances.
- Disconnect the UPS from the AC power source before performing any maintenance or cleaning.
- Batteries can present a risk of electrical shock and high short-circuit current. Observe the following precautions:
- Remove watches, rings, or other metal objects.
- Use tools with insulated handles.
- Wear rubber gloves and boots.
3. Product Features and Components
The nJoy Aten Pro 1000VA UPS is equipped with several features and ports for optimal performance and connectivity.
3.1 Front Panel

Figure 3: Front Panel Overview
This image displays the front panel of the UPS, showing the LCD screen that provides real-time status updates and the three control buttons: ON/MUTE, SELECT, and OFF/ENTER.
- LCD Display: Shows real-time status information such as AC mode, battery mode, charge level, battery level, input voltage, output voltage, overload, fault, and low battery.
- ON/MUTE Button: Powers on the UPS or mutes the alarm.
- SELECT Button: Navigates through LCD display menus.
- OFF/ENTER Button: Powers off the UPS or confirms selections.
3.2 Rear Panel

Figure 4: Rear Panel Connections
This image illustrates the rear panel of the UPS, detailing the various connection ports and components, including RS232, Schuko outputs, circuit breaker, intelligent slot, USB, and AC input.
- RS232 Interface: For serial communication with a computer.
- Schuko Outputs (3): Connect your critical devices here for battery backup and surge protection.
- Circuit Breaker: Provides overload protection.
- Intelligent Slot (SNMP): For optional SNMP card for network management.
- USB Interface: For USB communication with a computer.
- AC Input: Connect the UPS to the main AC power supply.
4. Setup Instructions
4.1 Unpacking and Inspection
- Carefully unpack the UPS and inspect it for any shipping damage. If any damage is found, do not install the unit and contact your dealer.
- Verify that all accessories are included: UPS unit, USB cable, RS232 cable, and user manual.
4.2 Placement
- Place the UPS in a clean, dry, and temperature-controlled environment.
- Ensure adequate clearance (at least 20 cm) around the UPS for proper ventilation.
- Avoid placing the UPS near water or excessive humidity.
4.3 Initial Charging
- Before initial use, connect the UPS to a standard AC power outlet for at least 4 hours to ensure the batteries are fully charged. This will maximize battery runtime.
4.4 Connecting Equipment
- Connect your computer, monitor, and other critical devices to the Schuko output receptacles on the rear panel of the UPS.
- Do not connect laser printers or strip heaters to the UPS outputs, as these devices can draw significant power and overload the UPS.
- Connect the UPS to a wall outlet using the provided power cord.
4.5 Software Installation (Optional)
For advanced monitoring and management, install the UPS management software on your computer.

Figure 5: UPS Management Software
This image shows a graphical representation of the UPS management software interface, illustrating its capabilities for monitoring UPS status, scheduling operations, and configuring settings across various operating systems like Mac OS, Linux, and Windows.
- Connect the UPS to your computer using either the USB or RS232 cable.
- Install the provided management software (compatible with Mac OS, Linux, Windows).
- The software allows for:
- Real-time status visualization.
- Scheduling of power on/off and battery tests.
- Comprehensive UPS configuration.
5. Operating Instructions
5.1 Turning the UPS On/Off
- To Turn On: Press and hold the ON/MUTE button until you hear a beep. The UPS will perform a self-test and then enter AC mode.
- To Turn Off: Press and hold the OFF/ENTER button until the UPS powers down.
5.2 LCD Display Information
The LCD display provides critical information about the UPS status. Use the SELECT button to cycle through different display modes.
- AC Mode: Indicates the UPS is operating on utility power.
- Battery Mode: Indicates the UPS is operating on battery power (during an outage).
- Charge Level: Shows the current load percentage.
- Battery Level: Displays the remaining battery capacity.
- Input Voltage: Current incoming AC voltage.
- Output Voltage: Current outgoing AC voltage.
- Overload: Indicates connected equipment exceeds UPS capacity.
- Fault: Indicates a system error.
- Low Battery: Warning that battery power is critically low.
5.3 Eco Mode
The Eco Mode feature helps reduce energy consumption. When the input voltage is within the acceptable range, the UPS will bypass the inverter and directly supply power from the utility, increasing energy efficiency. This mode can be configured via the management software.

Figure 6: Key Operational Features
This image highlights three core operational features of the UPS: Pure Sine Wave output for clean power, Zero Transfer Time for seamless power transition, and Eco Mode for energy efficiency.
6. Maintenance
6.1 Battery Care and Replacement
- The UPS uses sealed lead-acid batteries (2 x 12V/9Ah). These batteries are designed for a specific lifespan.
- To maximize battery life, ensure the UPS is always connected to AC power to keep the batteries charged.
- Batteries are user-replaceable by qualified personnel only. Contact NJOY support or a certified technician for battery replacement.
- Dispose of old batteries properly according to local regulations.
6.2 Cleaning
- Ensure the UPS is turned off and disconnected from AC power before cleaning.
- Use a soft, dry cloth to wipe the exterior of the UPS.
- Do not use liquid or aerosol cleaners.
- Periodically clean the ventilation openings to prevent dust buildup.
7. Troubleshooting
If the UPS is not operating correctly, refer to the following table for common issues and solutions.
| Problem | Possible Cause | Solution |
|---|---|---|
| UPS does not turn on. | No AC input power; Low battery. | Ensure the power cord is securely connected. Allow the UPS to charge for at least 4 hours. |
| UPS is in battery mode frequently. | Unstable AC input power; High sensitivity setting. | Check the utility power quality. Adjust the UPS input voltage sensitivity via software if necessary. |
| Overload warning on LCD. | Too many devices connected; Connected devices draw too much power. | Disconnect non-essential equipment. Ensure total load does not exceed 900W. |
| Short battery runtime. | Batteries not fully charged; Batteries reaching end of life. | Allow the UPS to charge for 24 hours. Consider battery replacement if batteries are old. |
| UPS emits continuous alarm. | Overload; Battery fault; System fault. | Check LCD for specific error codes. Reduce load. If alarm persists, contact support. |
For issues not listed here, or if problems persist, please contact NJOY customer support.
8. Specifications
Detailed technical specifications for the nJoy Aten Pro 1000VA UPS.
| Feature | Specification |
|---|---|
| Model Number | PWUP-OL100AP-AZ01B |
| Capacity | 1000 VA / 900 W |
| UPS Type | On-line Double Conversion |
| Nominal Input Voltage | 110 – 300 Vac |
| Nominal Output Voltage | 230 Vac (± 1% in battery mode) |
| Frequency Range | 40 Hz ~ 70 Hz |
| Output Sockets | 3 x Schuko |
| Transfer Time (AC to DC) | Zero |
| Transfer Time (Inverter to Bypass) | 4 ms |
| Communication Ports | USB, RS232 (Optional: Smart SNMP card) |
| Operating Temperature | 0 ~ 40 °C |
| Efficiency | Up to 90% |
| Battery Type | 2 x 12V/9Ah Sealed Lead-Acid |
| Dimensions (L x W x H) | 28.2 x 14.5 x 22 cm |
| Weight | 7 Kilograms |
8.1 Runtime Chart
The following chart illustrates the approximate battery runtime based on the connected load.
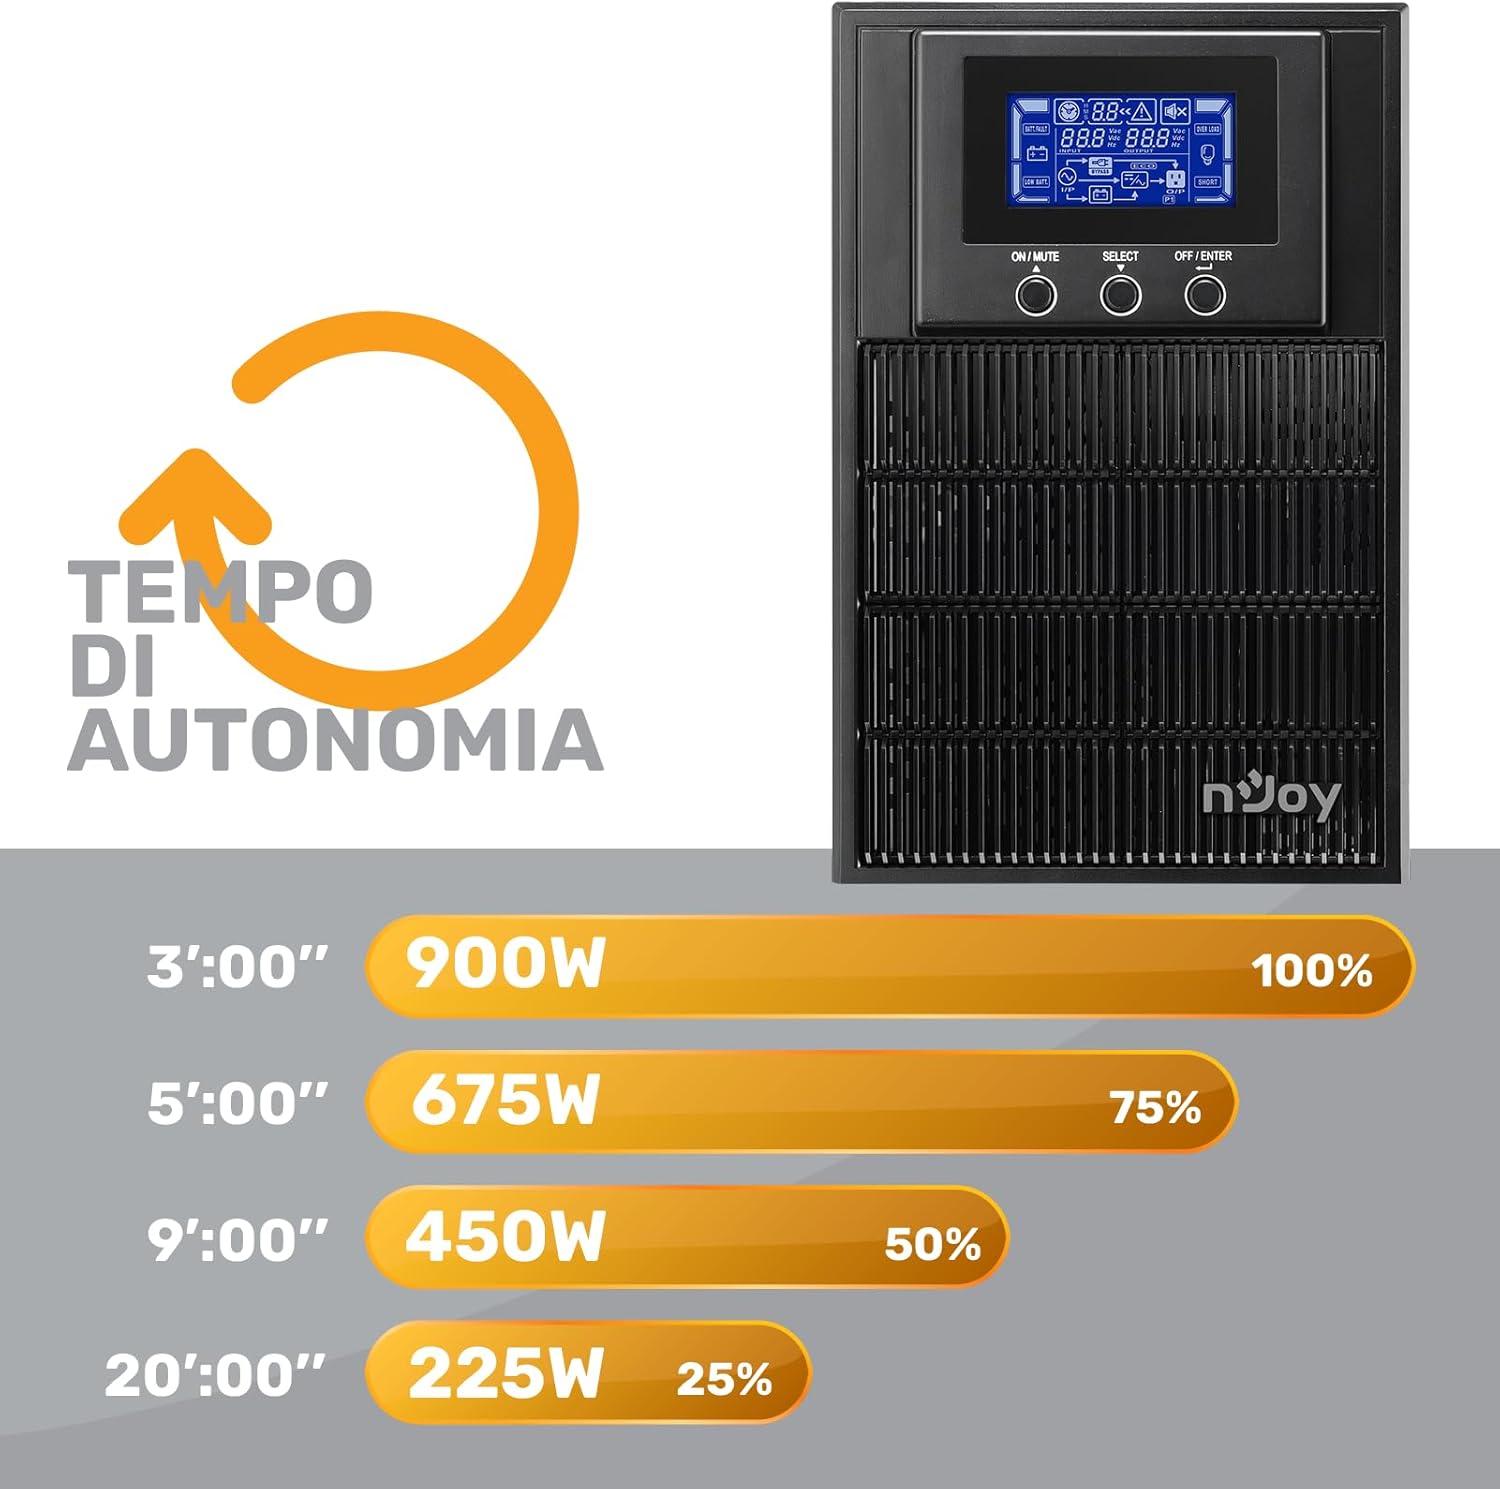
Figure 7: Battery Runtime vs. Load
This graph shows the estimated battery runtime in minutes for the nJoy Aten Pro 1000VA UPS at different load percentages. For example, at 100% load (900W), the runtime is approximately 3 minutes, while at 25% load (225W), it can last up to 20 minutes.
- 100% Load (900W): Approximately 3 minutes
- 75% Load (675W): Approximately 5 minutes
- 50% Load (450W): Approximately 9 minutes
- 25% Load (225W): Approximately 20 minutes
9. Warranty and Support
NJOY provides a comprehensive warranty and dedicated customer support for the Aten Pro series.
- Warranty Period: The nJoy Aten Pro UPS comes with a 3-year warranty. Batteries are covered by a 1-year warranty.
- Customer Support: Our professional customer service team is available to provide prompt and quality assistance. If you require help or support before, during, or after your purchase, please do not hesitate to contact NJOY customer service. Refer to your product packaging or the NJOY official website for specific contact details.