VIVOHOME VH322
VIVOHOME 4CFM Vacuum Pump and R134a AC Manifold Gauge Set User Manual
Model: VH322
Introduction
This user manual provides detailed instructions for the safe and efficient operation, maintenance, and troubleshooting of your VIVOHOME 110V 1/3 HP 4CFM Single Stage Rotary Vane Air Vacuum Pump and R134a AC Manifold Gauge Set Kit. This kit is designed for diagnosing and recharging AC systems, efficiently removing moisture from air conditioning systems, and other applications requiring a high vacuum pull.

Image: The complete VIVOHOME 4CFM Vacuum Pump and R134a AC Manifold Gauge Set Kit, including the vacuum pump, manifold gauges, hoses, leak detector, and oil bottle.
Safety Information
WARNING: Read and understand all safety warnings and instructions before operating this product. Failure to follow the warnings and instructions may result in electric shock, fire, and/or serious injury.
- Always wear appropriate personal protective equipment (PPE), including safety glasses and gloves, when handling refrigerants or operating the vacuum pump.
- Ensure the work area is well-ventilated. Refrigerants can displace oxygen and cause asphyxiation.
- Do not operate the vacuum pump in wet conditions or expose it to rain.
- Always disconnect power before performing any maintenance or service on the pump.
- Handle refrigerant cylinders with care. Do not expose them to excessive heat.
- Ensure all connections are secure before starting the vacuum pump or charging the system to prevent refrigerant leaks.
- Dispose of used vacuum pump oil and refrigerants according to local environmental regulations.
Package Contents
Verify that all items are present and undamaged upon unpacking:
- 1 x Single-Stage Vacuum Pump
- 1 x Bottle of Vacuum Oil (0.35 qt./330 ml)
- 1 x R134a AC Manifold Gauge Set
- 3 x Color-Coded Hoses (Red, Blue, Yellow)
- 1 x Refrigerant Leak Detector
- 2 x R410a Fitting Adapters (1/4" male to 5/16" female)
- 1 x Fitting Adapter (1/4" male to 1/2" female)
- 1 x R134a Self-sealing Can Tap
- 1 x R134a Puncture Can Tap
- 2 x R134a Quick Coupler Adapters
- 1 x Portable Carry Bag

Image: A visual representation of all accessories included in the VIVOHOME HVAC kit, such as the vacuum pump, manifold gauges, hoses, and various adapters.
Product Overview
Vacuum Pump Features
- Die-Cast Aluminum Housing: Lightweight and durable construction.
- 4 Pole Pure Copper Motor: Provides high torque and efficient operation.
- Built-in High-Volume Cooling Fan: Ensures efficient heat dissipation for extended use.
- Oil Sight Glass: Allows easy monitoring of oil levels and quality.
- Oil Drain Valve: Located at the bottom for quick and thorough emptying.
- Anti-backflow Design: Prevents oil from flowing back into the system during power outages.
- Exhaust Port with Built-in Cotton Filter: Reduces noise and eliminates oil mist.

Image: An internal view of the VIVOHOME vacuum pump highlighting its 4-pole pure copper motor for high torque and efficient performance.

Image: Diagram showing the efficient heat dissipation features of the vacuum pump, including the built-in high-volume cooling fan, T-shaped heat fins, and mesh vent.

Image: Close-up views of the vacuum pump's portable handle, one-piece van housing design, oil-filling port, and anti-slip bottom.

Image: Illustration of the transparent oil window for monitoring oil levels and the bottom oil drainage point on the vacuum pump.
Manifold Gauge Set Features
- Accurate Pressure Measurement: Designed for refrigeration systems with ±1.6% accuracy.
- Large Viewing Glass: Provides clear visibility of refrigerant flow.
- Color-Coded Pressure Gauges: Blue for low pressure, Red for high pressure.
- Color-Coded Hoses: Red (high-pressure), Blue (low-pressure), Yellow (filling hose).
- Durable Hoses: Made from flexible rubber with a leak-proof seal design, 800 Psi working pressure, 4000 Psi burst pressure.
- Wide Compatibility: Compatible with R134a, R12, R22, R502, and R410a systems.
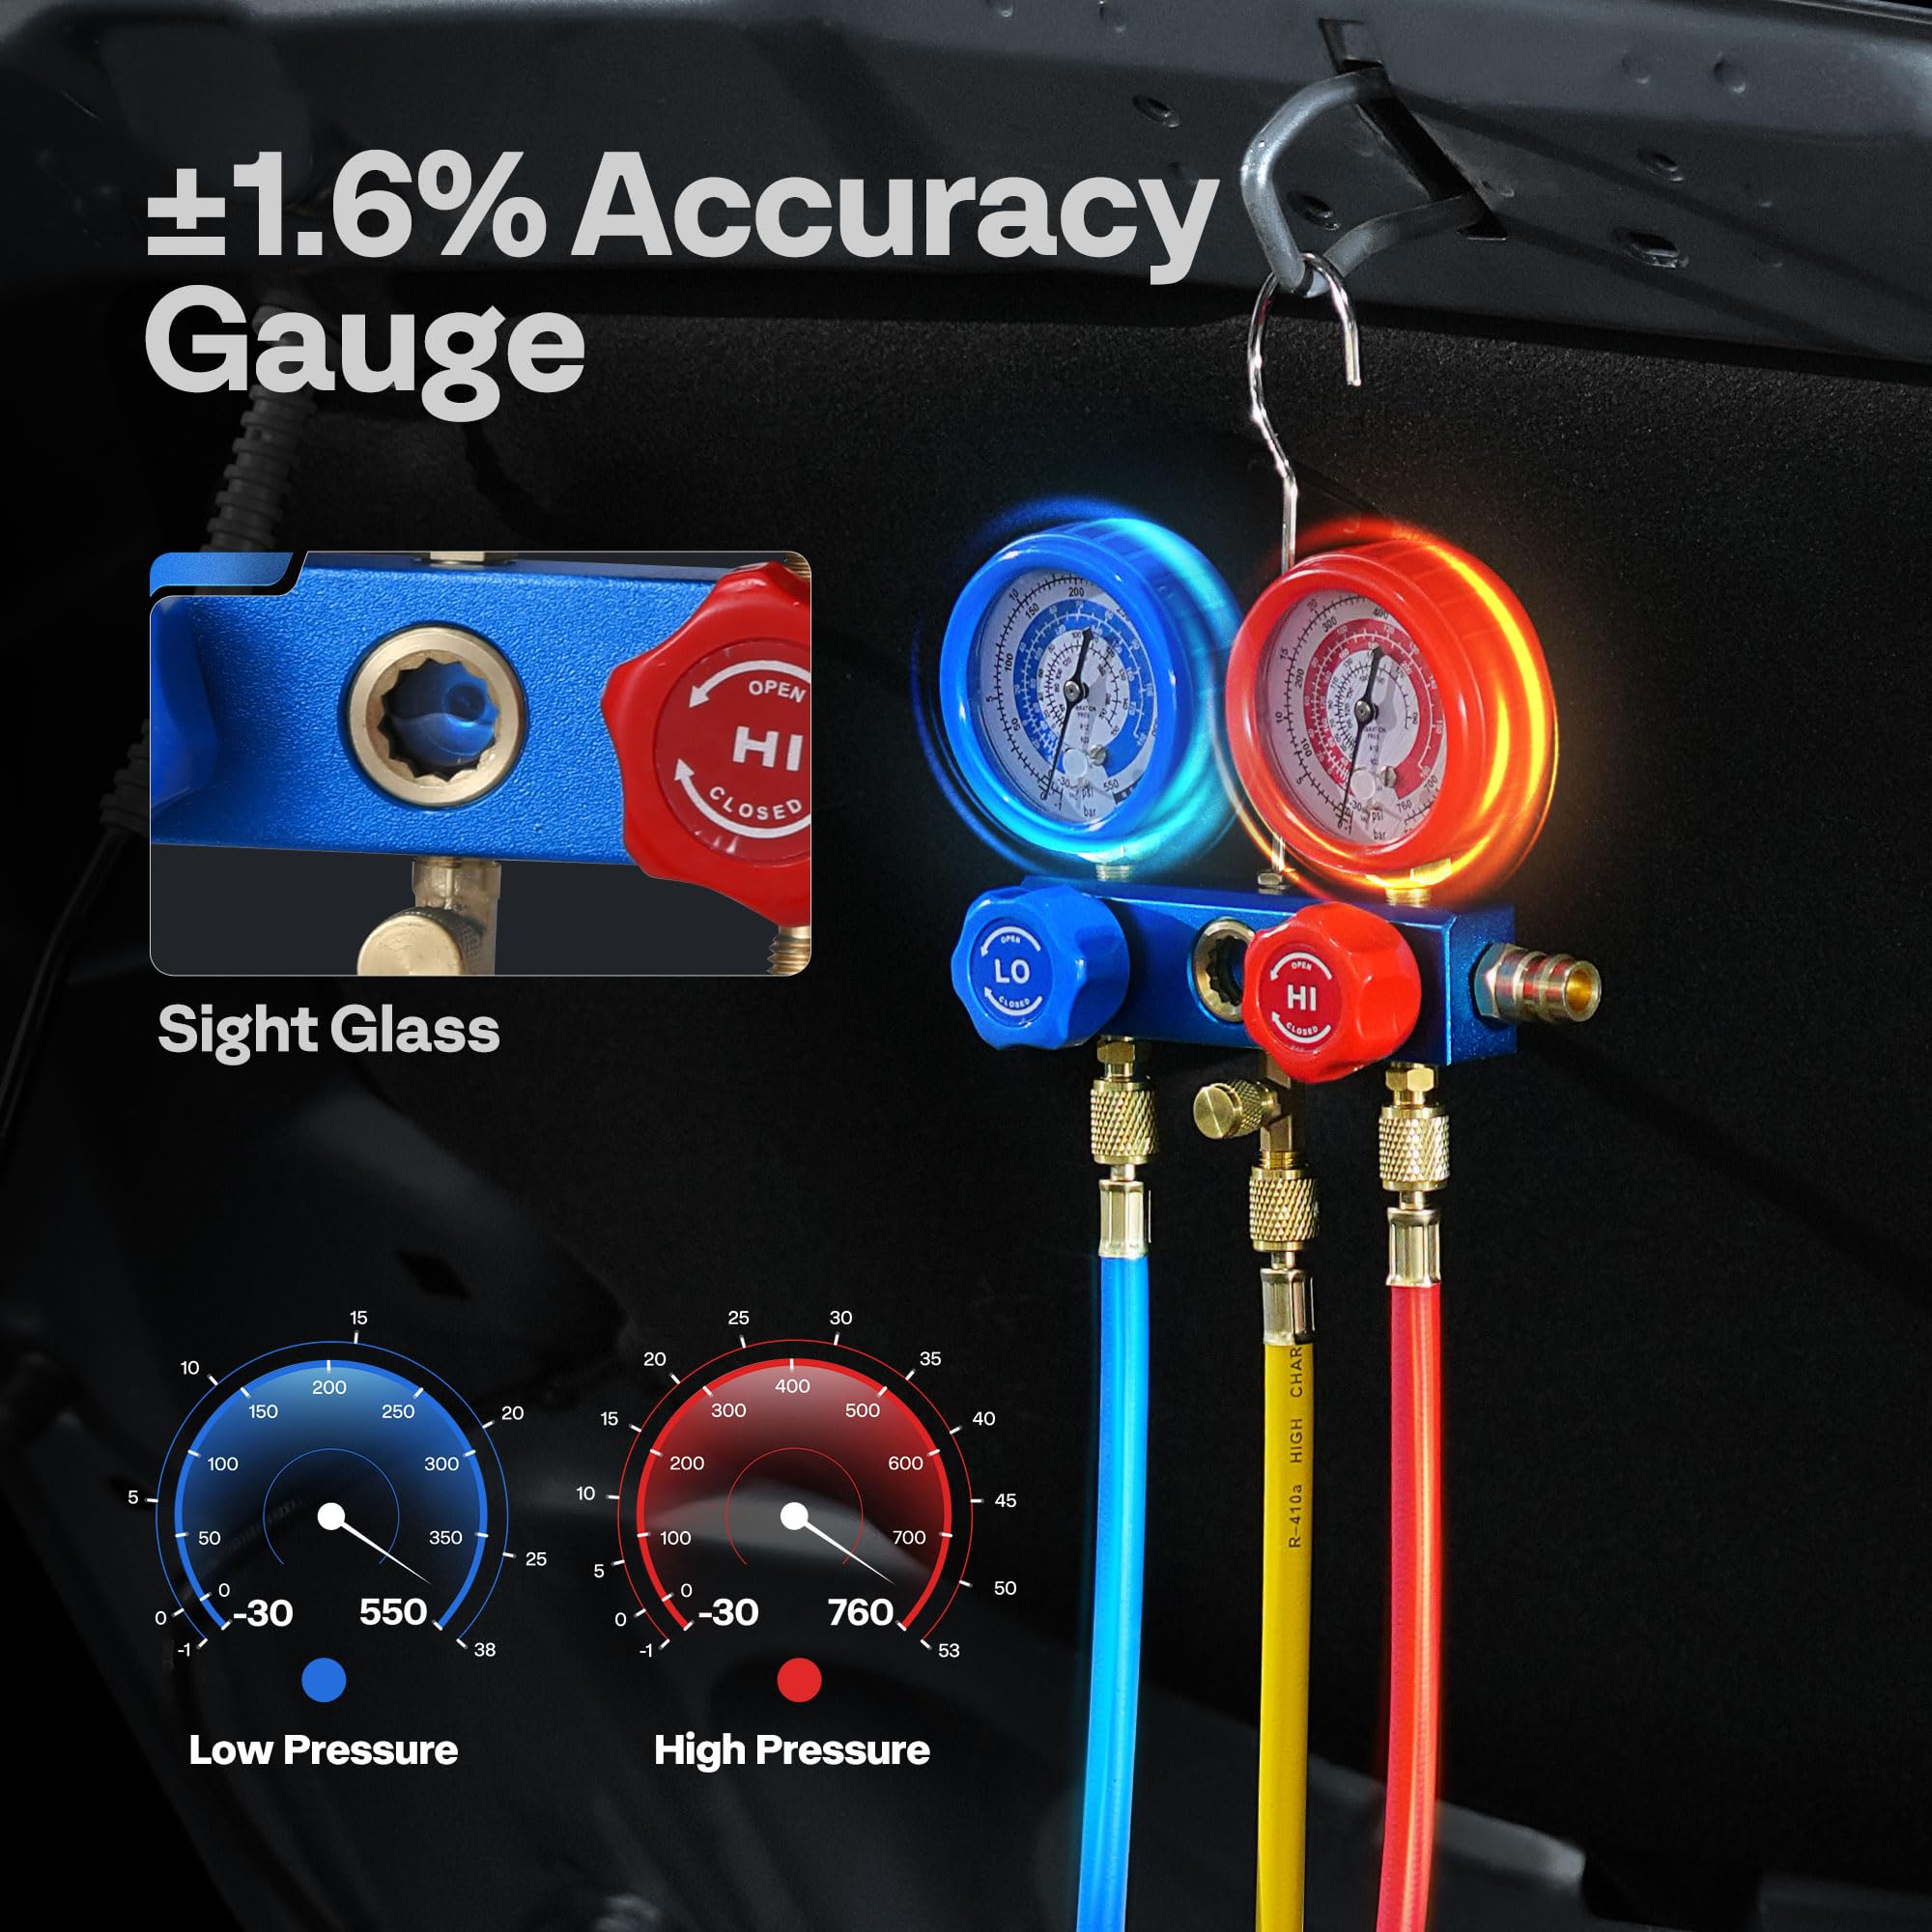
Image: Close-up of the VIVOHOME manifold gauge set, showing the high and low pressure gauges, sight glass, and control knobs.

Image: Cross-section diagram of the 5FT rubber hoses, detailing their construction with Nitrile Rubber, Polyester Woven Mesh, and 3 Reinforced Nylon Barriers for durability and high pressure ratings.
Refrigerant Leak Detector Features
- 7 Adjustable Sensitivity Levels: For precise leak detection.
- Maximum Sensitivity: 0.21 oz/yr.
- Detects various refrigerants: CFCs (R12, R11, R500, R503), HCFCs (R22, R123, R124, R502), HFCs (R134a, R404a, R125, R410a).

Image: The VIVOHOME refrigerant leak detector with its adjustable sensitivity dial and indicators for different refrigerant types it can detect.
Setup
1. Vacuum Pump Preparation
- Place the vacuum pump on a stable, level surface.
- Remove the oil fill cap and fill the pump with the provided vacuum oil. Use the oil sight glass to ensure the oil level is between the MIN and MAX marks. Do not overfill.
- Replace the oil fill cap securely.
- Connect the power cord to a grounded 110V AC outlet.
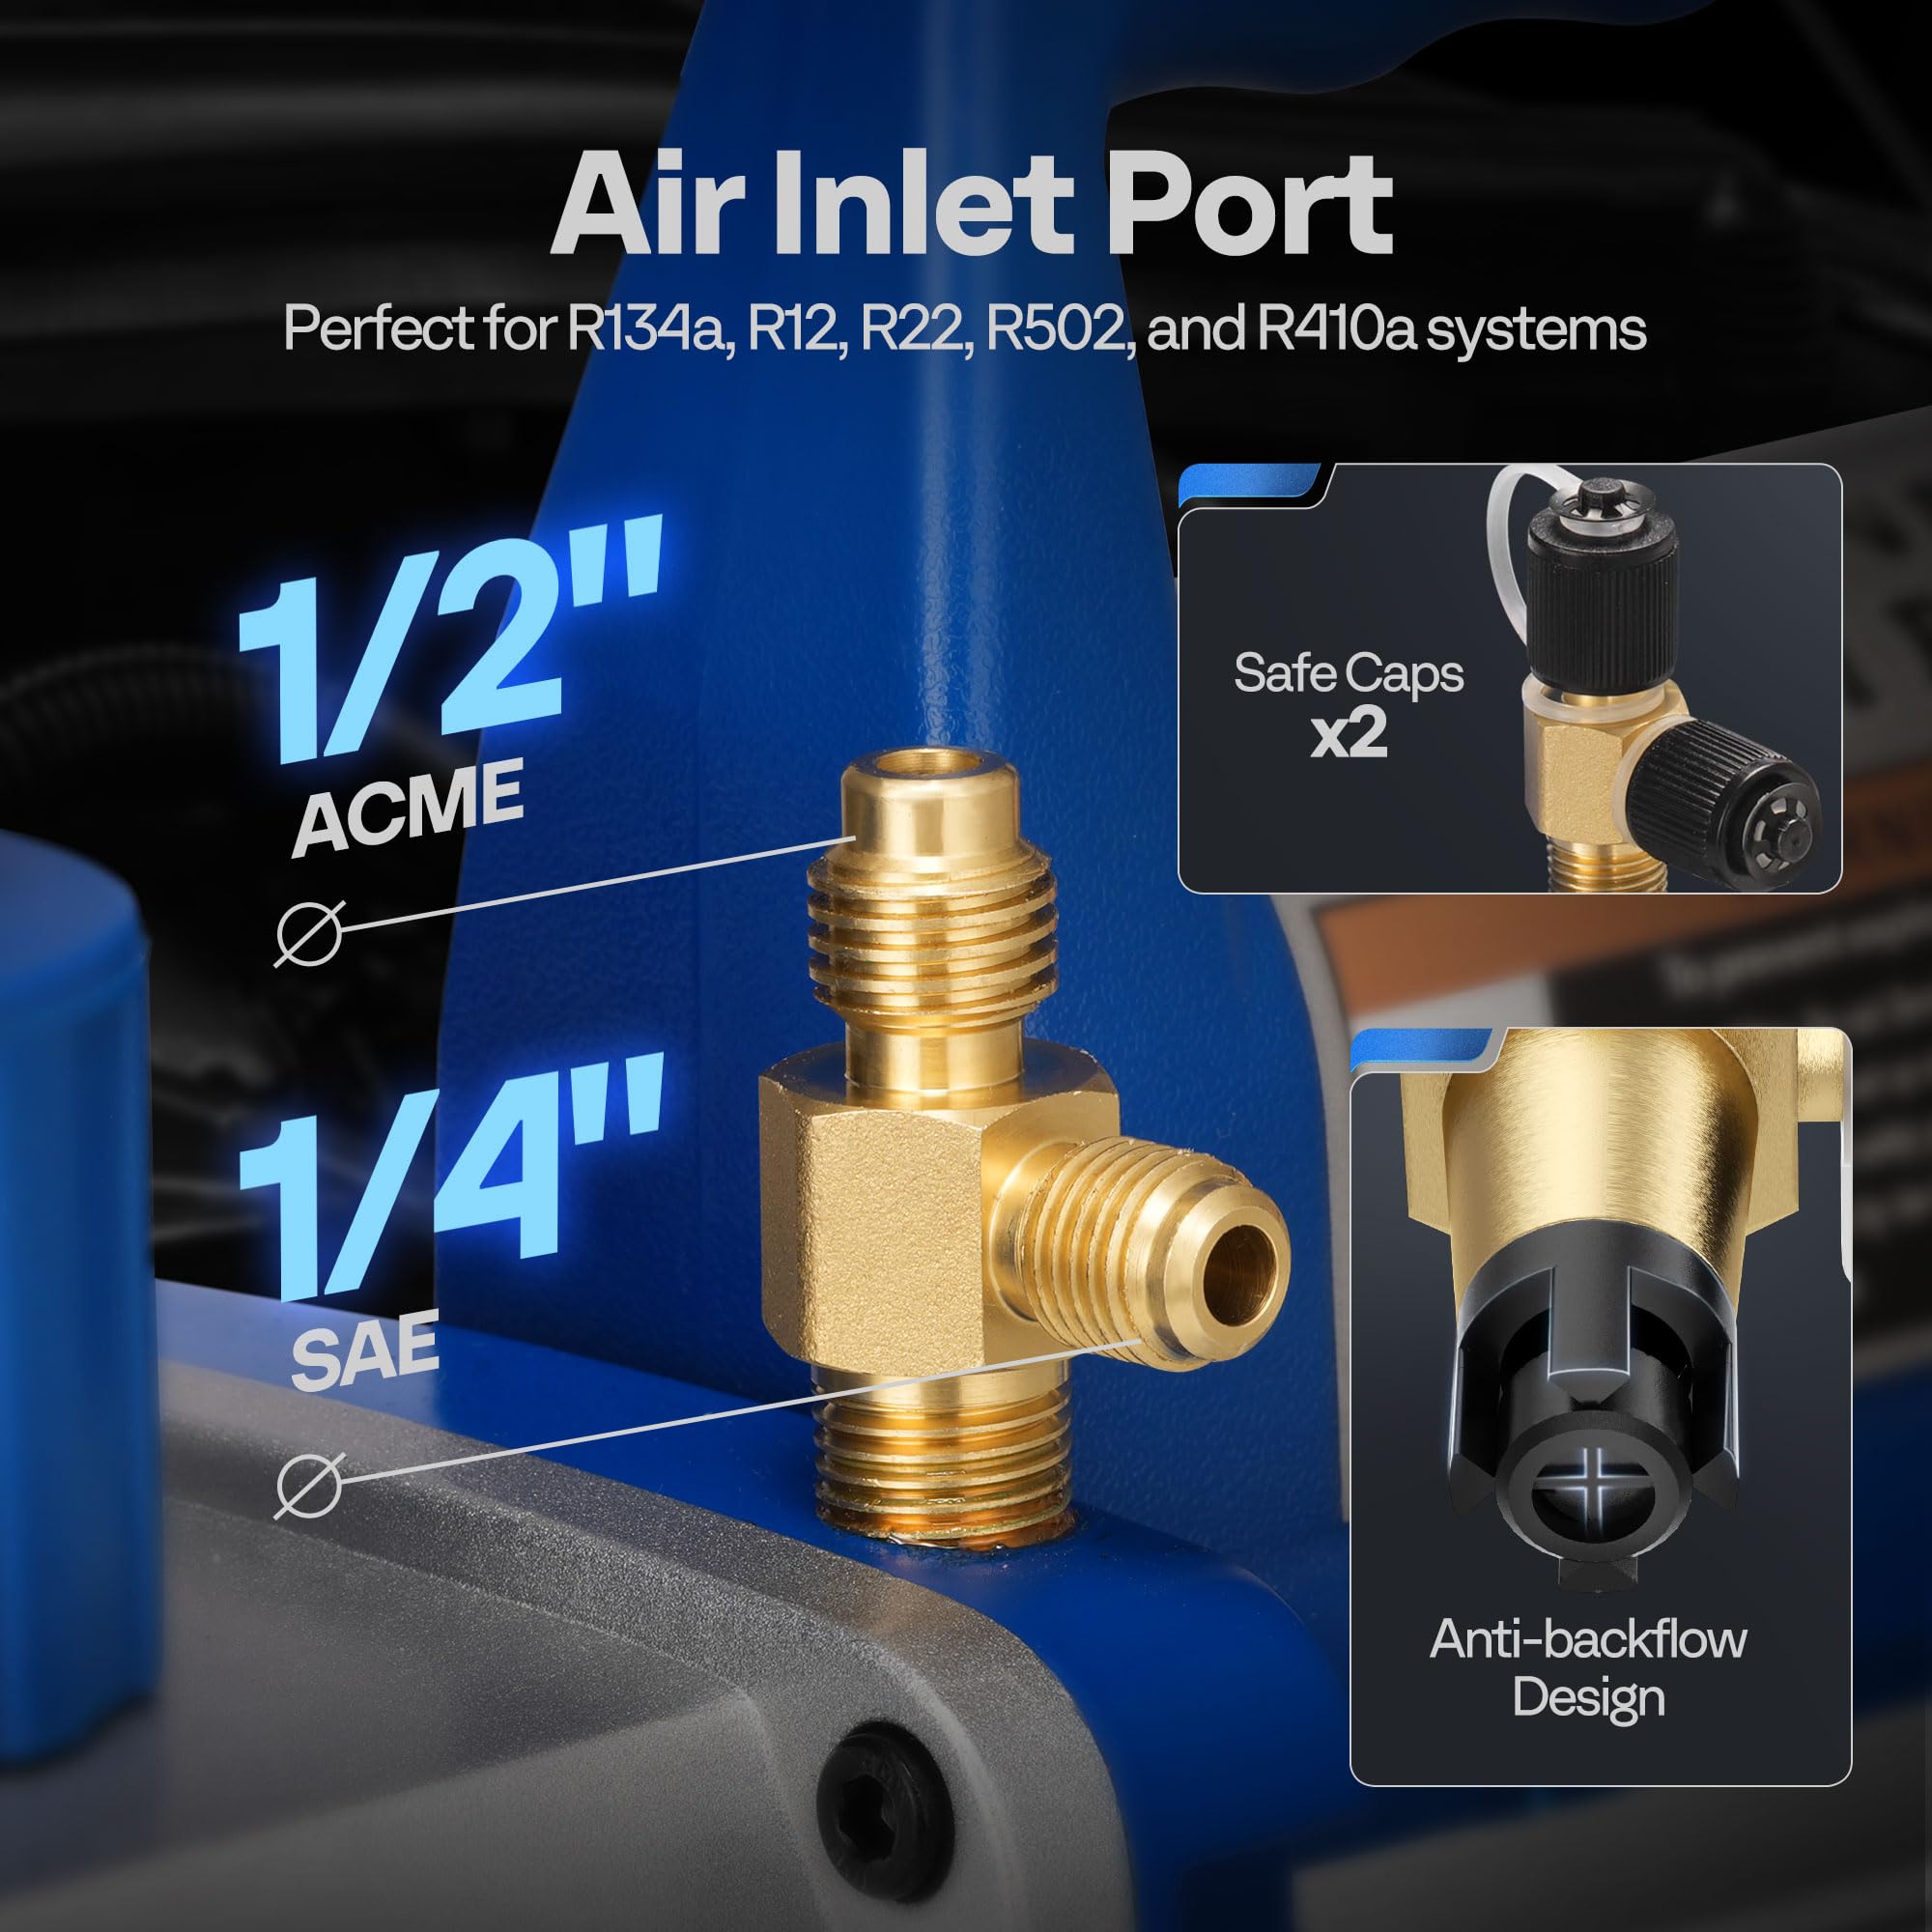
Image: Close-up of the vacuum pump's air inlet port, showing the 1/2" ACME and 1/4" SAE connections, along with safe caps and anti-backflow design.
2. Manifold Gauge Set Connection
- Ensure all valves on the manifold gauge set are closed.
- Connect the blue hose (low-pressure) to the low-side service port of the AC system.
- Connect the red hose (high-pressure) to the high-side service port of the AC system.
- Connect the yellow hose (charging/vacuum) to the vacuum pump's inlet port. Use appropriate adapters if necessary (e.g., R410a adapters).
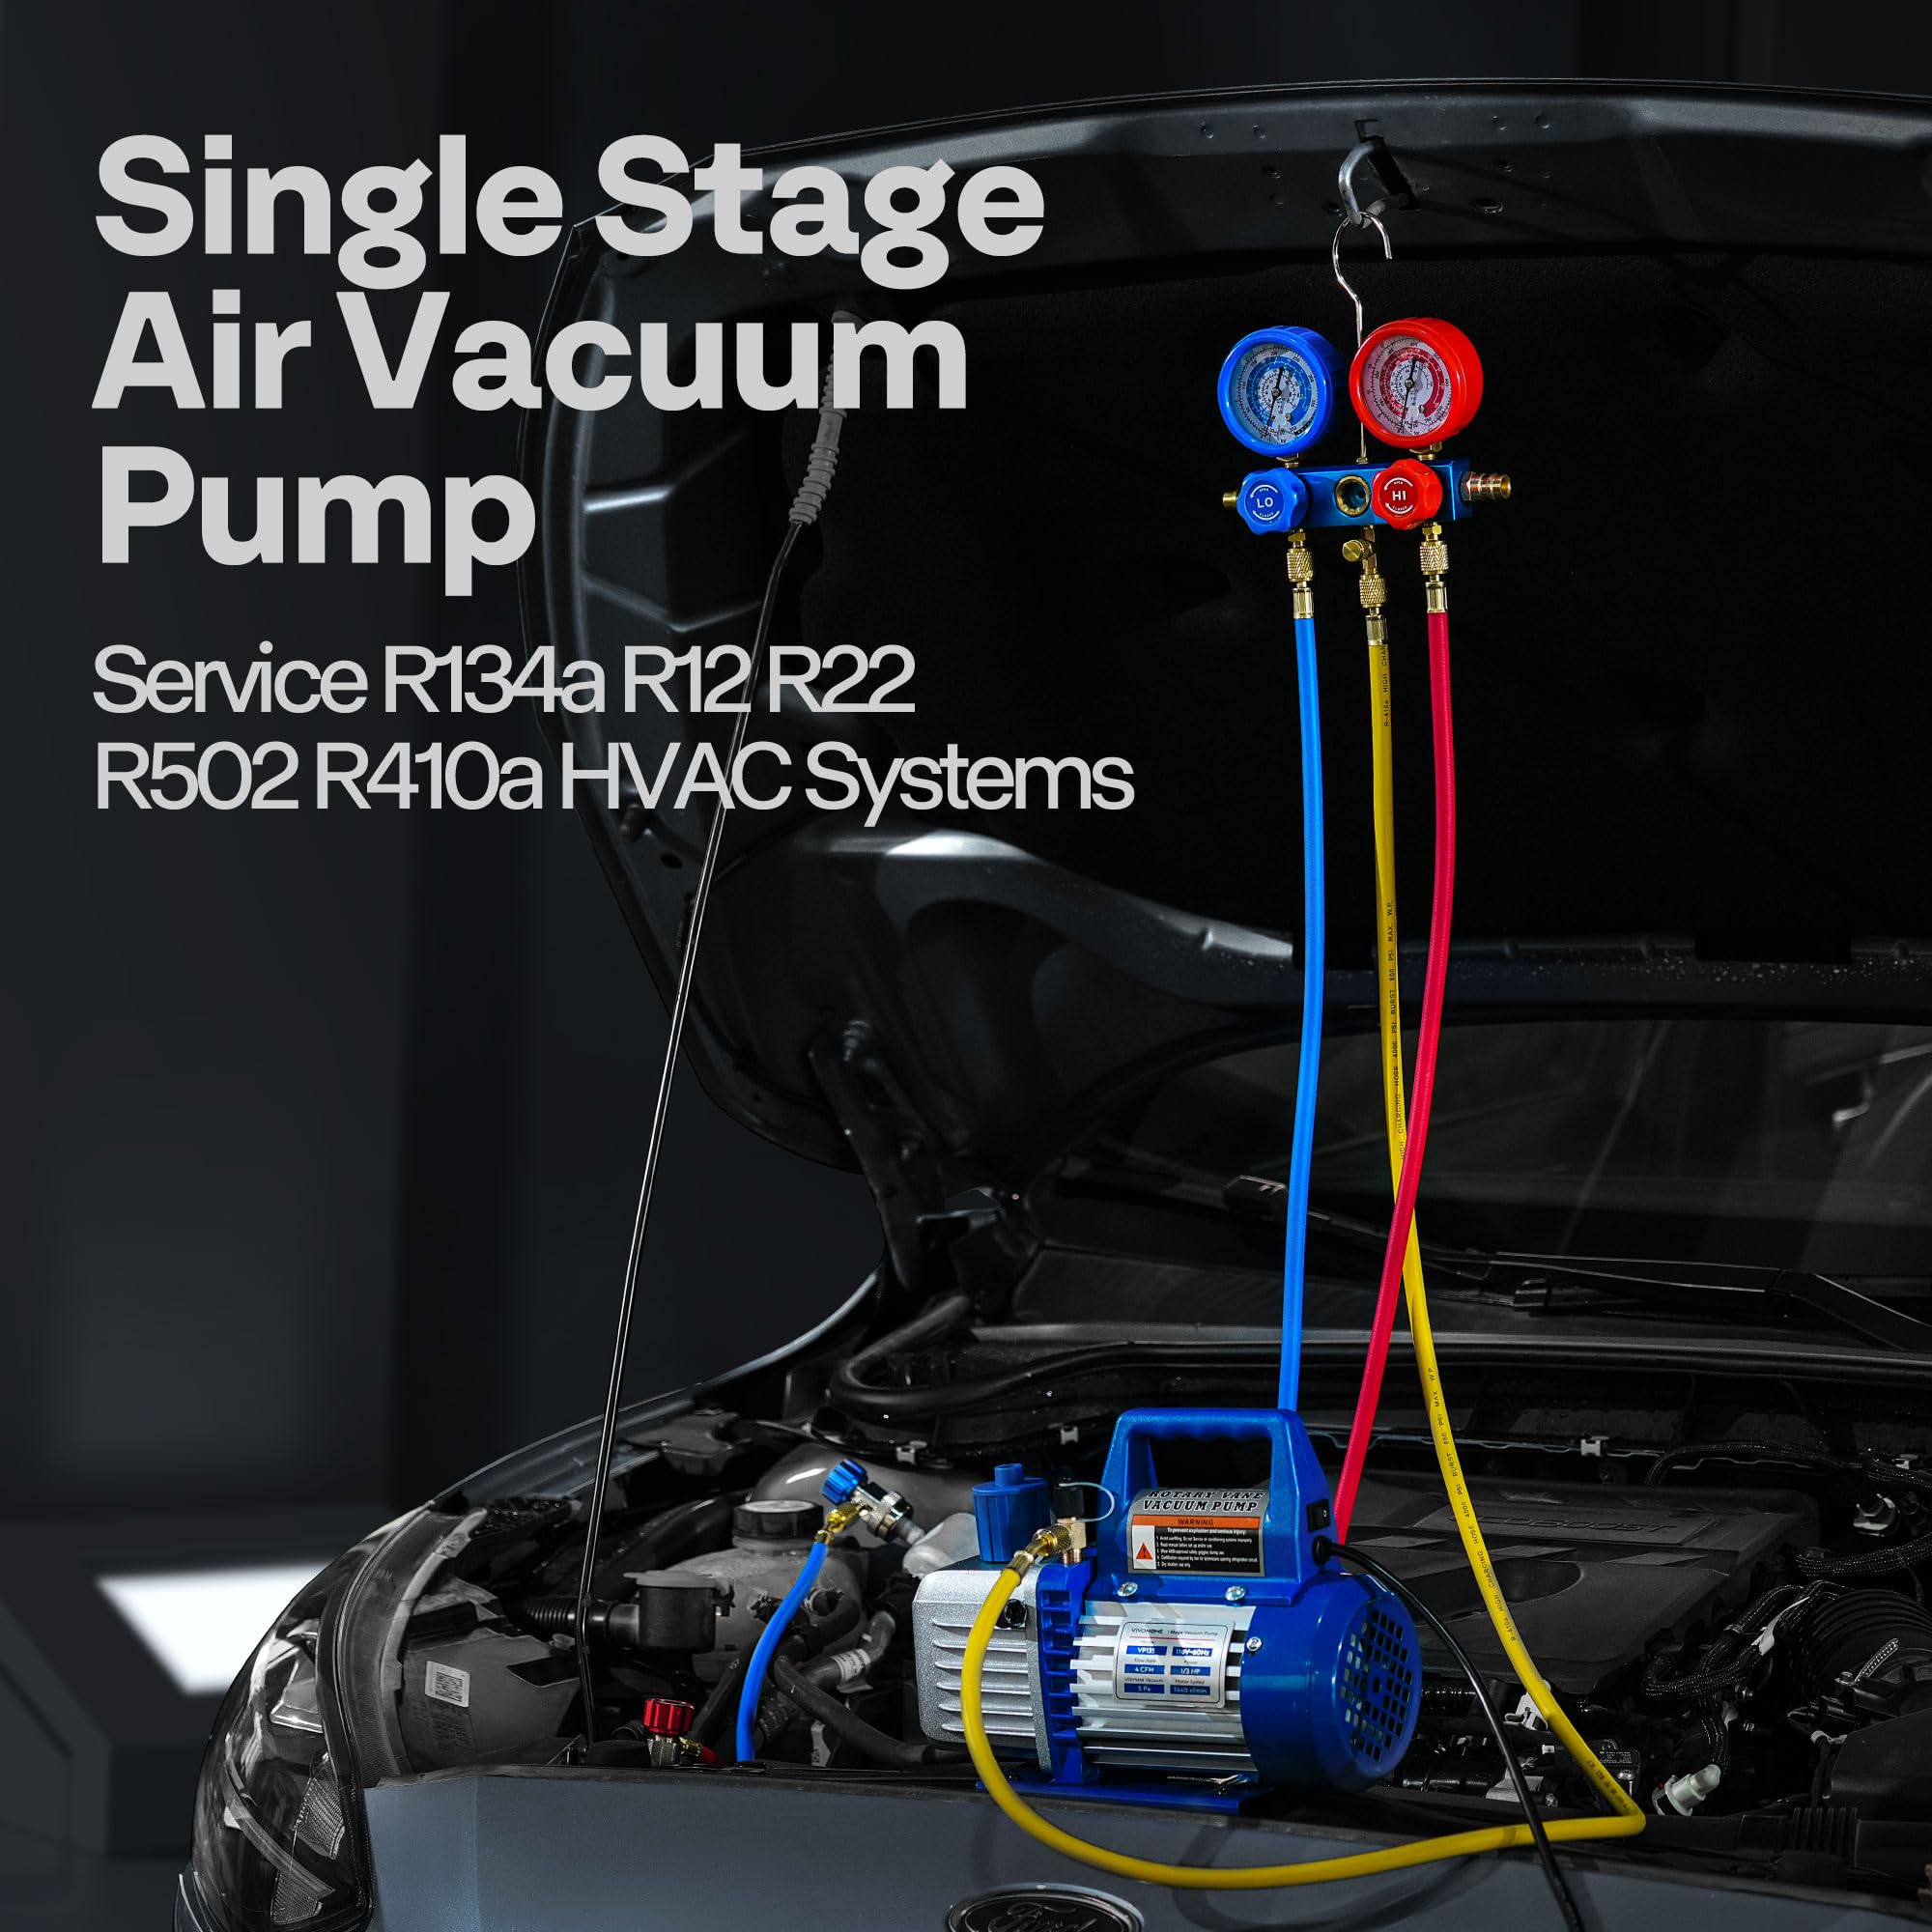
Image: The VIVOHOME single-stage air vacuum pump and manifold gauge set connected to an automotive AC system under the hood, ready for service.
Operating Instructions
1. Evacuating the AC System
- Ensure all connections are tight.
- Open the low-side and high-side valves on the manifold gauge set.
- Turn on the vacuum pump. The gauges should immediately show a drop in pressure, indicating the system is being evacuated.
- Allow the pump to run for at least 15-30 minutes, or until the low-pressure gauge reads below 500 microns (or as low as possible, typically -29.9 inHg). The duration depends on the system size and ambient temperature.
- Once the desired vacuum is reached, close the low-side and high-side valves on the manifold gauge set.
- Turn off the vacuum pump.
- Monitor the gauges for at least 15-20 minutes. If the pressure rises, it indicates a leak in the system. Proceed to the Troubleshooting section if a leak is detected.
Video: Official VIVOHOME demonstration of the vacuum pump and R134a AC manifold gauge set in operation, showing connection and evacuation steps.
Video: A comprehensive overview of the VIVOHOME Vacuum Pump Set, detailing its components and basic usage for AC system maintenance.
2. Charging the AC System (with Refrigerant)
- After successful evacuation and leak test, connect the yellow hose to the refrigerant can tap.
- Purge the yellow hose by slightly opening the can tap for a second to release any air in the hose, then close it.
- Start the vehicle engine and turn on the AC to maximum cooling with the fan on high.
- Slowly open the low-side valve on the manifold gauge set to allow refrigerant to enter the system. Do not open the high-side valve during charging.
- Monitor the low-side pressure gauge and the temperature of the air coming from the vents.
- Once the system is charged to the manufacturer's specifications (refer to your vehicle's service manual for exact pressure readings), close the low-side valve and the refrigerant can tap.
- Disconnect the hoses from the AC service ports, starting with the high-side, then the low-side.
3. Using the Leak Detector
- Turn on the leak detector and allow it to warm up according to its instructions.
- Adjust the sensitivity level as needed. Start with a lower sensitivity and increase if no leaks are found.
- Slowly move the detector probe around all connections, hoses, and components of the AC system where leaks might occur.
- The detector will emit an audible and/or visual alarm if a refrigerant leak is detected.
- Pinpoint the exact location of the leak for repair.
Video: VIVOHOME's demonstration of their vacuum pump and recovery machine set, which includes principles applicable to using the vacuum pump and leak detector.
Maintenance
1. Vacuum Pump Oil Change
Regular oil changes are crucial for the longevity and performance of your vacuum pump. Change the oil after every 10 hours of operation or if the oil appears cloudy or discolored.
- Ensure the pump is cool and disconnected from power.
- Place a suitable container under the oil drain valve.
- Open the oil drain valve and remove the oil fill cap to allow the oil to drain completely.
- Close the oil drain valve.
- Refill the pump with new vacuum oil, ensuring the level is between the MIN and MAX marks on the sight glass.
- Dispose of used oil responsibly according to local regulations.
2. Cleaning and Storage
- Wipe down the vacuum pump and manifold gauge set with a clean, damp cloth after each use.
- Store the kit in the provided portable carry bag in a cool, dry place, away from direct sunlight and extreme temperatures.
- Ensure all hoses are properly coiled and connections are capped to prevent dust and debris from entering.
Troubleshooting
| Problem | Possible Cause | Solution |
|---|---|---|
| Vacuum pump not starting. | No power, faulty switch, motor issue. | Check power connection. Ensure switch is ON. Contact VIVOHOME support if problem persists. |
| Pump not pulling sufficient vacuum. | Low oil level, contaminated oil, leak in system/hoses, clogged intake. | Check oil level and quality; change oil if necessary. Inspect all connections for leaks. Check for obstructions in the intake port. |
| Pressure rises after evacuation (leak detected). | Leak in AC system, loose hose connections, faulty O-rings. | Use the leak detector to pinpoint the leak. Tighten all connections. Replace worn O-rings. Repair the AC system leak. |
| Refrigerant not charging properly. | Valves closed, low refrigerant in can, system already full. | Ensure low-side valve is open. Check refrigerant can. Verify system pressure with gauges. |
| Leak detector not responding. | Low battery, faulty sensor, incorrect sensitivity. | Replace batteries. Ensure sensitivity is set appropriately. Clean sensor if accessible. |
Specifications
| Feature | Detail |
|---|---|
| Model | VH322 |
| Voltage | 110 Volts |
| Frequency | 60 Hz |
| Flow Rate | 4 CFM (114 L/min) |
| Power | 1/3 HP (250W) |
| Ultimate Vacuum | 5 Pa |
| Duty Cycle | 30 min |
| Oil Capacity | 0.35 qt. (330 ml) |
| Item Weight | 17.6 pounds |
| Product Dimensions | 10.5 x 4.5 x 8.7 inches |
| Compatible Refrigerants | R134a, R12, R22, R502, R410a |
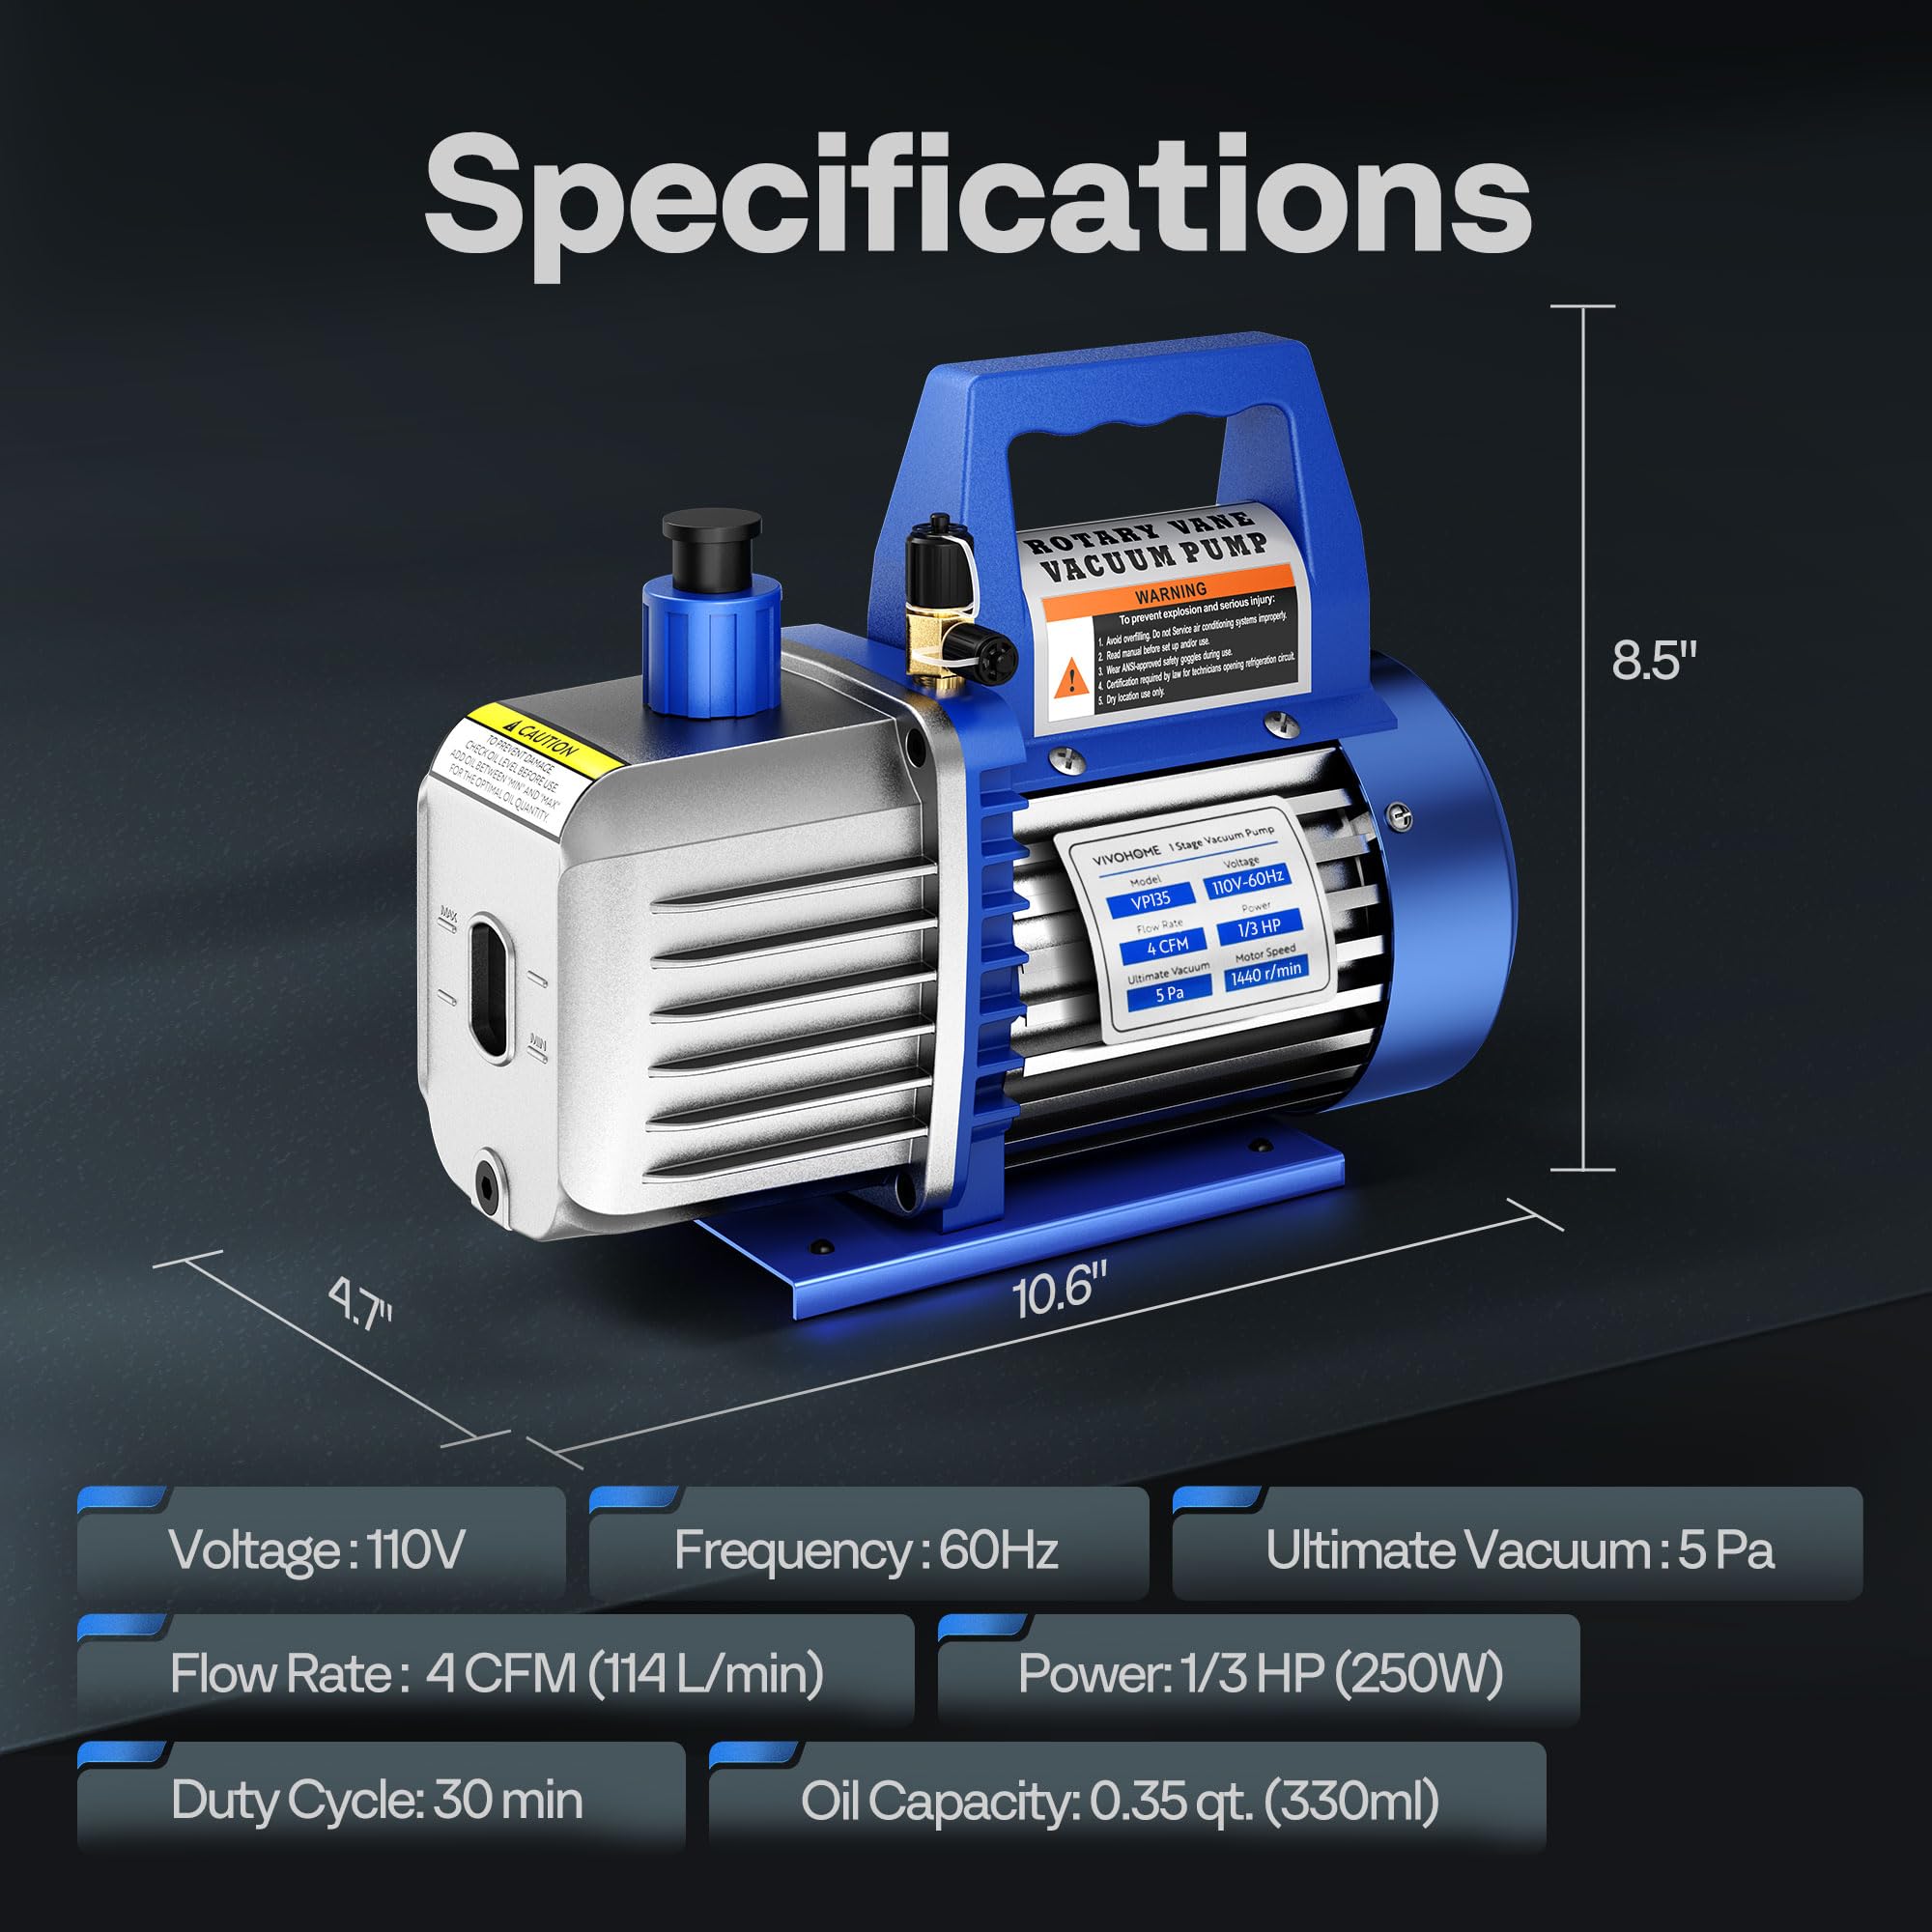
Image: A diagram illustrating the key specifications and dimensions of the VIVOHOME vacuum pump.
Warranty and Support
VIVOHOME products are designed for reliability and performance. For warranty information, technical support, or replacement parts, please contact VIVOHOME customer service. Refer to your purchase documentation for specific warranty terms and contact details.
You can also visit the official VIVOHOME store for more information: VIVOHOME Store on Amazon