Introduction
This manual provides essential information for the proper use and maintenance of your Easy@Home Replacement TENS Lead Wires. These wires are designed to connect your TENS (Transcutaneous Electrical Nerve Stimulation) unit to electrode pads, facilitating the delivery of electrical impulses for therapy.
The Easy@Home Replacement TENS Lead Wires are specifically designed for the Easy@Home EHE009 TENS unit. They feature a 2.5mm mini plug for connection to the device and two 2mm pin connectors for attaching to electrode pads. This package contains two electrode lead wires.
Product Overview
The Easy@Home Replacement TENS Lead Wires consist of a cable with a 2.5mm mini plug on one end and two 2mm pin connectors on the other. These components are crucial for the functionality of your TENS therapy.

Image: A coiled white TENS lead wire with a 2.5mm mini plug on one end and two 2mm pin connectors on the other. This is the complete product as packaged.
- 2.5mm Mini Plug: This plug connects directly to the output port of compatible TENS units.
- 2mm Pin Connectors: These two connectors attach to the electrode pads, which are then placed on the skin.
- Cable Length: Provides sufficient length for comfortable placement of electrode pads.
Compatibility
It is essential to choose the correct plug size for your device to ensure proper function and safety. These lead wires are specifically designed for the Easy@Home EHE009 TENS unit.
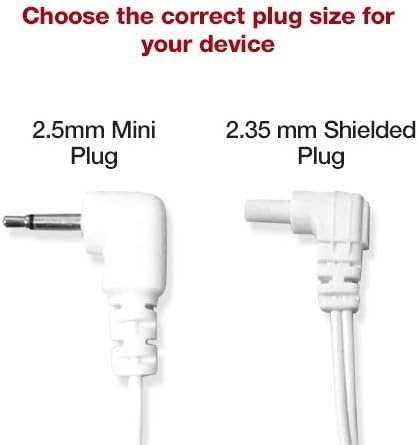
Image: A visual comparison showing a 2.5mm Mini Plug on the left and a 2.35mm Shielded Plug on the right, with text indicating "Choose the correct plug size for your device." This highlights the specific plug type of this product.
While primarily designed for the Easy@Home EHE009, these lead wires may be compatible with other TENS or EMS devices that utilize a 2.5mm mini plug output and 2mm pin input for electrode pads. Please verify your device's specifications before purchase.
Important Note: These lead wires are not compatible with EMPI or Prospera devices, as these brands typically use different connector types.
Setup and Installation
Follow these steps to properly connect the replacement lead wires to your TENS unit and electrode pads:
- Ensure Device is Off: Before connecting or disconnecting any wires, ensure your TENS or EMS unit is powered off to prevent accidental stimulation.
- Connect to TENS Unit: Insert the 2.5mm mini plug end of the lead wire firmly into the corresponding output port on your Easy@Home EHE009 TENS unit.
- Connect to Electrode Pads: Attach the two 2mm pin connectors to the input sockets on your electrode pads. Ensure a secure connection for optimal signal transmission.

Image: A close-up view of the 2.5mm Mini Plug and the two 2mm Pin Connectors, illustrating their design and how they would connect to a device and electrode pads.
Once connected, you can proceed with placing the electrode pads on your skin according to your TENS unit's instructions for use.
Operation
These lead wires serve as a conduit for electrical signals from your TENS unit to the electrode pads. Their operation is passive, meaning they do not require separate power or controls. Proper function relies on secure connections and the operational status of your TENS unit and electrode pads.
- Ensure all connections are snug before powering on your TENS unit.
- Avoid bending or kinking the wires excessively, as this can damage the internal conductors.
- Always refer to your TENS unit's instruction manual for specific operational guidelines, therapy settings, and safety precautions.
Maintenance
Proper maintenance extends the lifespan of your lead wires and ensures consistent performance:
- Cleaning: Wipe the wires with a soft, dry cloth after each use. Do not use abrasive cleaners or immerse the wires in water.
- Storage: Store the lead wires in a cool, dry place, away from direct sunlight and extreme temperatures. Avoid tangling or tightly coiling the wires, which can cause internal damage.
- Inspection: Periodically inspect the wires for any signs of damage, such as fraying, cuts, or exposed conductors. Discontinue use immediately if damage is observed and replace the wires.
Troubleshooting
If you experience issues with your TENS unit's performance, consider the following troubleshooting steps related to the lead wires:
- No Sensation or Weak Sensation:
- Ensure the 2.5mm mini plug is fully inserted into the TENS unit.
- Verify that the 2mm pin connectors are securely attached to the electrode pads.
- Check the electrode pads themselves for sufficient gel adhesion and ensure they are not dried out.
- Inspect the lead wires for any visible damage (fraying, cuts). Damaged wires should be replaced.
- Intermittent Sensation:
- This often indicates a loose connection. Re-seat both the mini plug and the pin connectors.
- Gently flex the wire along its length while the unit is on (at a low setting) to identify any internal breaks. If sensation cuts in and out, the wire may be faulty.
- Device Not Powering On (if related to connection):
- While lead wires typically do not prevent a TENS unit from powering on, a short circuit in a severely damaged wire could potentially affect some units. Inspect for severe damage.
If troubleshooting steps do not resolve the issue, consult your TENS unit's manual or contact Easy@Home customer support.
Specifications
| Feature | Detail |
|---|---|
| Plug Type | 2.5mm Mini Plug |
| Connector Type | Two 2mm Pin Connectors |
| Compatibility | Designed for Easy@Home EHE009; compatible with devices using same plug/connector specifications. Not compatible with EMPI or Prospera devices. |
| Quantity | 2 pieces per pack |
| Manufacturer | Easy@Home |
| Package Dimensions | 9.37 x 6.93 x 0.75 inches |
| Item Weight | 1.41 ounces |
| Date First Available | December 12, 2018 |
Important Information
Legal Disclaimer
Statements regarding dietary supplements have not been evaluated by the FDA and are not intended to diagnose, treat, cure, or prevent any disease or health condition. This product is an accessory for medical devices and should be used as directed by a healthcare professional or in accordance with the instructions of the primary TENS/EMS unit.
Customer Support
For further assistance, product inquiries, or warranty information, please visit the official Easy@Home store or contact their customer service directly.