Introduction
This user manual provides detailed instructions for the installation, operation, and maintenance of your Team Electronic CB Mobile MiniCom radio and MiniMag 1180 magnetic base antenna. Please read this manual thoroughly before using the product to ensure safe and correct operation and to achieve optimal performance.
Safety Information
- Always ensure the device is connected to a stable 12V DC power source. Incorrect voltage can damage the unit.
- Do not operate the radio without a properly connected antenna. Operating without an antenna can damage the transmitter.
- Avoid exposing the radio to extreme temperatures, direct sunlight, dust, or moisture. The device is not water-resistant.
- Do not attempt to open or modify the radio or antenna. This will void the warranty and may cause damage or injury.
- Ensure the antenna is securely mounted and positioned away from obstructions for best performance and safety.
- When installing the antenna on a vehicle, ensure it does not obstruct the driver's view or pose a hazard.
Package Contents
Verify that all items listed below are present in your package:
- 1x Team Electronic CB Mobile MiniCom Radio (Model CB3208) with fixed microphone
- 1x DC Power Cable
- 1x Under-dash Mounting Kit
- 1x User Manual (this document)
- 1x Declaration of Conformity
- 1x Team Electronic MiniMag 1180 Magnetic Base Antenna (Model CB6025) including 3.8m cable and PL-connector
Product Overview
Team Electronic CB Mobile MiniCom Radio (CB3208)
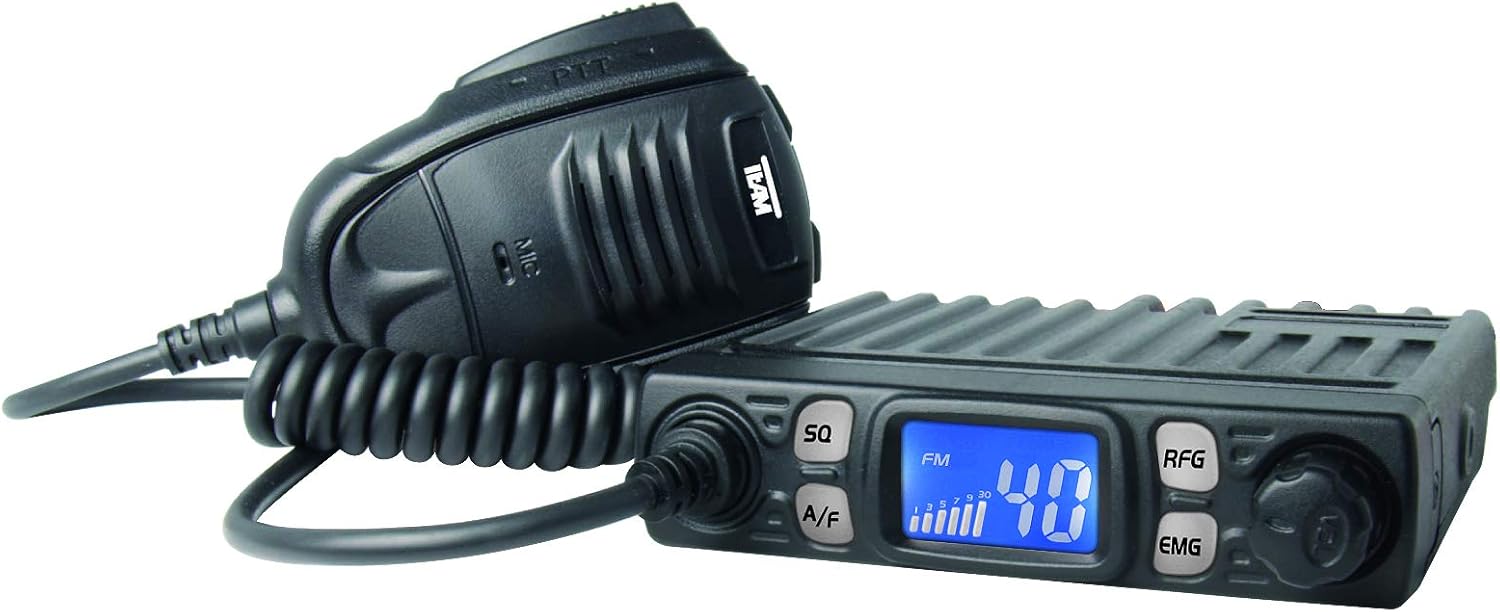
Image 1: Front view of the Team Electronic CB Mobile MiniCom radio with its attached microphone. The radio features an LCD display, control buttons, and a rotary knob.
The MiniCom is a compact CB mobile radio designed for reliable communication. Key features include:
- LCD Display: White characters on a blue background for clear visibility.
- Automatic & Adjustable Squelch: Reduces background noise for clearer reception.
- Channel Scan Function: Automatically scans through channels to find active transmissions.
- Priority Channel 9/19: Quick access to emergency channels.
- Keypad Lock: Prevents accidental changes to settings.
- AM/FM Switching: Supports both Amplitude Modulation and Frequency Modulation modes.
- Multi Standard: Compatible with various European CB standards.
- Receive Gain (RFG): Adjustable sensitivity for optimizing signal reception.
- S-Meter Display: Indicates incoming signal strength.
- Up/Down Microphone: Allows channel selection directly from the microphone.
- Connections: DC 12V power input, external speaker jack, 6-pin microphone port, PL antenna connector.
Team Electronic MiniMag 1180 Magnetic Base Antenna (CB6025)
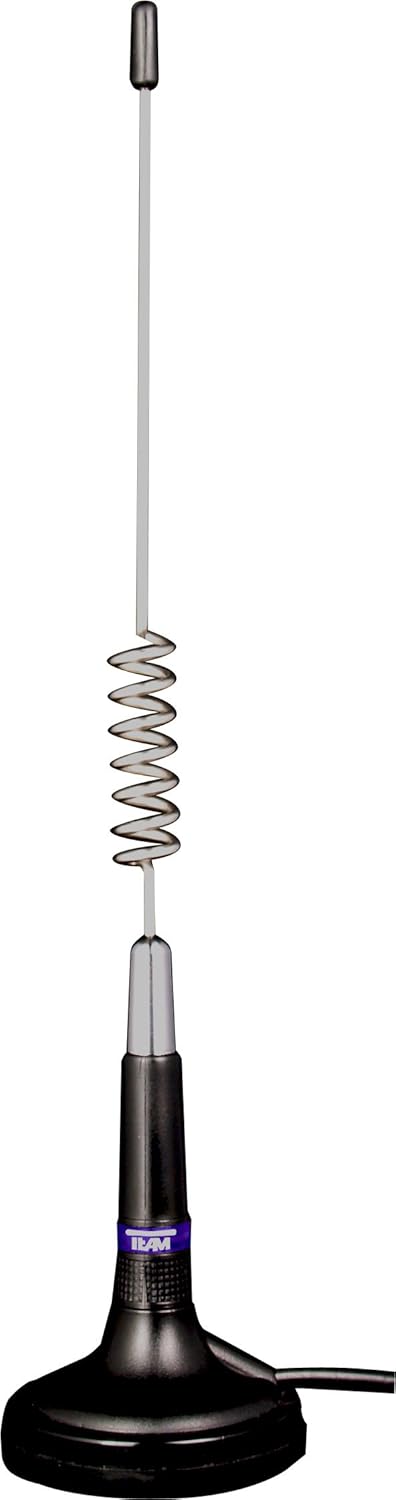
Image 2: The Team Electronic MiniMag 1180 magnetic base antenna, showing its compact design and magnetic base for easy mounting.
The MiniMag 1180 is a compact magnetic base antenna designed for easy installation and removal, ideal for mobile CB radio use. Key features include:
- Magnetic Base: Provides strong adhesion to metallic surfaces, such as vehicle roofs.
- Integrated Cable: 3.8 meters (approximately 12.5 feet) of coaxial cable with a pre-installed PL-connector.
- Compact Design: Total length of 29 cm (approximately 11.4 inches).
- Antenna Type: 5/8 Lambda design for efficient performance.
- Power Handling: Capable of handling up to 30 Watts.
- Frequency Range: Optimized for 26-27 MHz CB frequencies.
Setup
1. Radio Installation (MiniCom)
- Mounting: Use the provided under-dash mounting kit to secure the MiniCom radio in a convenient and safe location within your vehicle. Ensure it does not obstruct airbags or driver's view.
- Power Connection: Connect the supplied DC power cable to the 12V power input on the rear of the MiniCom. Connect the other end to your vehicle's 12V power supply (e.g., fuse box, cigarette lighter adapter if suitable). Ensure correct polarity (red to positive, black to negative/ground).
- Microphone Connection: Plug the 6-pin microphone connector into the designated port on the front of the MiniCom radio.
- External Speaker (Optional): If desired, connect an external speaker to the external speaker jack on the rear of the radio.
2. Antenna Installation (MiniMag 1180)
- Placement: Choose a flat, metallic surface on your vehicle, such as the center of the roof, for optimal performance. Ensure the surface is clean and dry. The magnetic base requires a good ground plane.
- Mounting: Carefully place the MiniMag 1180 antenna onto the chosen metallic surface. The strong magnet will secure it in place.
- Cable Routing: Route the 3.8m coaxial cable from the antenna into the vehicle, ensuring it does not get pinched or damaged by doors, windows, or moving parts. Avoid routing it near ignition systems or other sources of electrical interference.
- Antenna Connection: Connect the PL-connector at the end of the antenna cable to the PL antenna connector on the rear of the MiniCom radio. Hand-tighten the connector securely.
Important: Before operating, ensure all connections are secure and the antenna is properly installed. Operating the radio without an antenna can cause damage.
Operating Instructions
- Power On/Off: Turn the volume knob clockwise to power on the radio. The LCD display will illuminate. Turn counter-clockwise until it clicks to power off.
- Volume Adjustment: Rotate the volume knob to adjust the listening volume.
- Channel Selection: Use the UP/DOWN buttons on the microphone or the channel selector knob on the radio to change channels.
- AM/FM Mode: Press the A/F button to switch between AM (Amplitude Modulation) and FM (Frequency Modulation) modes. The selected mode will be indicated on the display.
- Squelch (SQ) Adjustment:
- Automatic Squelch: Press the SQ button briefly to activate/deactivate automatic squelch.
- Manual Squelch: Press and hold the SQ button, then rotate the channel selector knob to adjust the squelch level. Adjust until background noise disappears, but you can still hear weak signals.
- Receive Gain (RFG) Adjustment: Press the RFG button to adjust the receiver sensitivity. This can be useful in areas with strong local signals or high interference.
- Priority Channel (EMG): Press the EMG button to quickly switch to emergency channels (9 or 19, depending on configuration). Press again to return to the previous channel.
- Channel Scan: Press the SCAN button (if available, or refer to specific button on your model) to initiate channel scanning. The radio will stop on an active channel. Press again to resume scanning.
- Keypad Lock: Press and hold the LOCK button (or a combination, refer to specific button on your model) to lock the keypad and prevent accidental operation. Repeat to unlock.
- Transmitting: To transmit, press and hold the PTT (Push-To-Talk) button on the microphone. Speak clearly into the microphone. Release the PTT button to listen.
Maintenance
- Cleaning: Use a soft, dry cloth to clean the exterior of the radio and antenna. Do not use abrasive cleaners or solvents.
- Antenna Care: Periodically check the antenna cable for any signs of wear or damage. Ensure the magnetic base is clean and free of debris to maintain a strong connection to the vehicle surface.
- Connections: Regularly check all cable connections (power, microphone, antenna) to ensure they are secure.
- Storage: If storing the unit for an extended period, disconnect it from power and store it in a dry, cool place.
Troubleshooting
| Problem | Possible Cause | Solution |
|---|---|---|
| Radio does not power on. | No power connection; incorrect polarity; blown fuse. | Check power cable connections. Verify 12V supply. Check vehicle fuse. Ensure correct polarity. |
| No reception or very weak signals. | Antenna not connected; squelch set too high; RFG set too low; antenna placement issues. | Ensure antenna is securely connected. Adjust squelch (SQ) to a lower level. Adjust RFG. Reposition antenna for better line of sight. |
| Cannot transmit. | Microphone not connected; PTT button faulty; antenna issue. | Check microphone connection. Ensure PTT button is fully pressed. Verify antenna connection and integrity. |
| Excessive background noise. | Squelch set too low; electrical interference. | Increase squelch (SQ) level. Check for nearby electrical devices causing interference. |
Specifications
Team Electronic CB Mobile MiniCom (CB3208)
- Dimensions (Housing): 24 x 100 x 104 mm
- Weight: 445 g
- Power Supply: 12V DC
- Microphone Connection: 6-pin
- Antenna Connection: PL-type
- Features: LCD display (white on blue), Automatic & adjustable squelch, Channel scan, Priority channel 9/19, Keypad lock, AM/FM switching, Multi Standard, RFG, S-meter display, Up/Down microphone.
Team Electronic MiniMag 1180 Antenna (CB6025)
- Type: Magnetic Base Antenna
- Length: 29 cm
- Antenna Type: 5/8 Lambda
- Power Handling: 30 W
- Base Diameter: 68 mm
- Frequency Range: 26-27 MHz
- Cable Length: 3.8 m
- Connector: PL-type
General Specifications
- Voltage: 12 Volt
- Frequency Range: 26-27 MHz
- Water Resistance Level: Not water resistant
- Batteries Required: No
- Compatible Devices: CB radios, other TEAM Electronic devices, 5/8 Lambda antennas, PL-connection devices
Warranty and Support
For warranty information, please refer to the documentation provided at the time of purchase or contact your retailer. TEAM Electronic GmbH provides products designed for reliability and performance. For technical support or service inquiries, please contact your authorized dealer or the manufacturer directly.
Date of First Availability: January 15, 2020