
1. Product Overview
The Merkury Innovations GPS Titan Drone is a quadcopter equipped with a 720P HD WiFi camera, designed for aerial photography and video recording. It features GPS functionality for precise positioning and return-to-home capabilities, along with intelligent flight modes such as Follow Me and Altitude Hold. The drone offers live video streaming to a connected smartphone, enhancing the flight experience.

Image 1.1: The GPS Titan Drone, highlighting its GPS capabilities.

Image 1.2: Key features of the GPS Titan Drone, including GPS Sync, One-Key Modes, HD Camera, Live View, and Precision Controls.
2. Package Contents
- GPS Titan Drone
- Remote Controller
- Propellers (set of 4, plus spares)
- USB Charging Cable
- User Manual
3. Component Identification
3.1 Drone Components
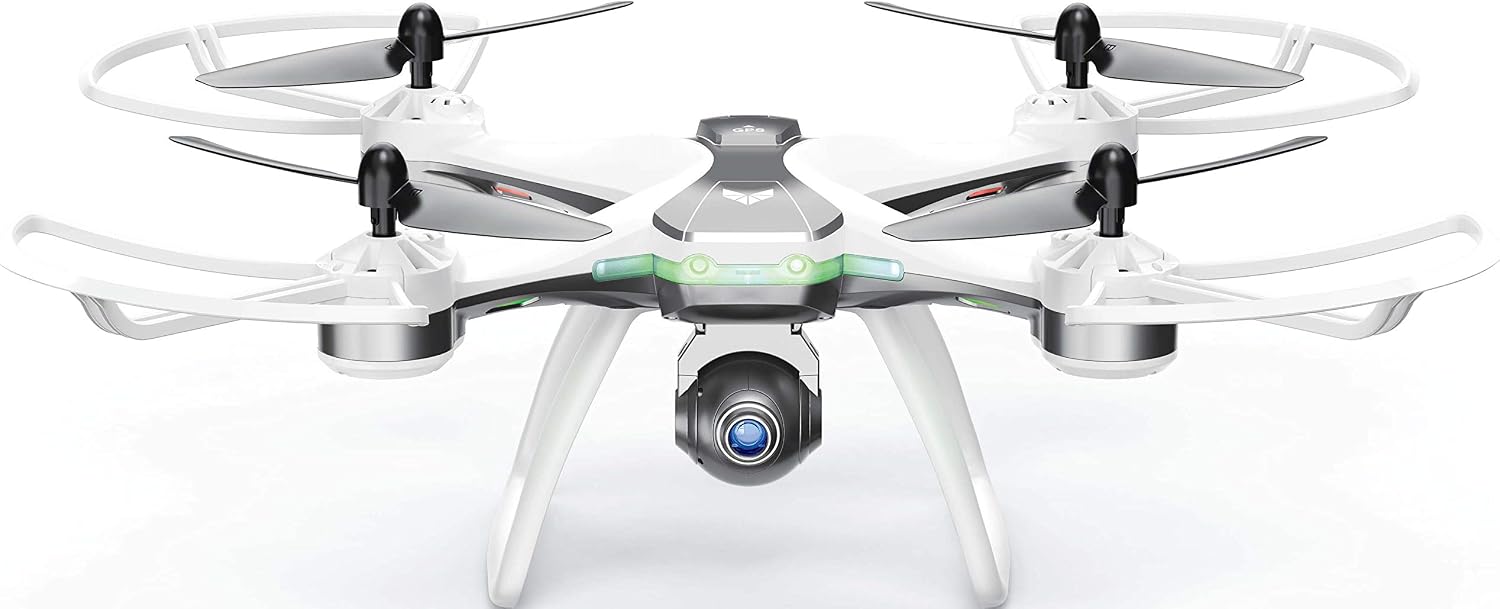
Image 3.1: The GPS Titan Drone, displaying its main body, propellers, and integrated camera.
- Propellers: Four rotating blades for lift and propulsion.
- Motors: Drive the propellers.
- Camera: 720P HD camera for photo and video.
- Landing Gear: Provides stability during landing.
- Battery Compartment: Houses the drone's intelligent battery.
- LED Indicators: Provide status information (e.g., power, GPS signal).
3.2 Remote Controller Components

Image 3.2: The remote controller with a smartphone attached, ready for live view.

Image 3.3: Detailed diagram of the remote controller, indicating the function of each button and joystick.
- Left Joystick: Controls Ascend/Descend, Turn Left/Turn Right.
- Right Joystick: Controls Forward/Backward, Left/Right Sideward Fly.
- Power Switch: Turns the remote controller on/off.
- Indicators: Display power and connection status.
- One-Key Return Button: Initiates GPS Return Home.
- Photo/Video Button: Short press for photo, long press for video.
- One-Key Take Off/Landing/Emergency Stop Button: For automated take-off, landing, or immediate stop.
- High/Low Speed Button: Adjusts drone speed.
- Headless Mode Button: Activates headless flight mode.
- One-Key Waypoint Flight Button: Activates waypoint flight (requires app setup).
- One-Key Follow Button: Activates Follow Me mode.
- Camera Angle Adjustment Buttons: Adjusts the camera's steering angle.
4. Setup
4.1 Drone Battery Installation
- Ensure the drone is powered off.
- Locate the battery compartment on the drone.
- Insert the intelligent battery into the compartment, ensuring it clicks into place securely.
- Close the battery compartment cover.
4.2 Remote Controller Battery Installation
The remote controller requires 4x AA batteries (not included).
- Ensure the remote controller is powered off.
- Open the battery cover on the back of the remote controller.
- Insert 4x AA batteries, observing the correct polarity (+/-).
- Close the battery cover securely.
4.3 Propeller Installation
If propellers are not pre-installed, attach them according to the markings (A and B) on the propellers and motor arms. Ensure each propeller is securely fastened to its corresponding motor shaft.
4.4 Charging the Drone Battery
- Connect the USB charging cable to the drone battery.
- Connect the other end of the USB cable to a USB power adapter (e.g., computer USB port, wall adapter).
- The indicator light on the charging cable will show charging status (refer to specific light behavior in the quick start guide if provided).
- Once fully charged, disconnect the battery from the charger.
4.5 App Installation
Download the dedicated control app for the GPS Titan Drone from your smartphone's app store (e.g., Apple App Store or Google Play Store). Search for "Titan GPS Drone" or refer to the QR code in the quick start guide if available.
4.6 Pairing the Drone and Remote
- Place the drone on a flat, level surface.
- Power on the drone. The LED indicators will flash.
- Power on the remote controller.
- Push the left joystick up and then down. The drone's LED indicators will become solid, indicating successful pairing.
- Connect your smartphone to the drone's Wi-Fi network (usually named "Titan_GPS_XXXXXX").
- Open the control app to establish a connection for live video and advanced features.
5. Operating Instructions
5.1 Pre-Flight Checklist
- Ensure both drone and remote controller batteries are fully charged.
- Check that propellers are securely attached and undamaged.
- Verify that the drone and remote are successfully paired.
- Ensure a clear, open area for flight, away from obstacles, people, and animals.
- Check weather conditions; avoid flying in strong winds or rain.
- Confirm GPS signal acquisition (if flying outdoors) for stable flight and return-to-home functions.
5.2 Take-Off and Landing
- One-Key Take Off: After pairing and GPS lock (if applicable), press the One-Key Take Off/Landing button. The drone will automatically ascend to a safe altitude and hover.
- Manual Take Off: After pairing, push both joysticks to the bottom-outward corners to unlock the motors. Then, slowly push the left joystick up to ascend.
- One-Key Landing: During flight, press the One-Key Take Off/Landing button. The drone will automatically descend and land.
- Emergency Stop: In an emergency, press and hold the One-Key Take Off/Landing button for several seconds to immediately stop the motors. Use only in critical situations to prevent damage or injury.
5.3 Basic Flight Controls
| Joystick Movement | Drone Action |
|---|---|
| Left Joystick Up/Down | Ascend/Descend |
| Left Joystick Left/Right | Turn Left/Turn Right (Yaw) |
| Right Joystick Up/Down | Forward/Backward (Pitch) |
| Right Joystick Left/Right | Left/Right Sideward Fly (Roll) |
5.4 Advanced Features
GPS Sync
Utilizes satellite connection for precise movement tracking or following a preset path. Allows control over speed and distance from the ground or synced smartphone.
Altitude Hold
Maintains the drone's current altitude, allowing the pilot to focus on directional control and camera operation.
Headless Mode
Simplifies flight by orienting the drone's movement relative to the pilot, regardless of the drone's actual front direction. Press the left joystick down to start Headless Mode.
Follow Me Mode
The drone will automatically follow the remote controller or connected smartphone, maintaining a set distance and altitude. Activate via the One-Key Follow button.
One-Key Waypoint Flight
Allows the drone to fly along a pre-defined path set in the companion app. Activate via the One-Key Waypoint Flight button after setting the path in the app.
One-Key Around (2M executable)
The drone will circle a point at a specified radius (e.g., 2 meters). Refer to the app for specific setup and activation.
5.5 Camera Operation
- Take Photo: Short press the Photo/Video button on the remote controller.
- Record Video: Long press the Photo/Video button on the remote controller to start/stop video recording.
- Adjust Camera Angle: Use the Camera Steering Angle buttons on the remote controller to remotely adjust the camera's tilt during flight.

Image 5.1: The motorized camera mount allows for remote adjustment of the camera angle.
6. Maintenance and Care
- Cleaning: Use a soft, dry cloth to clean the drone and remote controller. Avoid using liquids or solvents.
- Propeller Inspection: Regularly check propellers for cracks, bends, or damage. Replace damaged propellers immediately using the provided spares.
- Battery Care: Store batteries in a cool, dry place. Do not overcharge or over-discharge. If not used for extended periods, charge batteries to approximately 50% capacity.
- Storage: When not in use, store the drone and its components in a safe, dry environment, away from direct sunlight and extreme temperatures.
7. Troubleshooting
| Problem | Possible Solution |
|---|---|
| Drone does not power on. | Ensure the drone battery is fully charged and correctly installed. |
| Remote controller does not power on. | Check if AA batteries are correctly installed and have sufficient charge. Replace if necessary. |
| Drone and remote fail to pair. | Ensure both devices are powered on and follow the pairing procedure (Section 4.6) carefully. Try restarting both devices. |
| Unstable flight or drifting. | Perform a gyroscope calibration on a flat surface (refer to quick start guide for specific steps). Ensure propellers are not damaged. Fly in calm conditions. |
| No live video feed on smartphone. | Ensure your smartphone is connected to the drone's Wi-Fi network and the control app is open. Check Wi-Fi signal strength. |
| GPS features (e.g., Return Home, Follow Me) not working. | Ensure the drone has acquired a strong GPS signal (indicated by solid GPS LED). Fly in an open outdoor area. |
8. Specifications
| Feature | Detail |
|---|---|
| Brand | Merkury Innovations |
| Model Number | AV-DRG02-199 |
| Video Capture Resolution | 720p (1280x720 Pixels) |
| Connectivity Technology | Wi-Fi |
| Wireless Communication Technology | Wi-Fi |
| Age Range (Description) | Adult |
| Batteries Included | No |
| GTIN/UPC | 844702082427 |

Image 8.1: Drone dimensions, indicating a length of 13.75 inches.
9. Warranty and Support
For warranty information or technical support, please refer to the documentation included with your product or contact Merkury Innovations customer service directly. Contact details can typically be found on the product packaging or the official Merkury Innovations website.