
TUSY TUSY-1562
TUSY 15x15 Inch Heat Press Machine User Manual
Model: TUSY-1562
Introduction
This user manual provides comprehensive instructions for the safe and effective operation of your TUSY 15x15 Inch Heat Press Machine. Designed for heat sublimation and vinyl transfer applications, this machine offers efficient and precise heat application for various materials. Please read this manual thoroughly before initial use to ensure proper setup, operation, and maintenance.

Image: The TUSY 15x15 inch heat press machine, showcasing its compact and robust design.
Safety Instructions
To prevent injury or damage to the machine, always adhere to the following safety precautions:
- Ensure the machine is placed on a stable, heat-resistant surface.
- Do not touch the heat platen during or immediately after operation, as it will be extremely hot. Use heat-resistant gloves if necessary.
- Keep hands and fingers clear of the pressing area when closing the machine.
- Unplug the machine from the power outlet when not in use or before cleaning and maintenance.
- Do not operate the machine with a damaged power cord or plug.
- Keep children and pets away from the machine during operation.
- Ensure adequate ventilation in the work area to dissipate heat and any fumes from materials.
- Never immerse the machine in water or any other liquid.
Product Overview and Components
Familiarize yourself with the main parts of your TUSY Heat Press Machine:
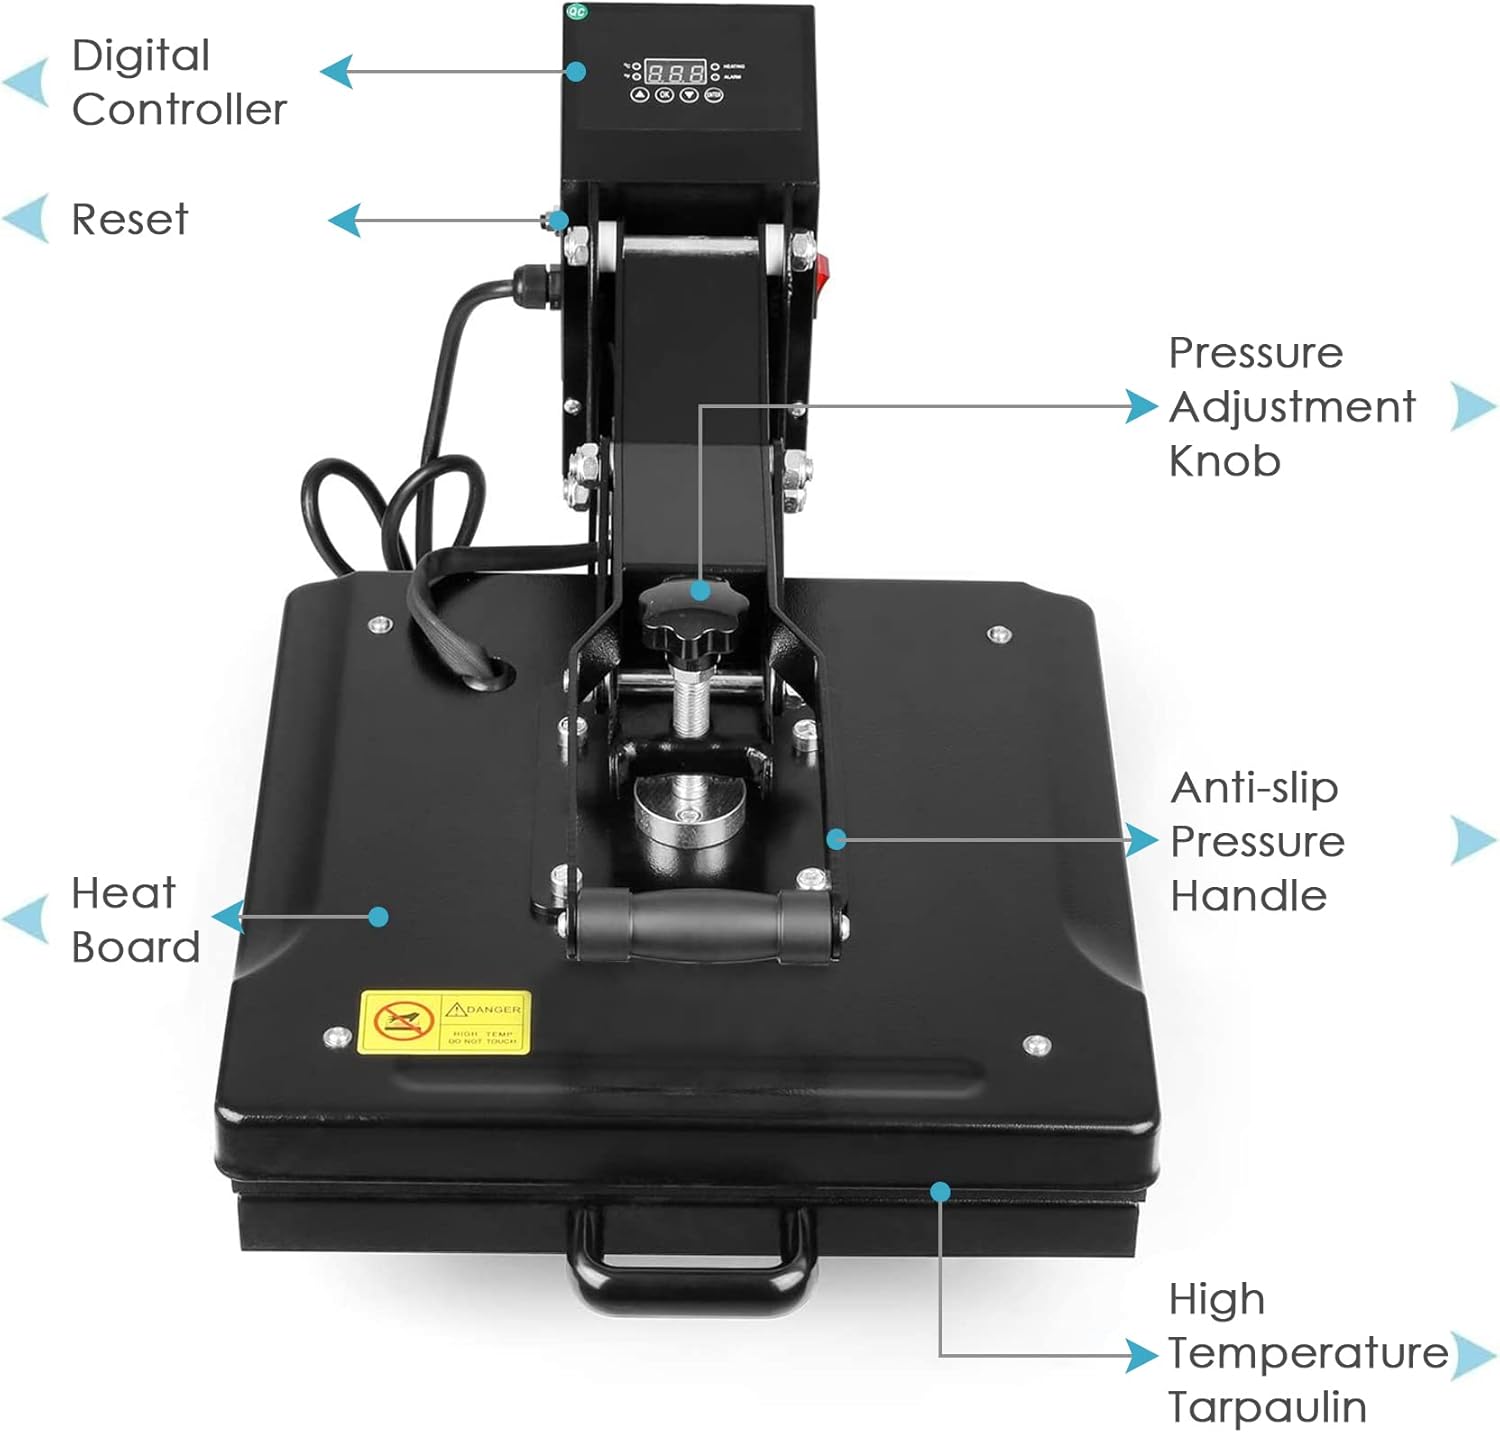
Image: Labeled diagram showing the Digital Controller, Reset button, Pressure Adjustment Knob, Anti-slip Pressure Handle, Heat Board, and High Temperature Tarpaulin.
- Digital Controller: Used to set and monitor temperature and time.
- Pressure Adjustment Knob: Allows for precise control over the pressing pressure.
- Anti-slip Pressure Handle: Provides a secure grip for opening and closing the heat press.
- Heat Board (Upper Platen): The heated surface that applies heat and pressure.
- High Temperature Tarpaulin (Lower Platen): The base where items are placed for pressing.
The TUSY heat press features a double-arm force design, which contributes to easier operation and more stable, labor-saving pressing compared to single-arm designs.

Image: Visual comparison highlighting the double arm force mechanism for easier use.
Setup
- Unpacking: Carefully remove the heat press from its packaging. Retain packaging for future storage or transport.
- Placement: Place the machine on a sturdy, flat, and heat-resistant surface. Ensure there is sufficient space around the machine for ventilation and safe operation.
- Power Connection: Plug the power cord into a grounded electrical outlet. Ensure the voltage matches the machine's requirements (110 Volts).
Operating Instructions
Follow these steps for successful heat transfer operations:
- Power On: Turn on the main power switch, typically located on the side or back of the control box. The digital display will illuminate.
- Set Temperature and Time:
- Use the digital control board to set your desired temperature and time. Refer to the specific transfer material instructions for recommended settings.
- To set the temperature to Fahrenheit:
- Turn on the switch and wait for 3 seconds until the "HEATING" indicator light illuminates.
- Press and hold the "OK" button. The display will show "P-3" then "C".
- Press the arrow up button to change "C" to "F". Press "ENTER" to confirm.

Image: Step-by-step guide on how to switch the temperature unit from Celsius to Fahrenheit on the digital controller.
- Pre-heat: Allow the machine to reach the set temperature. The "HEATING" indicator will turn off, and an alarm may sound when the target temperature is reached.
- Prepare Item: Place your garment or item onto the lower platen. Ensure it is flat and smooth.
- Position Transfer: Place your transfer paper or vinyl design onto the item, ensuring it is correctly aligned.
- Adjust Pressure: Use the pressure adjustment knob to set the appropriate pressure for your material. Turn clockwise for more pressure, counter-clockwise for less.
- Press: Gently push the ironing board inside and press the handle down firmly to close the heat press. The timer will automatically begin counting down.
- Completion: Once the set time expires, an alarm will sound, and the machine will automatically lift. Carefully open the handle and remove your item.

Image: Visual sequence demonstrating the nine steps of operating the heat press, from lifting the handle to completing the print.
The TUSY heat press is designed for fast and even heat distribution, crucial for consistent transfer results. This is achieved through its single tube heating element, which ensures uniform heating across the entire 15x15 inch platen.

Image: Illustration comparing uniform heating (achieved by TUSY) with uneven heating patterns found in other machines, demonstrating its benefit for consistent results.
This machine is suitable for various items, including t-shirts, bags, scarves, and meal pads.

Image: Collage showing various items like scarves, bags, meal pads, and clothes, illustrating the versatility of the heat press.
Maintenance
- Cleaning: Ensure the machine is unplugged and completely cool before cleaning. Wipe the heat platen with a soft, dry cloth. For stubborn residue, use a specialized heat press platen cleaner. Do not use abrasive cleaners.
- Storage: Store the heat press in a dry, dust-free environment. Keep the platen closed to protect the heating element.
- Regular Inspection: Periodically check the power cord for any signs of damage. Ensure all knobs and handles are securely fastened.
Troubleshooting
| Problem | Possible Cause | Solution |
|---|---|---|
| Machine does not power on. | Power cord not connected; power switch off; circuit breaker tripped. | Check power connection; ensure switch is on; reset circuit breaker. |
| Temperature reading is inaccurate. | Calibration issue. | Refer to the "How to set the temperature to Degree 'Fahrenheit'" section for recalibration steps. If issues persist, contact customer support. |
| Uneven heat transfer. | Incorrect pressure setting; foreign material on platen; faulty heating element. | Adjust pressure knob; clean platen surface; contact customer support if heating element is suspected. |
| Alarm sounds continuously. | Time cycle completed; button stuck. | Acknowledge the alarm by pressing a button or opening the press; check for stuck buttons. |
Specifications
| Feature | Detail |
|---|---|
| Model Number | TUSY-1562 |
| Platen Size | 15 x 15 inches (38 x 38 cm) |
| Voltage | 110 Volts |
| Wattage | 1400 watts |
| Temperature Range | 0 - 240°C (0 - 464°F) |
| Time Range | 0 - 499 seconds |
| Item Weight | 39.6 pounds |
| Product Dimensions | 18 x 15 x 15 inches |
| Recommended Uses | Craft, Hobby |

Image: The TUSY heat press machine with dimensions indicating its 15x15 inch platen size.
Warranty and Support
TUSY is committed to providing excellent customer service. For any questions regarding product functions, operation, or technical support, please contact our dedicated support team.
Our 24/7 attentive support is available to assist you with any issues or inquiries you may have.
Please refer to your purchase documentation for specific warranty details and contact information.
Ask a question about this manual
Ask about setup, troubleshooting, compatibility, parts, safety, or missing instructions. Manuals+ will review the question and use this page’s manual context to help answer it.