Introduction
Thank you for choosing the SEBSON Outdoor Motion Detector IP44. This device is designed to automatically switch on lighting based on movement and ambient light conditions, providing convenience and energy efficiency for outdoor areas. This manual provides essential information for safe installation, operation, and maintenance of your motion detector.
Safety Instructions
- Installation must be performed by a qualified electrician in accordance with national wiring regulations.
- Disconnect power at the main circuit breaker before installation or maintenance.
- Ensure the supply voltage matches the specifications of the device (230V AC, 50/60Hz).
- Do not exceed the maximum load capacity (800W for incandescent, 400W for LED/energy-saving lamps).
- Avoid installing near heat sources, air conditioning units, or objects that may cause false triggers.
- This product is rated IP44 for outdoor use, protecting against splashing water. Ensure all connections are properly sealed.
Package Contents
Please check that all items are present:
- 2 x SEBSON Outdoor Motion Detector IP44
- Mounting screws and wall plugs
- Instruction Manual
Product Overview
The SEBSON Outdoor Motion Detector features a compact design with an adjustable sensor head. It includes controls for adjusting detection sensitivity (LUX) and illumination duration (TIME).

Figure 1: SEBSON Outdoor Motion Detector (White)

Figure 2: Key Features of the Motion Detector

Figure 3: Dimensions and Adjustable Angles
Specifications
| Feature | Specification |
|---|---|
| Model Number | 2_X_IR_OUT_A |
| Dimensions (L x W x H) | 6.75 x 5.55 x 7.9 cm |
| Weight | 200 Grams |
| Power Source | Electric Cable (230V AC, 50/60Hz) |
| Max. Detection Range | 12 Meters |
| Detection Angle | 180° |
| Mounting Type | Surface Mount (Wall) |
| Adjustable Sensor Head | 40° vertical, 100° horizontal |
| Time Setting (TIME) | 10 seconds to 15 minutes (adjustable) |
| Light Sensitivity (LUX) | 3 to 2000 LUX (adjustable) |
| Max. Load Incandescent | 800W |
| Max. Load LED/Energy Saving | 400W |
| Operating Temperature | Up to 40°C |
| IP Rating | IP44 (Splash-proof) |
Installation
Follow these steps for proper installation. Ensure power is disconnected before proceeding.
1. Mounting
- Choose a suitable outdoor location for surface mounting, ideally between 1.8m and 2.5m high, where the sensor can cover the desired area without obstruction.
- Carefully detach the base from the sensor unit. The video below demonstrates this process.
- Mark the drilling points on the wall using the base as a template.
- Drill holes, insert wall plugs, and secure the base to the wall using the provided screws.

Figure 4: Rear View of the Motion Detector Base
2. Wiring
Connect the electrical wires to the terminal block inside the sensor base. Pay close attention to the correct polarity and connections as shown in the diagram below. Incorrect wiring can damage the device or pose a safety hazard.
- L (Live): Connect the incoming live wire.
- N (Neutral): Connect the incoming neutral wire and the neutral wire for the lamp.
- L' (Switched Live): Connect the live wire for the lamp.
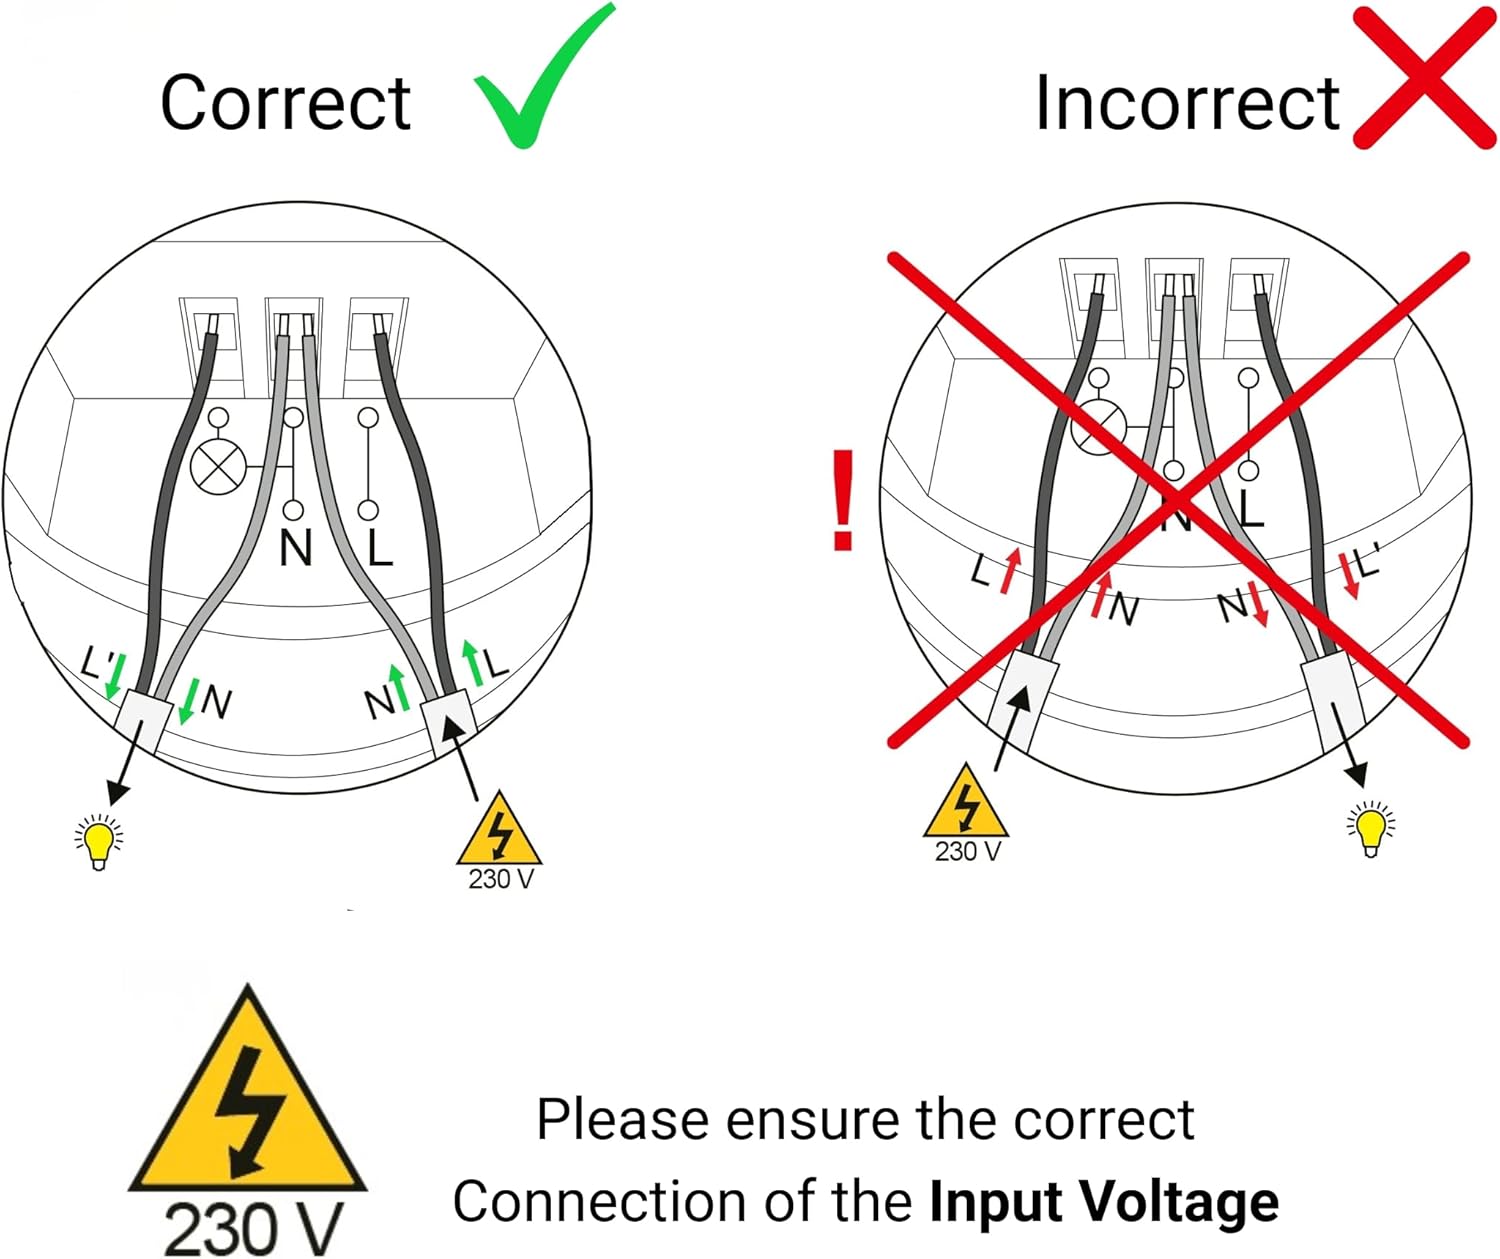
Figure 5: Correct Wiring Diagram (230V)
3. Final Assembly
After wiring, carefully reattach the sensor unit to its base, ensuring all wires are securely tucked away and the unit clicks into place. Restore power at the circuit breaker.
Video 1: Unboxing and Disassembly for Wiring. This video demonstrates how to open the motion detector for wiring and shows the internal terminal block.
Adjustments and Settings
The motion detector has two adjustable dials: LUX (light sensitivity) and TIME (illumination duration).
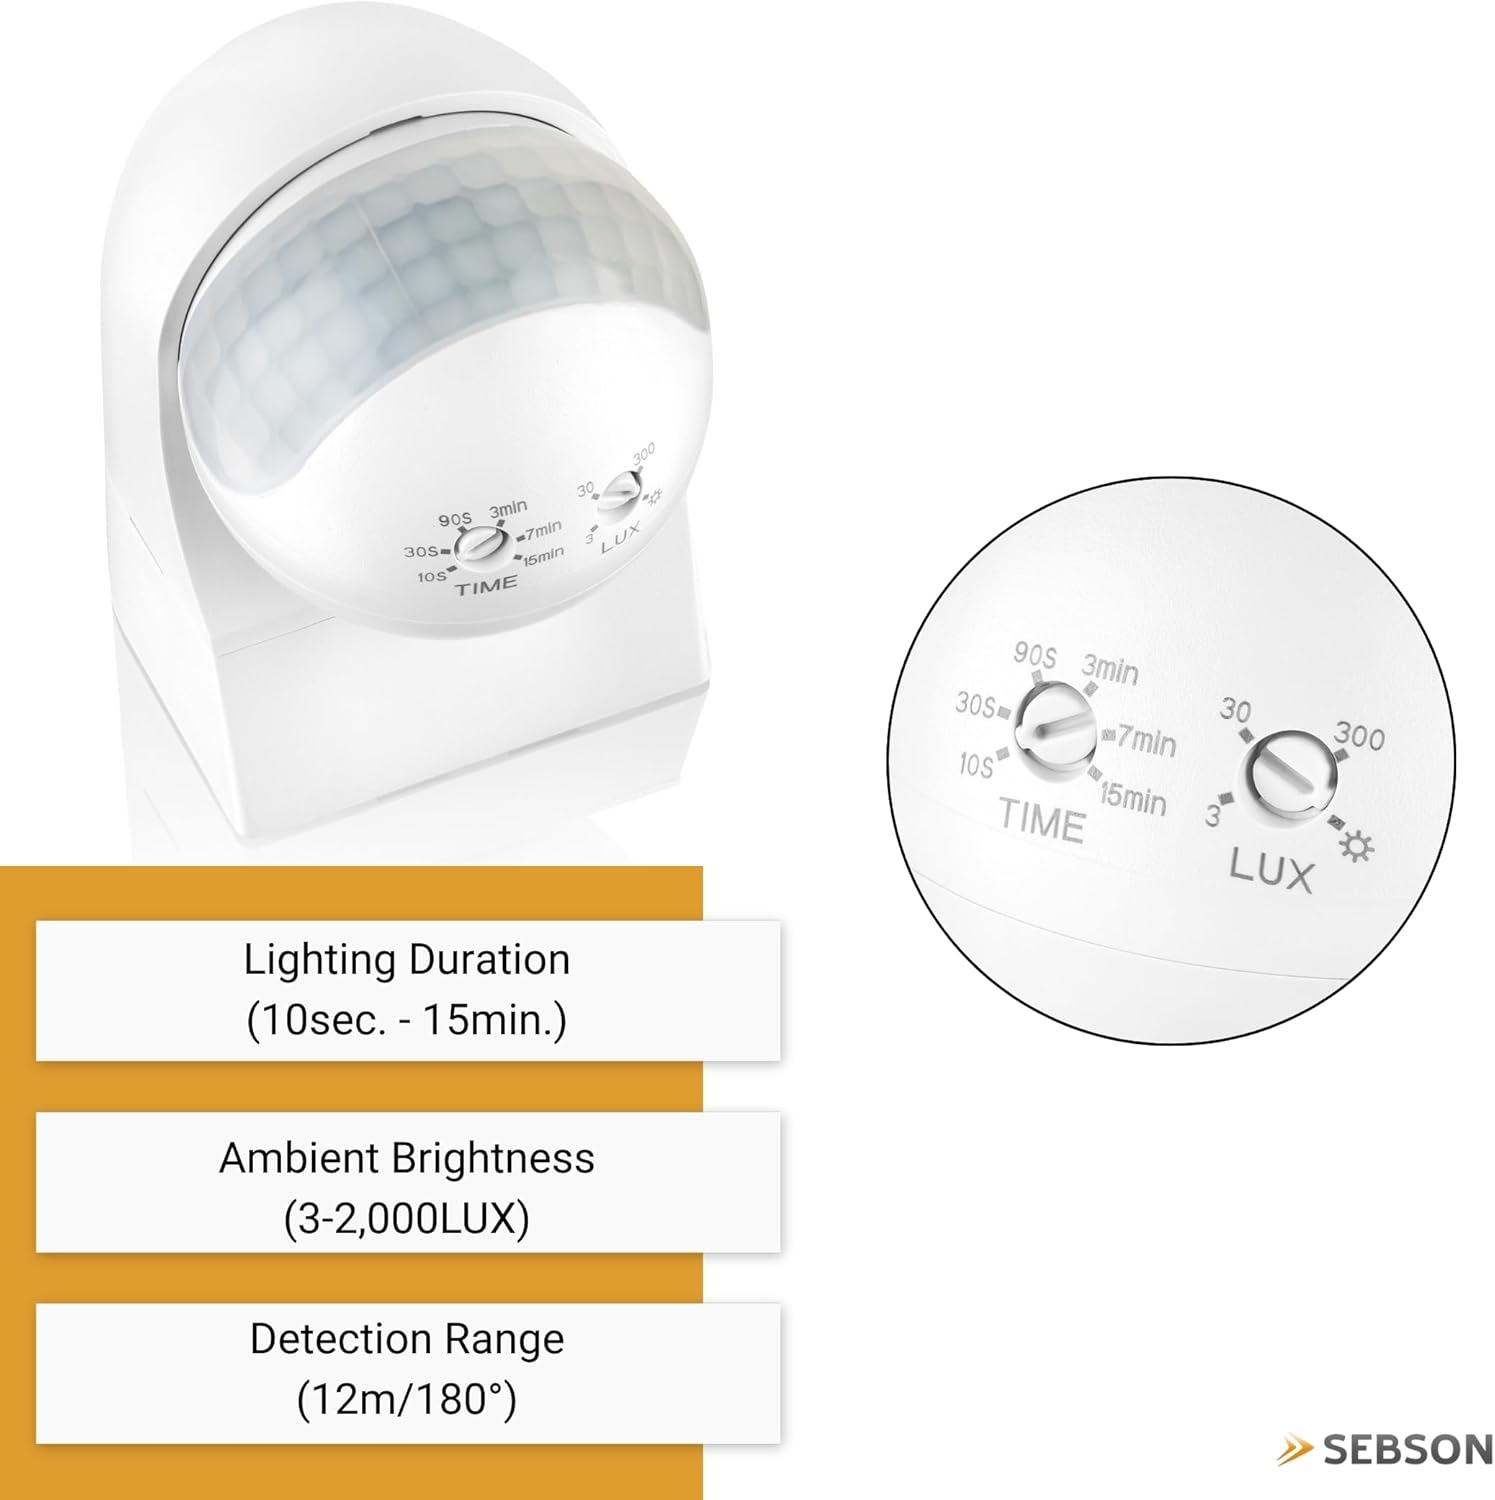
Figure 6: LUX and TIME Adjustment Dials
1. TIME Setting (Illumination Duration)
This dial controls how long the connected light remains on after motion is detected. Turn the dial to set the desired duration:
- 10s (minimum): Light stays on for approximately 10 seconds.
- 15min (maximum): Light stays on for approximately 15 minutes.
2. LUX Setting (Light Sensitivity)
This dial determines the ambient light level at which the sensor becomes active. The sensor will only trigger the light if the ambient light is below the set LUX value.
- 3 LUX (moon symbol): The sensor will only activate in very dark conditions (e.g., night).
- 2000 LUX (sun symbol): The sensor will activate in all light conditions, including daylight.
For initial testing, set the LUX to the maximum (sun symbol) and TIME to the minimum (10s). Once installed, adjust the LUX setting to your preferred ambient light level for activation.

Figure 7: Detection Range and Adjustment Details
Operating Instructions
Once installed and configured, the motion detector operates automatically:
- When motion is detected within the 180° field of view and 12-meter range, and the ambient light level is below the set LUX threshold, the connected light will switch on.
- The light will remain on for the duration set by the TIME dial.
- If motion is continuously detected during the set TIME, the timer will reset, and the light will remain on until no motion is detected for the full duration.
- The sensor head can be manually adjusted (40° vertically, 100° horizontally) to optimize the detection area after installation.

Figure 8: Motion Detector Installed on a House Exterior
Maintenance
To ensure optimal performance and longevity of your motion detector:
- Regularly clean the sensor lens with a soft, damp cloth to remove dust or dirt that may obstruct detection. Do not use abrasive cleaners.
- Periodically check the mounting for security and ensure no new obstructions are blocking the sensor's field of view.
- Do not attempt to open or repair the device yourself. Refer to qualified personnel for any issues beyond basic maintenance.
Troubleshooting
| Problem | Possible Cause | Solution |
|---|---|---|
| Light does not turn on when motion is detected. | 1. LUX setting is too high (sun symbol) during daylight. 2. No power to the unit. 3. Incorrect wiring. 4. Motion is outside detection range. | 1. Adjust LUX setting to a lower value (moon symbol) for night operation. 2. Check circuit breaker and connections. 3. Verify wiring against the diagram (Figure 5). 4. Adjust sensor head angle or reposition the unit. |
| Light stays on continuously. | 1. Constant motion in detection area. 2. TIME setting is too long. 3. Incorrect wiring (e.g., L and L' swapped). 4. Sensor malfunction. | 1. Reduce detection range or adjust sensor head to exclude constant motion sources. 2. Adjust TIME setting to a shorter duration. 3. Check wiring (Figure 5). 4. Contact customer support if other solutions fail. |
| Light turns on for no apparent reason. | 1. Small animals or moving objects (trees, curtains) in detection area. 2. Heat sources (e.g., exhaust vents) causing false triggers. | 1. Adjust sensor head angle to exclude unwanted areas. 2. Reposition the detector away from heat sources. |
| Detection range is too short or inconsistent. | 1. Obstructions blocking the sensor. 2. Mounting height is incorrect. 3. Temperature difference between moving object and ambient air is too small. | 1. Clear any obstructions from the sensor's view. 2. Ensure mounting height is within recommended range (1.8m - 2.5m). 3. This is normal for passive infrared sensors; performance may vary with environmental conditions. |
Warranty and Support
SEBSON products are manufactured with quality and durability in mind. This product comes with a standard manufacturer's warranty. For detailed warranty information, technical support, or service inquiries, please refer to the contact information provided with your purchase or visit the official SEBSON website.